Table of Contents >> Show >> Hide
- What Is a Microwave Kiln?
- How a Microwave Kiln Works, Without the Mad Scientist Problem
- Why “From Scratch” Should Mean “From a Safety Plan”
- What You Can Make With a Microwave Kiln
- Glass Compatibility: The Quiet Rule That Saves Projects
- The Workspace: Small Kiln, Serious Setup
- What Not to Put in a Microwave Kiln
- Microwave Kiln Safety: The Non-Negotiables
- Common Beginner Problems and What They Usually Mean
- Why a Firing Notebook Is Your Secret Weapon
- Should You Build or Buy?
- Practical Experiences: What Working With a Microwave Kiln Teaches You
- Conclusion: A Better Way to Think About “From Scratch”
- SEO Tags
A microwave kiln sounds like something invented by a crafty wizard who got bored waiting for dinner to reheat. The idea is wonderfully odd: a small insulated chamber goes inside a dedicated microwave, captures energy, and turns tiny pieces of compatible glass into pendants, cabochons, tiles, test pieces, and other miniature works of fire-powered art. It is part science lesson, part jewelry studio, part “please do not touch that, it is hotter than your weekend plans.”
But the phrase “from scratch” deserves a careful explanation. This article is not a construction manual for modifying a microwave, mixing unknown refractory materials, or experimenting with high-temperature homemade parts. A microwave kiln can involve extreme heat, glass dust, ceramic fiber, fumes, cracking glass, electrical equipment, and fire risk. So, a smart “from scratch” approach starts with knowledge, planning, safety, and choosing purpose-made equipmentnot improvising with random garage treasures and optimism.
In other words: yes, microwave kiln glass fusing can be accessible and fascinating. No, your kitchen microwave should not become a medieval dragon cave between reheating soup and making popcorn. A safe setup begins with understanding what a microwave kiln is, what it can and cannot do, and why small-scale craft heat still deserves big respect.
What Is a Microwave Kiln?
A microwave kiln is a compact firing chamber designed for small projects, most commonly fused glass jewelry or decorative pieces. It usually has an insulated body and a special interior surface that absorbs microwave energy and converts it into radiant heat. Instead of heating a burrito from the inside out, the microwave helps the kiln heat its chamber so glass can soften, tack fuse, contour fuse, or melt into a smoother form.
The appeal is obvious. Traditional glass kilns can be expensive, heavy, and space-hungry. A microwave kiln is smaller, easier to store, and far less intimidating for beginners who want to test glass fusing without committing to a full studio. It is especially popular for pendants, earrings, small cabochons, mini mosaics, and experiment tiles.
However, the trade-off is control. A full-size programmable kiln can manage firing schedules, hold temperatures, ramp up slowly, and cool in controlled stages. A microwave kiln is faster but less precise. It works best for small, simple, repeatable projects where the artist accepts some trial and error. Think of it as a sketchbook for heatnot a replacement for a professional kiln.
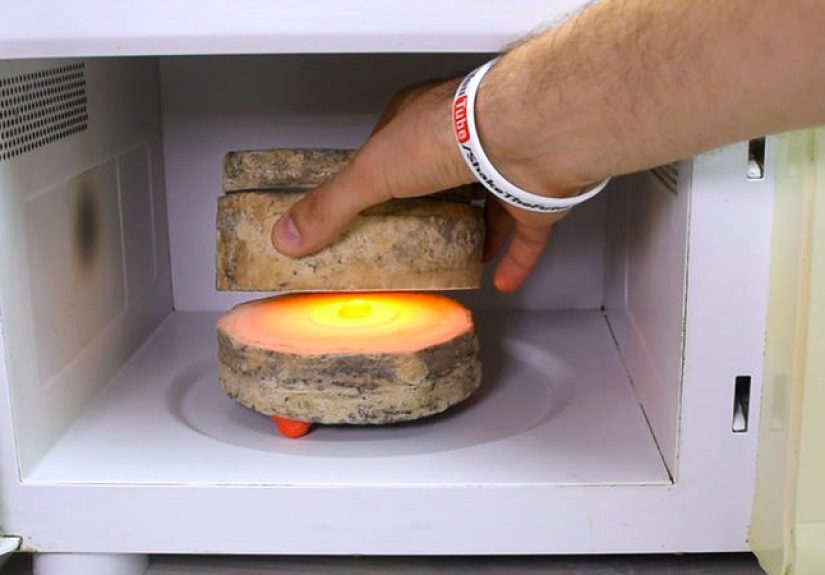
How a Microwave Kiln Works, Without the Mad Scientist Problem
The short version: a microwave oven produces non-ionizing electromagnetic energy. A food-safe microwave uses that energy to excite water molecules and heat food. A microwave kiln uses a heat-absorbing interior material to transform microwave energy into high heat inside a small chamber. The glass inside does not magically “microwave” like leftovers; it is heated by the kiln environment.
That distinction matters because the microwave oven itself is not a toy. Modern microwaves are built with shielding and safety interlocks so radiation remains contained during normal operation. If a door is damaged, if the unit operates with the door open, or if someone modifies the appliance, the risk changes dramatically. A safe microwave kiln setup uses a dedicated microwave in good condition and follows the kiln manufacturer’s instructions closely.
Another practical point: the microwave used for craft firing should not go back to food use. Glass, binders, shelf papers, coatings, and firing residues may create fumes or dust. Even if everything looks clean, the appliance has crossed from kitchen tool into craft equipment. Once it becomes part of the studio, it should stay there. Your sandwich deserves better boundaries.
Why “From Scratch” Should Mean “From a Safety Plan”
Search the internet long enough and you will find people attempting homemade microwave kilns using improvised materials. The problem is that high heat does not care how clever a build looks in a photo. Refractory materials, ceramic fiber, susceptors, coatings, adhesives, and microwave behavior all require real technical understanding. Using the wrong material can create fumes, fire hazards, glass failure, microwave damage, or exposure to harmful dust.
For a responsible beginner, building “from scratch” should mean building the workflow from scratch: choosing the right equipment, preparing a safe workspace, learning glass compatibility, practicing good cleanup, and keeping records. The kiln itself should be a purpose-made product from a reputable supplier, especially for home hobby use.
This safety-first framing is also better for SEO and reader trust. People searching for “microwave kiln from scratch” may be curious, budget-conscious, or simply adventurous. A high-quality article should answer that curiosity without handing readers a risky recipe. The smartest DIY lesson here is knowing which parts not to DIY.
What You Can Make With a Microwave Kiln
Microwave kilns are best for small glass projects. The sweet spot is miniature work: jewelry components, charms, tiny tiles, decorative accents, simple test samples, and small fused shapes. Beginners often start with layered compatible glass, frit, stringers, or small pre-cut shapes. The result can be glossy, colorful, and surprisingly polished when the setup is dialed in.
What microwave kilns usually do not do well is large-scale work. Big plates, deep slumps, thick castings, and serious pottery firing belong in traditional kilns. A microwave kiln chamber is small, and its firing curve is not as refined. Asking it to behave like a professional glass kiln is like asking a scooter to tow a boat. Technically, the scooter may have enthusiasm, but the ending will not be graceful.
Best beginner-friendly project ideas
Good first projects include simple pendants, single-color cabochons, small layered glass squares, test tiles using compatible glass, and tiny decorative magnets. These projects teach the core lessons: glass compatibility, spacing, heat behavior, cleanup, cooling patience, and how different colors or thicknesses react.
The most successful early projects are not the most complicated ones. A beginner who starts with clean shapes and compatible materials will usually learn faster than someone who dumps every shiny object into the kiln and hopes for a masterpiece. Glass fusing rewards curiosity, but it also has a strict personality. It likes consistency.
Glass Compatibility: The Quiet Rule That Saves Projects
Glass expands when heated and contracts when cooled. Different glass types expand and contract at different rates. In glass fusing, compatibility is essential because incompatible glass may crack during cooling or fail later. Many hobbyists talk about COE, or coefficient of expansion, using categories like COE 90 or COE 96. The basic idea is simple: keep compatible glass systems together.
However, COE alone is not a magic guarantee. Some manufacturers test their glass for compatibility within their own product lines, and they may warn against assuming that any two glasses with the same number will automatically behave well together. For beginners, the safest approach is to buy glass labeled for fusing and stay within one tested system until skills improve.
Window glass, bottle glass, random stained glass scraps, and mystery glass can be tempting because they are cheap or already sitting in a box. But mystery glass often creates mystery results: cracks, devitrification, bubbles, sharp edges, or odd textures. It may be fun for controlled experiments after experience grows, but it is not the best starting point for reliable microwave kiln projects.
The Workspace: Small Kiln, Serious Setup
A microwave kiln workspace does not need to look like a factory, but it should be organized. The area should be well ventilated, free of clutter, and away from flammable materials. The microwave should sit on a stable surface with enough clearance around it. The landing area for the hot kiln should be heat-resistant and planned before firing starts. Nobody should be improvising a place to put hot equipment while holding it.
Basic personal protection matters. Safety glasses help protect against glass chips during cutting. Heat-resistant gloves help reduce burn risk when handling hot tools or kiln parts after appropriate cooling. Closed-toe shoes protect feet from dropped glass. A properly selected respirator may be needed when handling dusty kiln paper, shelf materials, ceramic fiber residue, or silica-containing products. Cleanup should control dust rather than sending it floating into the room.
Good studio habits are boring in the best possible way. Keep food and drinks out of the work area. Label tools. Store glass safely. Clean small shards before they migrate into socks, carpets, pet paws, or the alternate dimension where lost craft supplies apparently live.
What Not to Put in a Microwave Kiln
A microwave kiln is not a general-purpose furnace. Do not use unknown metals, random rocks, sealed objects, wet clay, plastics, food containers, coated materials, or anything that is not specifically approved for the firing method. Some materials can spark, release fumes, crack violently, or damage the microwave.
Clay deserves special caution. Traditional ceramics usually require higher temperatures and more controlled firing schedules than a small microwave kiln can reliably provide. Moisture trapped inside clay can turn to steam and crack or burst the piece. Low-fire specialty materials may be marketed for small kilns, but they still require manufacturer instructions, ventilation, and careful handling.
The safest rule is simple: if you cannot identify the material, its firing behavior, its fumes, and its compatibility with the kiln, do not fire it. Creativity is wonderful. Mystery smoke is not.
Microwave Kiln Safety: The Non-Negotiables
First, use a dedicated microwave that is in good condition. The door should close properly, the seals should be intact, and the unit should not be damaged. Second, follow the kiln manufacturer’s instructions. Different kilns behave differently, and microwave wattage affects results. Third, keep the workspace ventilated and keep combustible items away.
Fourth, respect cooling time. One of the most common beginner mistakes is peeking too soon. Hot glass can crack from thermal shock when exposed to cooler air. The kiln may also remain hot long after the microwave stops. Patience is part of the process. The kiln is not being dramatic; it is obeying physics.
Fifth, control dust. Kiln paper and some fiber products can become fragile or dusty after firing. Dust from glass, ceramics, silica-containing materials, and refractory products can irritate the lungs and may create long-term health concerns. Wet cleanup methods, HEPA-filtered cleanup tools, sealed disposal, and respirator use may be appropriate depending on materials.
Common Beginner Problems and What They Usually Mean
Cracked glass
Cracks often point to incompatibility, uneven thickness, rapid temperature change, or impatient cooling. The solution is not simply “fire it hotter.” Better results usually come from using compatible glass, simplifying the design, allowing gradual cooling, and keeping notes.
Bubbles
Bubbles can form when air gets trapped between layers. Some bubbles are charming; others look like the glass is trying to become a breakfast pancake. Consistent layer sizes, clean surfaces, and simple designs help reduce surprise bubbles.
Rough or cloudy surfaces
Cloudiness may come from residue, devitrification, incompatible glass, overheating, or contaminated materials. Clean glass before firing and avoid mystery scraps until you understand how they behave.
Uneven melting
Microwave ovens do not all heat the same way. Hot spots, wattage differences, kiln placement, and project thickness can affect results. Keep a firing notebook so every test teaches you something useful.
Why a Firing Notebook Is Your Secret Weapon
A microwave kiln notebook does not need to be fancy. Record the glass brand, compatibility system, project thickness, kiln paper or separator used, microwave model, power level if applicable, approximate firing time, cooling time, and result. Add a quick photo. After ten tests, patterns appear. After thirty tests, you start sounding wise. After fifty tests, you become the person friends ask before they accidentally fuse something weird.
This habit turns unpredictable craft sessions into controlled learning. It also helps prevent repeated mistakes. Without notes, every firing feels like a fresh mystery. With notes, you build a personal map of how your microwave kiln behaves.
Should You Build or Buy?
For most readers, buying a reputable microwave kiln is the better choice. A commercial kiln is not risk-free, but it has at least been designed for the purpose. A homemade kiln introduces unknowns: insulation performance, dust exposure, fumes, structural stability, microwave interaction, heat distribution, and fire resistance. Unless someone has proper materials knowledge, safety training, and testing equipment, “homemade” can quickly become “home insurance conversation.”
That does not mean DIY energy has no place here. Make your own project templates. Build a storage rack. Design a safer studio checklist. Create a firing log. Test color combinations. Develop repeatable product lines for jewelry or small gifts. The best do-it-yourself work is often in the creative system around the kiln, not in improvising the high-temperature equipment itself.
Practical Experiences: What Working With a Microwave Kiln Teaches You
The first experience many beginners have with a microwave kiln is surprise. Everything feels too small to be seriousuntil the first firing reminds you that tiny equipment can still create serious heat. A pendant-sized piece of glass can glow, soften, slump, and transform in minutes. That speed is exciting, but it also teaches humility. The kiln does not negotiate with impatience.
One useful lesson is that simple designs often look better than crowded ones. Beginners tend to stack too many colors, shapes, and textures into one small piece. The result can become muddy, bubbly, or visually chaotic. A clean base color, one accent strip, and a few dots of frit may look more professional than a glass confetti explosion. In microwave kiln work, restraint is not boring. It is design discipline wearing a sensible hat.
Another experience is learning that cooling is part of making, not waiting. When the microwave stops, the project is not finished. The glass is still going through stress. Opening too early can ruin a piece that looked perfect moments before. Many beginners learn this lesson exactly once, usually followed by a dramatic sigh and a promise to become more patient.
Workspace setup also becomes personal very quickly. A good firing session flows because everything has a place: glass cutter, grozing pliers, tweezers, safety glasses, gloves, kiln paper, notebook, waste container, and heat-safe landing area. A messy setup makes the process feel stressful. A tidy setup makes it feel like a tiny professional studio, even if the “studio” is a corner table guarded by a suspicious cat.
Microwave kiln work also teaches material respect. Compatible glass behaves more predictably. Clean glass fires better. Dust control matters. Ventilation is not optional decoration. A dedicated microwave is a boundary, not a luxury. These habits may seem cautious, but they are what allow the fun part to continue safely.
There is also a wonderful experimental rhythm to the craft. You make a small design, fire it, wait, open the kiln, inspect the result, and learn. Sometimes the piece is beautiful. Sometimes it looks like candy from another planet. Sometimes it teaches you what not to do next time. The low cost of small projects makes experimentation less painful. You are not ruining a giant sculpture; you are learning through tiny glass postcards from physics.
For people who enjoy both art and problem-solving, the microwave kiln is especially satisfying. It rewards observation. Why did one color spread more than another? Why did a corner pull inward? Why did two layers trap a bubble? Each result is feedback. Over time, you begin to predict outcomes, and that prediction feels like skill.
The biggest experience-based advice is to treat the microwave kiln as a beginner-friendly tool, not a shortcut around safety or craftsmanship. It can introduce you to glass fusing, help you make charming small pieces, and teach foundational studio habits. But it cannot replace a full kiln for advanced work, and it should never be treated casually just because it fits on a countertop.
If you approach it with patience, compatible materials, good ventilation, clean habits, and realistic expectations, a microwave kiln can be a delightful entry point into fused glass. It is small, yes. But in the right hands, small can still sparkle.
Conclusion: A Better Way to Think About “From Scratch”
A microwave kiln from scratch should begin with education, not improvisation. The safest path is to use a purpose-made microwave kiln, a dedicated microwave, compatible fusing glass, protective equipment, ventilation, and careful cleanup. The creative freedom comes after the safety plan is in place.
For beginners, the microwave kiln is a compact doorway into glass fusing. It teaches design, patience, heat behavior, material compatibility, and studio discipline. It can produce beautiful small projects and plenty of funny learning moments along the way. But it deserves respect. The goal is not to prove that anything can be fired in a microwave. The goal is to make small art safely, consistently, and joyfullywithout turning the craft table into a cautionary tale.
SEO Tags
Note: This article is written for educational and editorial purposes. It intentionally avoids unsafe step-by-step instructions for constructing homemade high-temperature microwave kiln components or modifying microwave ovens.


