Table of Contents >> Show >> Hide
- What This UV Arduino Clock Actually Does
- How The Clock Works
- Why This Design Works So Well As A Maker Project
- Design Lessons Hidden Inside The Glow
- What Builders Should Know Before Making One
- How This Clock Fits Into The Bigger Arduino World
- On The Experience Of Living With A UV Time-Writing Clock
- Final Thoughts
Some clocks whisper. Some clocks beep. Some clocks shout the hour at you with giant LEDs like a caffeinated airport terminal. And then there is the gloriously oddball UV Arduino clock: a machine that literally writes the time in light.
That sentence alone deserves a slow clap.
The idea behind this build is simple enough to explain at a party and weird enough to make everyone stop pretending to check their phone. An Arduino controls an articulated arm fitted with a UV LED. That arm moves across a glow-in-the-dark surface and “draws” the current time on demand. The numbers appear in luminous strokes, linger for a short while, then fade away like the world’s most punctual ghost. It is a clock, yes, but it is also a tiny robot performance, a kinetic sculpture, and a very persuasive argument that practical design is sometimes overrated.
For makers, that is the magic. This project is not trying to beat your smartwatch. It is trying to make time feel physical again. Instead of passively displaying digits, it performs them. Instead of showing the hour all day long, it reveals it in a quick burst of invisible ultraviolet energy and glowing phosphorescence. It turns a boring function into a memorable event.
And honestly, if your desk has room for one more strange machine, this one has excellent manners.
What This UV Arduino Clock Actually Does
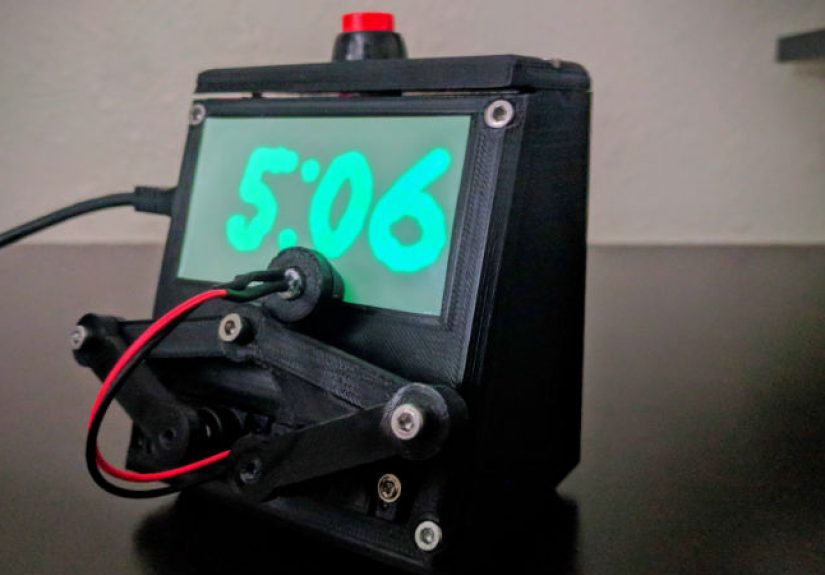
At its core, the project belongs to the family of plot clocks: machines that “write” the time rather than display it through fixed segments or screens. Older versions used markers on whiteboards. This version swaps messy ink for ultraviolet light and a phosphorescent surface. That change does two important things. First, it removes the need for physical contact, which means less wear, less smudging, and no dried-out markers. Second, it gives the clock a dreamy, sci-fi glow that makes ordinary digital numerals feel like they were borrowed from a spaceship garage sale.
The basic setup is beautifully lean. You have an Arduino board handling movement logic, an RTC module keeping accurate time, two hobby servos driving the arm, a UV LED acting as invisible ink, and a glow material on the front panel serving as the canvas. Press a button, and the arm sweeps into action, writing the hour and minute in luminous strokes. After a few moments, the light fades and the display resets itself without erasers, solvents, or drama.
That last part is key. The clock does not erase the time in the usual sense. The material simply loses its glow naturally. The display cleans itself by obeying physics, which is a pretty classy move.
How The Clock Works
The Brain: Arduino Plus RTC
An Arduino is the obvious choice for a build like this because it handles timing, motion control, and button input without acting like you asked it to solve quantum gravity. It is approachable, cheap, well-supported, and perfectly suited for hobby robotics. But an Arduino on its own is not a reliable long-term timekeeper. That is why the real-time clock module matters.
An RTC stores the actual time independently, even when the main board is powered down. In many maker builds, creators move from older modules to the DS3231 because it keeps time more accurately and behaves more like a grown-up component. In a project where the whole point is “look at this elegant nonsense telling the correct time,” accuracy is not a luxury. It is the difference between charming and suspicious.
That also explains why Arduino clock projects keep coming back to RTC modules. A fancy display is fun. A fancy display that is wrong by lunch is modern art.
The Muscle: Servos And Arm Geometry
The writing mechanism is usually driven by two small hobby servos mounted behind a 3D-printed front panel. Together they move an articulated arm across the glowing surface. This is where the build quietly turns from “cute electronics project” into “surprise, there is kinematics now.”
The arm has to move precisely enough to draw recognizable numerals, maintain consistent spacing, and stay aligned with the writing area. That means the code is not just spitting out time values. It is translating them into motion paths. If the calibration is off, your clock will stop writing numbers and start inventing a new alphabet.
That is part of the appeal, though. This project teaches the kind of lesson maker culture loves: hardware rarely fails in one dramatic way. It fails in twelve tiny hilarious ways. A horn is one tooth off. A servo twitches. A line bows. Suddenly your “12:45” looks like it owes you money.
The Ink: UV Light And Phosphorescent Material
The star of the show is the combination of ultraviolet light and glow-in-the-dark material. UV light sits outside the visible range humans normally see, which is why the LED can feel almost secretive while it is charging the surface. The canvas responds by absorbing energy and releasing it slowly as visible glow. That delayed release is the reason the numbers remain visible after the arm moves on.
This is what makes the clock feel magical rather than merely clever. The arm is not dragging a pen. It is depositing energy. You do not watch it write with pigment; you watch it wake up the display. That distinction gives the whole project a soft, cinematic quality that standard segment displays just cannot match.
Modern glow materials are often based on compounds that store and release light far better than older novelty products. That is why current phosphorescent surfaces can hold a brighter glow for longer and make projects like this far more convincing than the cheap plastic stars many people remember from childhood bedrooms.
Why This Design Works So Well As A Maker Project
The best Arduino builds usually land in the sweet spot between understandable and slightly absurd. This one absolutely nails it.
On the understandable side, every major part has a clear job. The RTC keeps time. The servos move the arm. The UV LED activates the surface. The button triggers the reveal. You can follow the logic without needing a PhD or a ceremonial robe.
On the absurd side, it is a machine that hides a simple fact behind a tiny theatrical routine. Most clocks are designed to reduce friction. This one adds just enough friction to become delightful. You do not merely glance at the time; you summon it.
That is why the build sticks in people’s heads. It is not because it is the most efficient solution. It is because it is the most memorable one. In a maker landscape crowded with sensible boxes that measure something and upload it somewhere, a UV plot clock feels refreshingly unnecessary in the best possible way.
Design Lessons Hidden Inside The Glow
1. Constraint Can Improve Style
Because the digits are drawn by motion, the clock cannot get away with sloppy typography. The numeral shapes need to be simple, clear, and consistent. That forces the designer to think about legibility, travel paths, and the relationship between motion and form. In other words, the clock accidentally teaches graphic design through robotics. Sneaky little educator.
2. Temporary Displays Can Be More Engaging
Most modern displays are persistent. They sit there, glowing forever, gently flattening every moment into the same visual experience. A UV writing clock does the opposite. It creates a temporary display that appears, fades, and disappears. That makes the information feel momentary and alive. You notice it because it does not stay forever.
3. Mechanical Motion Adds Emotional Value
People like machines that move with purpose. There is a reason plotters, split-flap displays, and tiny desktop robots attract fans. Motion communicates process. A normal digital clock gives you an answer. This clock gives you a performance and an answer. The second version wins on personality every time.
What Builders Should Know Before Making One
Choose The Timekeeping Hardware Carefully
If you are adapting the concept for your own build, the RTC choice matters more than it first appears. A better module means less drift, fewer corrections, and a nicer overall experience. It is hard to enjoy a poetic glowing clock when it is confidently living in the wrong hour.
Pay Attention To Calibration
Mechanical calibration is the real tax on this project. The servos need correct zero points, the arm geometry must be repeatable, and the writing area has to match the programmed coordinates. Fortunately, this is also where the build becomes rewarding. Once calibrated, the machine feels alive. Before calibration, it feels like a spider learning cursive.
Mind The Material
Not all glow surfaces behave the same way. Brightness, persistence, and color can vary. Some materials glow more vividly, some fade faster, and some produce a cleaner-looking numeral after UV exposure. Even the room lighting matters. A clock like this tends to look most dramatic in dim conditions, though good materials can remain readable in daylight too.
Respect UV Safety
Here is the sensible grown-up paragraph, and it deserves to stay. UV light is invisible, which makes it easy to underestimate. Depending on wavelength and intensity, ultraviolet exposure can pose risks to the eyes and skin. If you are building or modifying a UV project, choose components thoughtfully, avoid direct eye exposure, do not stare into the emitter, and design the device so the light is aimed at the surface rather than at humans. “It is tiny” is not a safety standard.
That does not make the project dangerous by default. It just means the same rule applies here as everywhere else in electronics: cool builds deserve boring safety habits.
How This Clock Fits Into The Bigger Arduino World
Arduino has spent years powering clocks of every possible temperament: LED clocks, binary clocks, alarm clocks, clocks that glow through diffusers, clocks that use photochromic layers, and clocks that look like they escaped from an old laboratory. The UV writing clock stands out because it combines several maker obsessions at once: motion control, custom enclosures, alternative displays, and just enough theatrical nonsense to make the result unforgettable.
It also captures a larger truth about great DIY electronics. People do not fall in love with projects because they are merely functional. They fall in love with them because function meets personality. The Arduino ecosystem is full of examples where ordinary hardware becomes extraordinary through presentation. A UV clock is a perfect case study. The electronics are humble. The experience is not.
In a way, that is the real achievement here. The project takes everyday ingredients and combines them into something that feels inventive. Arduino board. RTC module. Servos. LED. Button. Plastic case. None of those parts are individually shocking. Together, they become a machine that literally writes light onto time.
On The Experience Of Living With A UV Time-Writing Clock
Using a clock like this feels very different from using a normal desk clock, and that difference is the whole point. A typical clock fades into the background within a day or two. Your brain stops seeing it. The UV Arduino clock refuses to become wallpaper. Every time you check the hour, there is a tiny interaction. You press a button, the arm wakes up, the servos make that unmistakable little robotic hum, and the numbers appear one stroke at a time. It feels less like reading time and more like requesting it.
That tiny ritual changes the mood of the object. Suddenly the clock is not a passive appliance. It has behavior. It has timing. It has a little bit of stage presence. Even people who do not care about electronics tend to lean in when they see it work. There is usually a beat of silence, followed by some version of, “Okay, that is ridiculously cool.” Which, frankly, is one of the highest honors a desk gadget can receive.
The build experience is equally memorable because it hits several emotional phases in quick succession. At first, it feels straightforward: wire the Arduino, mount the servos, connect the RTC, add the LED, upload the code. Then calibration begins, and the project reveals its personality. This is the stage where optimism gets replaced by negotiation. You realize that a one-degree servo error can turn a neat numeral into abstract expressionism. You nudge offsets, test again, adjust horn positions, test again, and slowly the machine stops scribbling nonsense and starts looking competent.
That moment is deeply satisfying. The first time the arm writes a clean, readable time on the glowing surface, the whole build snaps into focus. You are no longer looking at parts. You are looking at a character. The enclosure matters more. The motion sounds nicer. The glow seems brighter. Success in maker projects often comes from this exact transition: the instant when a pile of components develops a point of view.
There is also something quietly relaxing about the fade. Standard digital displays never rest. They keep insisting on their own existence, second after second, all day long. A phosphorescent UV clock is gentler. The numbers appear, hover for a while, and then dissolve. That fading makes the object feel less demanding and more atmospheric. It adds a little patience to a category that is usually all about immediacy.
From a design perspective, it also teaches you to appreciate materials in a different way. Builders quickly notice how much the glow surface affects the final experience. One sheet glows brighter. Another fades faster. One looks punchy in low light. Another works better in a sunny room. You begin by thinking you are building a clock and end by realizing you are also tuning a visual instrument.
Perhaps the most enjoyable part, though, is how shamelessly unnecessary the project is. Nobody needs a robotic arm to write time in UV on a glowing panel. That is exactly why it is so good. It reminds you that making things is not only about solving problems cheaply or quickly. Sometimes it is about making an ordinary idea strange enough to become memorable. This clock does that brilliantly. It tells time, sure. More importantly, it makes time feel handcrafted for a few glowing seconds.
Final Thoughts
The phrase “Arduino Clock Jots Down The Time, In UV” sounds like a headline designed to bait curious nerds, and to be fair, it absolutely works. But the build earns the attention. It blends robotics, lighting, material science, and playful design into a clock that feels both homemade and oddly futuristic.
Its greatest trick is not the UV LED or the articulated arm. It is the way it transforms a dull daily action into an experience. You do not just check the time. You watch it appear. Then you watch it fade. The machine turns information into performance, and that is why it lingers in memory long after the glowing digits have vanished.
For makers, that is a lesson worth keeping: the best projects are not always the most practical. Sometimes the best project is the one that makes people smile, lean closer, and ask, “Wait… it does what?”