Table of Contents >> Show >> Hide
- The 3 Rules of Great Grilling
- Grill Setup That Actually Works
- Flavor Fundamentals: Rubs, Brines, Marinades, Smoke, and Sauce
- 10 BBQ & Grilling Recipes You’ll Actually Make Again
- 1) Reverse-Sear Ribeye with Peppery Crust
- 2) Juicy Grilled Burgers (No Pressing, No Regrets)
- 3) BBQ Chicken Thighs That Stay Tender (and Have Crispy Skin)
- 4) Sticky “Set-It-and-Forget-It” Ribs on a Grill
- 5) Cedar-Plank-Style Salmon (Without Stress)
- 6) Garlic-Lemon Shrimp Skewers (Fastest Crowd-Pleaser)
- 7) Charred Veggie Platter with Herb “Green Sauce”
- 8) Foil-Packet Potatoes & Onions (The Side Dish That Doesn’t Need Babysitting)
- 9) Grilled Pizza (Because You’re Not a Regular Cook, You’re a Cool Cook)
- 10) Grilled Peaches with Cinnamon-Sugar Crunch
- Food Safety & Party Logistics (So Everyone Remembers the Fun Part)
- Conclusion
- Backyard Experiences: The Stuff You Only Learn After a Few Cookouts
There are two kinds of grillers in this world: people who “just wing it,” and people who own three thermometers
and still poke the chicken like it owes them money. This guide is for both. We’re going to cook food that’s
smoky, juicy, properly charred, and not “mysteriously still raw in the middle.” You’ll get smart grilling
fundamentals plus a lineup of crowd-pleasing BBQ & grilling recipessteak, chicken, burgers, seafood, veggies,
even dessert. Yes, dessert. Your grill is about to become the best appliance you own that isn’t technically an
appliance.
The 3 Rules of Great Grilling
1) Build two heat zones (aka: stop cooking everything over a bonfire)
The biggest upgrade you can makeno new gear requiredis cooking with two zones:
one hot side for searing and one cooler side for finishing. Think of it like stovetop-to-oven cooking, but
outdoors and with more bragging rights. Two-zone grilling also saves you from flare-ups: when flames jump up,
you simply slide food to the cooler side and keep your eyebrows.
- Gas grill: Turn burners on one side to high; leave the other side off (or low).
- Charcoal grill: Pile lit coals on one side; keep the other side coal-free.
2) Use a thermometer (color is a liar)
A grill gives you gorgeous browning fastsometimes faster than the inside can cook. That’s why internal
temperature matters. The “poke test” is not a test; it’s a vibe. Thermometer = facts.
Quick safety temperature cheat sheet (US guidelines):
- Poultry (whole or ground): 165°F
- Ground meats (like burgers): 160°F
- Steaks/chops/roasts (beef, pork, lamb, veal): 145°F + a 3-minute rest
- Fish: 145°F (or until opaque and flakes easily)
3) Timing mattersespecially for sauce, sugar, and resting
BBQ sauce and sugary rubs can burn if you apply them too early over high heat. Treat sauce like a
finishing move: add it near the end so it sets and shines without turning bitter. Also, let meat rest after
cooking. During rest time, heat continues to move inward (“carryover cooking”), which can bump the internal
temp a few degrees on steaks and burgersand more on big cuts.
Grill Setup That Actually Works
Charcoal: lighting without lighter-fluid perfume
The cleanest, most reliable method is a chimney starter. You load charcoal on top, stuff paper
(or a fire starter) underneath, and let airflow do the work. When the top coals are mostly ashed over, you’re
ready to pour.
Charcoal temperature control: it’s mostly airflow
On many charcoal grills, temperature isn’t just “more coals = hotter” (though it helps). Airflow matters:
more oxygen fuels a hotter fire; restricting oxygen cools things down. Get comfortable with the vents and you
stop guessingand start cooking on purpose.
Preheat, then clean, then lightly oil
Preheat your grill with the lid closed so the grates get properly hot. Then clean while it’s hot (debris comes
off more easily). Right before cooking, lightly oil the grates or the food (not both like you’re trying to
summon a flare-up). A folded paper towel dipped in a neutral oil and held with tongs works great.
Flavor Fundamentals: Rubs, Brines, Marinades, Smoke, and Sauce
Dry brine = the easiest “chef trick” you’ll actually use
Dry brining is just salting in advance. Salt pulls moisture out, dissolves, then the salty liquid gets
reabsorbedseasoning the meat deeper and helping it stay juicy. For thick cuts, salt the day before. For thin
cuts, even 1–2 hours helps.
Marinades: great for some foods, not magic for all
Marinades are best when they bring something specific:
acid (brightness), salt (seasoning), fat (carries flavor), and
aromatics (herbs/spices/garlic). They won’t “soak” flavor inches deep into a thick steak, but
they absolutely help chicken, shrimp, tofu, and vegetables.
Rubs: watch the sugar at high heat
Sugar helps browning, but it also burns. If you’re cooking hot and fast (like burgers or thin chops), keep the
rub low-sugar or skip sugar altogether and finish with a glaze near the end. Save sweeter rubs for low-and-slow
or indirect cooks.
Sauce strategy: last 10–15 minutes (or on the side)
Many classic BBQ sauces are sweet and tomato-based, which can scorch over direct heat. Brush sauce on near the
end to “set” it, or serve it on the side so guests can choose their own adventure.
One easy upgrade for store-bought sauce
If your bottled sauce tastes like “sweet ketchup trying to join a rock band,” add a small splash of a neutral
vinegar (like apple cider vinegar) to brighten and balance it. Tiny change, huge payoff.
10 BBQ & Grilling Recipes You’ll Actually Make Again
These are designed for real life: backyard parties, Tuesday dinners, and that one friend who always shows up
“just to hang” and somehow eats four servings. Each recipe includes a two-zone plan so you can sear without
panic.
1) Reverse-Sear Ribeye with Peppery Crust
Why it works: Gentle heat first cooks the steak evenly; a final hot sear builds the crust.
You’ll need: Ribeye (1.25–2 inches thick), kosher salt, cracked black pepper, neutral oil.
-
Dry brine: Salt steak generously at least 1 hour ahead (overnight is even better).
Pat dry before grilling. -
Set up two zones: Aim for a moderate indirect side (think “roasting zone”) and a ripping-hot
direct side. -
Slow cook first: Place steak on the cooler side, lid closed. Flip occasionally.
Cook until it’s about 10–15°F below your target doneness. -
Sear hard: Move to the hot side and sear 45–90 seconds per side (and edges), until deeply
browned. -
Rest: Let it rest 5–10 minutes. Slice against the grain. Try not to monologue about your
“technique,” but also… you earned it.
Temperature target tip: Pull a few degrees early to account for carryover cooking.
2) Juicy Grilled Burgers (No Pressing, No Regrets)
Why it works: Gentle handling keeps burgers tender; two-zone grilling prevents over-charring.
You’ll need: 80/20 ground beef, salt, pepper, buns, toppings.
- Form loose patties slightly wider than the bun. Make a shallow dimple in the center to reduce doming.
- Preheat and clean grates. Lightly oil the grates or the patties.
-
Sear over direct heat to brown, then move to indirect heat to finish to
160°F. - Add cheese near the end. Toast buns briefly on the cooler side so they don’t turn into croutons.
- Rest 2 minutes (yes, even burgers benefit), then build your masterpiece.
Pro move: Salt the outside right before grilling for a better crust.
3) BBQ Chicken Thighs That Stay Tender (and Have Crispy Skin)
Why it works: Thighs have more fat and collagen than breasts, so they’re forgiving and
flavorful. Cooking a bit higher than the minimum safe temp can make them even more tender.
You’ll need: Bone-in, skin-on thighs; salt; pepper; paprika; garlic powder; BBQ sauce.
- Trim excess loose skin/fat. Salt at least 1 hour ahead if you can; pat dry.
-
Set up two zones. Start thighs skin-side down on the cooler side, lid closed, so the fat renders without
constant flare-ups. -
Cook until the internal temperature is in the
185–190°F range for best texture, then move to the hot side to crisp and lightly char
the skin. -
Brush with sauce only in the last 10–15 minutes so the sugars don’t burn. Let it set, then sauce again if
you’re feeling bold. - Rest 5–10 minutes before serving.
4) Sticky “Set-It-and-Forget-It” Ribs on a Grill
Why it works: Indirect heat mimics an oven; smoke from charcoal/wood adds real BBQ character.
You’ll need: Pork ribs, salt, pepper, paprika, brown sugar (optional), BBQ sauce.
- Remove the membrane (paper towel grip helps). Season well.
- Two-zone setup with a steady indirect temp. Add a small chunk of wood (optional) for smoke.
-
Cook ribs on the cooler side with lid closed until they’re tender when you lift with tongs and the surface
has good color. (This is not a 20-minute situation; plan a couple hours depending on heat and thickness.) -
Sauce at the end: brush, let it set for 10 minutes, then brush again. If you want extra caramelization,
briefly move to direct heatbut watch closely. - Rest 10 minutes, slice, and accept compliments.
5) Cedar-Plank-Style Salmon (Without Stress)
Why it works: Indirect heat protects delicate fish; gentle smoke makes it feel fancy.
You’ll need: Salmon fillet, salt, lemon, dill (or any herb), a soaked cedar plank (optional).
- Salt salmon 20–30 minutes ahead. If using a plank, soak it at least 1 hour.
- Cook on the cooler side, lid closed. If using a plank, place plank over indirect heat.
- Grill until it reaches about 145°F in the thickest part or flakes easily and looks opaque.
- Finish with lemon and herbs. Serve with something crisp and summery.
6) Garlic-Lemon Shrimp Skewers (Fastest Crowd-Pleaser)
Why it works: Shrimp cook fast; a quick marinade delivers big flavor.
You’ll need: Shrimp, garlic, lemon zest/juice, olive oil, chili flakes, salt.
- Marinate 15–20 minutes (not hoursacid can toughen seafood).
- Skewer and grill over direct heat, 1–2 minutes per side, just until opaque.
- Move to indirect heat if flare-ups happen. Finish with extra lemon.
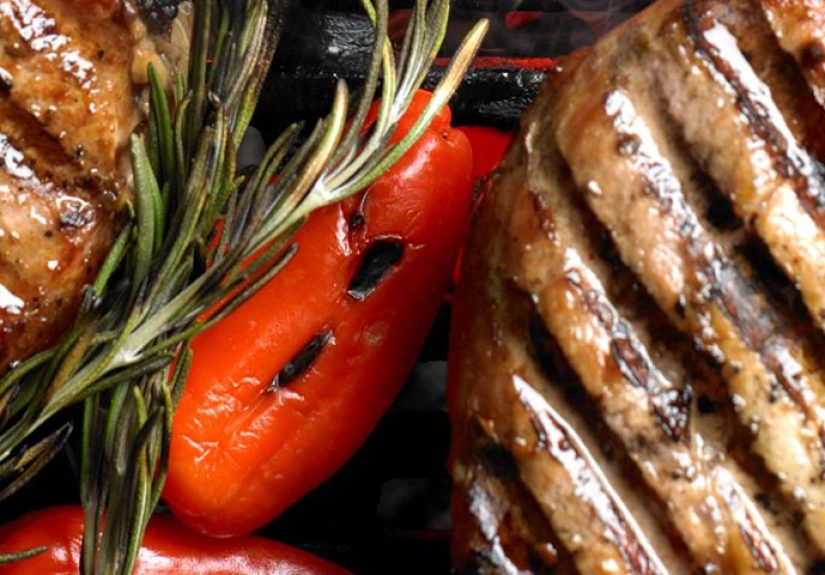
7) Charred Veggie Platter with Herb “Green Sauce”
Why it works: High heat creates sweetness and smoke; sauce makes veggies feel like a main dish.
You’ll need: Zucchini, bell peppers, onions, mushrooms, corn; oil; salt.
- Cut veggies into grill-friendly shapes (bigger than you think; shrinkage is real).
- Oil lightly, salt well. Grill over direct heat for char, then finish on indirect heat until tender.
-
Blend or chop a quick green sauce: parsley/cilantro + garlic + olive oil + vinegar/lemon + salt.
Spoon over everything.
8) Foil-Packet Potatoes & Onions (The Side Dish That Doesn’t Need Babysitting)
Why it works: Steam + smoke = tender potatoes with grilled flavor.
You’ll need: Baby potatoes, onions, butter (or oil), salt, pepper, optional rosemary.
- Slice potatoes thin for faster cooking. Toss with onions, fat, salt, pepper, herbs.
- Seal tightly in heavy foil packets.
- Grill on indirect heat, flipping once, until a knife slides in easily. Open carefully (steam is spicy).
- Optional: open packet and place briefly over direct heat to brown the edges.
9) Grilled Pizza (Because You’re Not a Regular Cook, You’re a Cool Cook)
Why it works: The grill acts like a blazing-hot ovencrispy crust, smoky flavor.
You’ll need: Pizza dough, sauce, cheese, toppings that cook fast.
- Two-zone setup. Clean and oil grates well (pizza dough is clingy).
- Stretch dough and grill over direct heat until the bottom sets and has marks.
- Flip, move to indirect heat, add toppings quickly, close lid to melt cheese.
- Rotate as needed for even cooking. Slice and serve immediately.
10) Grilled Peaches with Cinnamon-Sugar Crunch
Why it works: Grilling intensifies sweetness; dessert on a grill feels like a life hack.
You’ll need: Ripe peaches, butter, cinnamon, a pinch of sugar, optional ice cream.
- Halve and pit peaches. Brush with melted butter.
- Grill cut-side down over medium direct heat until marked and softened.
- Sprinkle cinnamon and a touch of sugar near the end. Serve warm, ideally with ice cream.
Food Safety & Party Logistics (So Everyone Remembers the Fun Part)
BBQ is joyful, but food safety is the quiet hero that keeps the day from becoming a group text titled
“Uh… is anyone else feeling weird?” Keep it simple:
- Clean: Wash hands and tools; pack sanitizer if you’re outdoors without a sink.
- Separate: Use separate plates and tongs for raw vs. cooked foods.
- Cook: Use a thermometer and hit safe temps.
-
Chill/hold: Don’t leave perishables out more than 2 hours (or 1 hour if it’s above 90°F).
Keep cold food cold (below 40°F) and hot food hot (at or above 140°F).
One more: never partially grill meat or poultry and “finish it later.” If you start cooking, finish cooking.
Your future self will thank you.
Conclusion
Great BBQ & grilling isn’t about being born with “grill instincts.” It’s about a few repeatable habits:
two-zone heat, a thermometer, smart timing for sauce, and giving food a short rest before slicing. Once those
basics are locked in, recipes become flexibleyou can swap cuts, change flavors, and still land the plane
beautifully. Try the reverse-sear steak when you want maximum applause, the chicken thighs when you want
guaranteed tenderness, and the veggie platter when you want people to say, “Wait, why are these vegetables
actually incredible?” Then finish with grilled peaches and pretend you planned dessert all along.
of experiences (as requested)
Backyard Experiences: The Stuff You Only Learn After a Few Cookouts
The first time I hosted a “casual” BBQ, I made the classic mistake of treating the grill like a single-temperature
device. Everything went over direct heat because, in my head, grilling was basically “put food above fire.”
The burgers charred before the centers hit a safe temp, the chicken looked gorgeous and lied to me internally,
and the vegetables turned into a mix of perfect and… existential. That was the day I learned the two-zone method
isn’t fancyit’s survival.
Once I started building a hot side and a cool side, the whole vibe changed. Flare-ups stopped being a crisis and
became a small inconvenience. Fat dripped, flames jumped up, and instead of doing the backyard panic-dance
(tongs in one hand, lid in the other, praying to the BBQ gods), I just slid the food to safety, closed the lid,
and looked like I totally meant to do that.
I also learned that the grill lid is not decorative. Leaving it open the entire time is basically saying,
“Hello, I would like random hot spots and surprise overcooking.” With the lid closed, the grill behaves more like
an oven: heat circulates, food cooks more evenly, and you don’t spend the entire meal hovering like a nervous
hummingbird. You still pay attentionbut you’re not held hostage by your own dinner.
Another humbling lesson: sauce timing. I used to brush BBQ sauce early because I wanted that sticky, glossy finish.
What I got instead was “campfire caramel” with a side of bitterness. Sweet sauces and high heat can turn on you fast.
Now I treat sauce like the last scene of an action movie: it shows up late, makes everything look amazing, and then
leaves before it causes problems. Ten to fifteen minutes to set is plenty. If people want more sauce, it goes on the
tablewhere it can’t burn.
Thermometers were my final upgrade. I resisted at first because I wanted to be the kind of person who “just knows.”
But grilling is chaotic: wind, weather, fuel differences, hot spots, thicker pieces, thinner pieces, and that one
chicken thigh that’s somehow twice the size of the others. The thermometer turns chaos into clarity. It also made me
a better host because I wasn’t cutting into meat every five minutes “to check,” which is basically leaking juiciness
on purpose. Now I check temps, pull food slightly early when appropriate, and let carryover cooking do its thing.
Finally, I learned that the best cookout food is the food you can repeat. A signature chicken thigh recipe, a go-to
burger method, a sauce tweak that makes bottled BBQ taste brighter, and one “wow” item (hello, grilled pizza) will
carry you through an entire summer. People don’t need you to reinvent dinner every weekend. They need you to serve
something delicious, confidently, with a cold drink and a plan for leftovers. That’s the real backyard flex.