Table of Contents >> Show >> Hide
- What a Cyclone Separator Does (and Why Your Filter Suddenly Stops Complaining)
- Why Make It See-Through?
- Pick Your Build Style
- Materials and Tools
- Build Steps: The Clear “Top-Hat” Thien-Style Separator
- Step 1: Choose Your Bin (and Don’t Pick a Wimpy One)
- Step 2: Cut the Top and Bottom Plates
- Step 3: Make the Baffle (The Secret Sauce)
- Step 4: Install the Clear Sidewall
- Step 5: Add a Tangential Inlet (So the Air Actually Spins)
- Step 6: Mount the Outlet and (Optional) Add a Guard
- Step 7: Seal the Top-Hat to the Bin
- Step 8: Hose Routing (The “Don’t Trip Over It” Phase)
- Step 9: Leak Test and First Spin
- Quick-Build Variant: Clear Cyclone Cone + Clear Bin
- Dialing In Performance: Little Tweaks That Make a Big Difference
- Safety and Reality Checks (Because Dust Is Not Glitter)
- Common Problems and Fixes
- FAQ
- of Real-World Lessons from People Who Actually Use These Things
If you’ve ever watched your shop vac go from “mini tornado” to “sad wheeze” after five minutes of sanding,
congratulations: you’ve met the arch-nemesis of suctiona clogged filter. The fix isn’t to smack the filter like it owes you money
(although… relatable). The fix is to keep most of that dust and debris from ever reaching the filter in the first place.
Enter the cyclone dust separator: a simple add-on that turns your one-stage shop vac into a two-stage dust-catching machine.
And because we’re building a see-through cyclone dust separator, you also get the most satisfying bonus feature in the shop:
watching the debris swirl like a tiny dust-themed galaxy before it drops into the bin.
What a Cyclone Separator Does (and Why Your Filter Suddenly Stops Complaining)
A cyclone separator (also called a pre-separator) sits between your tool/hose and your shop vacuum.
Air and debris enter the separator, the airflow spins, and heavier chips and dust get flung outward and fall into a collection bin.
Cleaner air then continues on to your shop vac.
The big win: your shop vac’s filter stays cleaner longer, which means more consistent suction and less time doing
“filter percussion therapy.” Separators can reduce how quickly filters clog during high-dust jobs like sanding or drywall work,
and they also make emptying easier because you dump the bin instead of disassembling the vac every time.
Why Make It See-Through?
- No more surprise overfills. You can see the fill level before chips start getting sucked into the outlet.
- Quick troubleshooting. If something clogs, collapses, or leaks, you’ll spot it fast.
- Better habits. You’ll empty the bin sooner (because watching it fill is weirdly addictive).
- Pure shop joy. It’s basically a lava lamp for woodworkers, except it smells like sawdust instead of nostalgia.
Pick Your Build Style
There are two practical ways to build a see-through cyclone setup for a shop vac:
| Build Style | What It Is | Best For | See-Through Level |
|---|---|---|---|
| Clear “Top-Hat” Thien-Style Separator | A clear sidewall chamber with an internal baffle plate (a proven DIY approach) | DIY builders who want a custom size and a fun weekend project | High (clear chamber; bin can be clear or opaque) |
| Clear Cyclone Cone + Clear Bin | A ready-made cyclone body mounted to a bin (still “build” because you assemble and mount it) | Fast setup, fewer cuts, great performance with less fuss | High (many cyclone bodies are translucent; pair with a translucent/clear bucket) |
This article walks you through the Top-Hat Thien-style build (the most classic DIY approach)
and then gives a quick-build variant using a cyclone cone if you prefer the shortcut.
Materials and Tools
Core Materials (Top-Hat Thien-Style Build)
- Collection bin: a sturdy bucket or trash can (10–20 gallon is a sweet spot). For maximum “see-through,” choose a translucent bin.
- Clear sidewall material: polycarbonate sheet/strip (preferred for toughness) or acrylic (clear but more crack-prone).
- Top and bottom plates: plywood, MDF, or HDPE (two circular plates for the “top-hat” chamber).
- Baffle plate: thin plywood, MDF, or plastic sheet.
- Inlet and outlet ports: PVC/DWV fittings or shop-vac hose ports sized to your hose (commonly 2-1/2″).
- Gasket/seal: foam weatherstripping tape and silicone (or hot glue for spot sealing).
- Fasteners: screws, washers, nuts/bolts (or threaded inserts if you’re feeling fancy).
- Latches or clamps: optional but helpful to keep the lid sealed to the bin.
Tools
- Jigsaw or bandsaw (for circles) and/or a router with a circle jig
- Drill + hole saws (for inlet/outlet holes)
- Measuring tape, marker, straightedge
- Screwdriver, clamps
- Sandpaper or file (for fitting curves)
- Safety glasses and hearing protection (your future self will thank you)
Build Steps: The Clear “Top-Hat” Thien-Style Separator
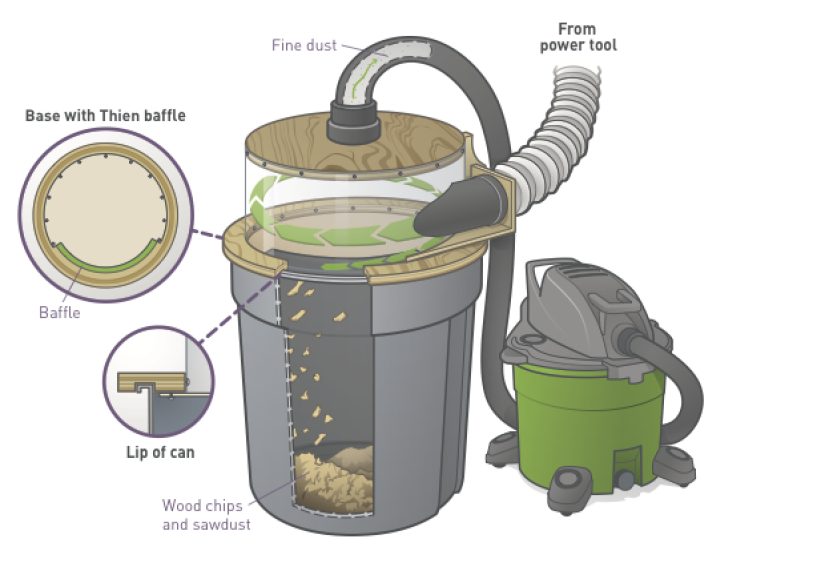
The “top-hat” design is popular because it can sit on a bin without permanently modifying the bin,
and the clear sidewall lets you watch the cyclone action. The heart of the system is the baffle:
a plate with a slot near the perimeter that lets debris drop into the bin while keeping the airflow spinning.
Step 1: Choose Your Bin (and Don’t Pick a Wimpy One)
Shop vacs create strong suction. Thin plastic containers can collapse like a soda bottle in a vacuum experiment.
Use a sturdy bucket or thick-walled trash can. If you want full transparency, look for a translucent bucket.
If you can’t find a clear bin that’s strong enough, it’s still worth building the top-hat chamber in clear polycarbonate
you’ll see the swirl there even if the bin is opaque.
Step 2: Cut the Top and Bottom Plates
-
Measure your bin opening and cut two matching circular plates that overhang the rim slightly.
The plates form the roof and floor of the clear “top-hat” chamber. -
In the top plate, cut a centered hole for the outlet (the port that goes to the shop vac).
This outlet typically points straight up (or sideways if you prefer a low profile). - Dry-fit everything on the bin to confirm you’ve got a good footprint and room for a gasket.
Step 3: Make the Baffle (The Secret Sauce)
The baffle is what makes this separator work like a cyclone without needing a cone.
A common approach is a baffle disk with a partial slot cut near the perimeter.
The slot allows chips and dust to drop down into the bin while the airstream continues to spin above.
- Cut a circular baffle disk that fits inside the top-hat chamber, leaving a small gap near the outer wall (so debris can drop cleanly).
- Mark and cut a perimeter slot (not a full ringleave a “solid” section). This helps maintain the cyclone motion while giving debris an exit.
-
Add spacers (blocks, dowels, or threaded standoffs) so the baffle sits below the top plate, creating a chamber height of a few inches.
The exact height isn’t magical, but consistency and airtightness are.
Step 4: Install the Clear Sidewall
- Cut a strip of polycarbonate tall enough to match the chamber height and long enough to wrap around the plates.
- Wrap it around the edge of the bottom plate, then screw it into place (pre-drill to avoid cracking).
- Add the top plate and fasten it to the clear wall, creating a rigid drum-like chamber.
- Seal the seams with silicone (or a careful bead of hot glue for small gaps). Airtight beats pretty.
Step 5: Add a Tangential Inlet (So the Air Actually Spins)
Your inlet needs to push air into the chamber along the wallnot straight toward the outlet.
A tangential inlet helps create the spinning motion that separates debris.
- Choose an inlet fitting that matches your hose size (2-1/2″ is common for shop vacs).
- Position the inlet hole near the top of the clear sidewall so incoming air hugs the wall and starts swirling immediately.
- Cut the opening and mount the inlet fitting. Seal every gap. Even tiny leaks can steal performance.
Step 6: Mount the Outlet and (Optional) Add a Guard
The outlet is usually centered in the top plate and connects to the shop vac.
If you frequently suck up long splinters, screws, or chunky debris, consider a simple guard:
a short section of perforated material or a coarse screen that prevents large items from entering the outlet.
Keep it open enough that it doesn’t restrict airflow.
Step 7: Seal the Top-Hat to the Bin
- Apply foam weatherstripping around the underside of the bottom plate where it contacts the bin rim.
- Set the separator on the bin and press down firmly for a good seal.
- If you want extra security, add latches, toggle clamps, or a strap to keep it seated.
Step 8: Hose Routing (The “Don’t Trip Over It” Phase)
- Tool/hose → inlet of the separator
- Outlet → shop vac
- Keep hoses as short as practical, avoid tight kinks, and use smooth bends where you can.
Step 9: Leak Test and First Spin
- Turn on the vac and run your hand around seams (without touching moving parts). Feel for air leaks.
- Seal leaks with silicone/hot glue and retest.
-
Do a test run with mixed debris (chips + sanding dust). Watch the swirl:
heavier debris should drop quickly, fine dust will partly pass through (that’s normal).
Quick-Build Variant: Clear Cyclone Cone + Clear Bin
If you’d rather spend your Saturday making sawdust than making a circle-cutting jig,
you can “build” a see-through cyclone system by mounting a small cyclone body to a bin.
Many purpose-built shop-vac cyclones are made of translucent, anti-static plastic and are designed to be mounted on a bucket or canister.
- Pick a cyclone sized for your hose (2-1/2″ hoses need a cyclone with matching inlet/outlet).
- Mount the cyclone to a lid (bucket lid or custom lid). Cut holes carefully and seal tightly.
- Use a translucent/clear bin if you want the full “see-through” experience.
- Connect hoses (tool to cyclone inlet, cyclone outlet to shop vac).
- Test for leaks and adjust fittings as needed.
This approach typically sacrifices a tiny bit of initial airflow because you’ve added another stage,
but it pays you back by keeping the filter cleaner so suction doesn’t fall off a cliff mid-job.
Dialing In Performance: Little Tweaks That Make a Big Difference
1) Airtight Beats Everything
Cyclones are not magic; they’re physics with a gasket. If you have leaks, you lose the pressure drop that drives good separation.
Take sealing seriously: weatherstripping, silicone, tight fasteners.
2) Match Hose Size to Your Use
- 2-1/2″ hose: great for general cleanup, planers with chip collection, big debris, and many shop vac setups.
- 1-1/4″ hose: common for handheld sanders and smaller tool ports, but can clog easier with chips.
- Adapters: use smooth transitions when possible; abrupt reductions can increase clogging.
3) Empty the Bin Before It’s “Basically Full”
Overfilling pushes the swirling debris closer to the outlet path, increasing carryover (dust going to the vac).
A see-through bin makes this easy: empty early, stay happy.
4) Don’t Expect 100% of Fine Dust to Drop Out
Cyclones excel at chips and heavier dust. Ultra-fine particlesespecially from sandingcan still make it to the shop vac.
That’s why the best setup is a separator + a good filter (and for many dust-sensitive tasks, a HEPA-rated system).
Safety and Reality Checks (Because Dust Is Not Glitter)
-
Wood dust isn’t harmless. Fine airborne dust can irritate your eyes and lungs, and long-term exposure is linked to serious health risks.
Use dust collection at the source, ventilate when possible, and wear appropriate respiratory protection for dusty tasks. - HEPA helps. A HEPA-type filter is designed to capture very fine particles; keep up with maintenance so it performs as intended.
- Never vacuum hot ash, hot coals, or anything smoldering. Plastic separators and shop vacs are not the place for surprise combustion.
- Be cautious with fine powders. Some dusts can be hazardous; follow tool and material safety guidance and avoid creating airborne clouds.
Common Problems and Fixes
Problem: The bin collapses
Fix: Switch to a stronger bucket/can, reinforce with a ring, or reduce restriction (check for clogs). Thin plastic and big vacs don’t always get along.
Problem: Lots of dust still reaches the shop vac
Fix: Check for air leaks, keep the bin less full, and make sure the inlet is truly tangential.
Also confirm your baffle/chamber geometry isn’t letting debris get pulled straight to the outlet.
Problem: Suction feels lower right away
Fix: Some initial loss can happen because you added another stage. The upside is that suction stays steadier over time because the filter clogs much slower.
Keep hoses short, avoid sharp bends, and confirm the separator isn’t leaking.
Problem: It clogs at the inlet
Fix: Use a larger hose size for chip-heavy cleanup, avoid sudden reductions, and remove stringy debris before it becomes a hose bookmark.
FAQ
Do I need a cyclone separator if my shop vac has a bag?
Bags help, but a separator can still reduce filter loading and keep performance steadierespecially for high-dust tasks like sanding.
Many people use both (separator first, bag/filter second).
Is a shop vac enough for every tool?
Shop vacs are great for small ports (sandings tools, routers, track saws). For large stationary machines, a dedicated dust collector is often better.
Your separator build still helps because it improves the shop vac’s consistency for the jobs it’s best at.
What’s the #1 mistake people make?
Leaks. A cyclone separator is basically an “airtightness contest” disguised as a shop accessory.
Seal it like you mean it.
of Real-World Lessons from People Who Actually Use These Things
The first thing many folks notice after adding a cyclone pre-separator is emotional: they stop dreading cleanup.
Not because cleanup becomes fun (let’s not get carried away), but because it becomes predictable.
Instead of suction fading halfway through sanding a tabletopright when you’re finally in a groovethe airflow stays more consistent.
Several tool reviewers and longtime woodworkers point out the same pattern: even if the separator slightly reduces initial airflow,
the system “wins” overall because the filter doesn’t choke as quickly.
The second lesson is surprisingly practical: a clear bin changes behavior. When you can see the debris pile forming,
you empty it sooner. That means fewer “oops” moments where you accidentally send a blizzard of dust into the vacuum filter
because the bin filled to the point where the cyclone couldn’t drop material effectively anymore.
A translucent bucket is basically a guilt-free accountability partner:
it doesn’t judge, it just silently shows you the consequences of your procrastination.
DIY builders also learn fast that seals matter more than perfection. People obsess over the perfect baffle shape,
but the separator usually improves dramatically just by eliminating leaks and making the inlet truly tangential.
A tiny gap around a fitting can turn your glorious dust cyclone into… a mildly enthusiastic swirl.
And once you’ve chased leaks once, you become the kind of person who owns weatherstripping in bulk.
Another common experience: you’ll start matching hose diameter to the mess. For sanding dust, almost any reasonable setup works.
For planers, jointers, and “chip confetti” cleanup, narrow hoses clog, and separators fill fast.
Many users end up keeping a short, wide hose for big debris and a smaller, lighter hose for handheld tools.
It’s not fancy, but it’s the difference between productive cleanup and performing hose surgery with a coat hanger.
Finally, there’s the unexpected “shop health” effect. Once the filter stays cleaner, people tend to upgrade filtration
(often to finer filters) and keep their setup maintainedbecause it’s no longer a constant battle.
That matters because wood dust is more than a nuisance: it’s a health hazard when it becomes airborne and gets inhaled.
A separator won’t replace good practicessource capture, ventilation, and proper respiratory protection when neededbut it
helps your system stay effective instead of degrading quietly as the filter loads up.
In other words: the real magic isn’t that a cyclone separator makes dust disappear. It’s that it makes dust management
feel like a tool you control, not a problem that controls you. Also, yes, watching the dust tornado is still weirdly satisfying.
No, you’re not alone.