Table of Contents >> Show >> Hide
- What Makes a Great Caramel Cheesecake (and Why It’s Not Just “Cheesecake + Sauce”)
- Equipment Checklist (So You Don’t Improvise With a Soup Pot)
- Caramel Cheesecake Recipe (Baked, 9-Inch)
- Timing Overview
- Ingredients
- Step 1: Prep the Pan Like You Mean It
- Step 2: Make the Crust (A.K.A. The Crunchy Foundation)
- Step 3: Make the Caramel Sauce (Skip If Using Store-Bought)
- Step 4: Make the Filling (Smooth, Not Foamy)
- Step 5: Choose Your Baking Method
- How to Know It’s Done (Without Playing Cheesecake Roulette)
- Step 6: Cool It Slowly (This Is Where Cheesecakes Earn Their Calm Reputation)
- Serving: Caramel Glamour Without the Mess
- Storage and Make-Ahead Tips
- Troubleshooting (Because Cheesecake Is a Custard With Opinions)
- Flavor Variations (Same Technique, Different Personality)
- Real-Life Caramel Cheesecake Experiences (The Fun, the Fumbles, the Glory)
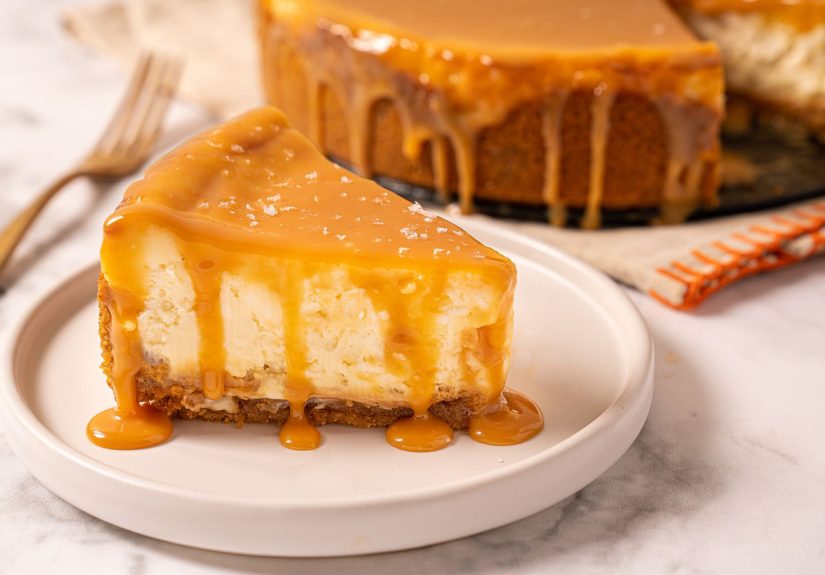
If cheesecake is the little black dress of desserts, caramel cheesecake is the same outfit with a dramatic cape and better lighting.
You get that tangy, creamy, “one more bite” cheesecake vibeplus a buttery caramel ribbon that tastes like your best decisions.
This guide pulls together the most reliable, kitchen-tested techniques used by big-name recipe teams and trusted American food sites,
then rewrites them into one clear, confidence-boosting plan you can actually follow without whispering, “Please don’t crack.”
Below you’ll find: a foolproof baked caramel cheesecake recipe (with options for a classic water bath or an easier steam method),
a quick homemade caramel sauce that won’t bully you into crystallizing, and a troubleshooting section that reads like a tiny dessert therapist.
What Makes a Great Caramel Cheesecake (and Why It’s Not Just “Cheesecake + Sauce”)
A truly great caramel cheesecake isn’t only topped with caramelit’s built to carry caramel. That means:
a sturdy crust, a filling that stays silky (not airy or spongy), and caramel used in the right places so it doesn’t seep, split,
or turn your cheesecake into a sweet slip-n-slide.
- Texture goal: creamy and dense, like a rich custardnot cakey.
- Caramel strategy: a little in the filling for flavor + more on top for drama.
- Heat control: gentle baking and gradual cooling to prevent cracks.
Equipment Checklist (So You Don’t Improvise With a Soup Pot)
- 9-inch springform pan (3-inch sides are ideal)
- Roasting pan (if using a water bath) or a metal pan/skillet (for steam method)
- Stand mixer or hand mixer (low speed is your friend)
- Fine-mesh sieve (optional, but great for ultra-smooth batter)
- Instant-read thermometer (optional, but this is the “cheat code”)
- Heavy-duty foil (for wrapping the pan, if doing a water bath)
Caramel Cheesecake Recipe (Baked, 9-Inch)
Timing Overview
- Active time: ~35–45 minutes
- Bake + cool: ~2 hours (including gradual cooling)
- Chill time: at least 6 hours, overnight is best
- Total commitment: a good dessert decision, not a quick snack decision
Ingredients
Graham Cracker Crust
- 2 cups graham cracker crumbs (about 14–16 full sheets, crushed)
- 3 tablespoons granulated sugar
- 1/2 teaspoon kosher salt
- 6 tablespoons unsalted butter, melted
- Optional: 1/2 teaspoon cinnamon (for cozy energy)
Cheesecake Filling
- 32 ounces full-fat cream cheese, fully softened (4 blocks)
- 1 cup granulated sugar
- 2 tablespoons cornstarch (helps stability and clean slices)
- 1 cup sour cream, room temperature
- 1/3 cup heavy cream, room temperature
- 1 tablespoon vanilla extract
- 3 large eggs + 1 egg yolk, room temperature
- 1/2 cup caramel sauce (homemade below or a thick store-bought caramel)
- Optional: 1/2 teaspoon espresso powder (makes caramel taste deeper, not “coffee”)
- Optional: 3/4 teaspoon fine sea salt (for a salted-caramel vibe)
Homemade Caramel Sauce (Makes About 1 Cup)
- 1 cup granulated sugar
- 6 tablespoons unsalted butter, cut into pieces
- 1/2 cup heavy cream, warmed (microwave 20–30 seconds)
- 1 teaspoon vanilla extract
- 3/4 teaspoon flaky sea salt (optional, for salted caramel)
Step 1: Prep the Pan Like You Mean It
- Preheat oven to 350°F.
- Lightly grease the inside of a 9-inch springform pan.
-
Optional but helpful: Line the bottom with a round of parchment paper.
This makes transferring slices less of a “please don’t stick” situation.
Step 2: Make the Crust (A.K.A. The Crunchy Foundation)
- Mix crumbs, sugar, salt, and cinnamon (if using) in a bowl.
- Add melted butter and stir until the texture resembles damp sand.
-
Press firmly into the bottom of the pan and about 1 inch up the sides.
Use the bottom of a measuring cup to pack it down like you’re building a tiny dessert patio. - Bake for 10 minutes.
- Remove and let cool. Reduce oven temperature to 325°F.
Step 3: Make the Caramel Sauce (Skip If Using Store-Bought)
Safety note: caramel is extremely hot. Treat it like culinary lava: respect it, don’t splash it, and don’t taste-test it immediately.
-
In a clean, dry, light-colored saucepan, heat sugar over medium heat.
It will clump, then melt, then turn amber. Swirl the pan occasionallyavoid stirring if you can. -
Once it’s a deep amber (think copper penny), add butter carefully. It will bubble aggressively.
Whisk until smooth. - Slowly pour in warmed cream while whisking. Bubble city will happen again. Keep whisking until silky.
- Remove from heat; whisk in vanilla and salt (if using).
- Cool 10–15 minutes before using in the cheesecake batter. You want it pourable, not scorching.
Step 4: Make the Filling (Smooth, Not Foamy)
The biggest cheesecake mistake is overmixing. Air = puffing = collapsing = cracks.
So we’re mixing on low, like we’re trying not to wake a sleeping cat.
- In a large bowl, beat softened cream cheese on low until completely smooth (about 1–2 minutes).
- Add sugar and cornstarch. Mix on low until combined and smooth.
- Add sour cream, heavy cream, vanilla, espresso powder (if using), and salt. Mix on low until uniform.
-
Add eggs and yolk one at a time, mixing on low just until each disappears.
Stop as soon as the batter looks cohesive. -
Pour in 1/2 cup caramel sauce and gently mix on low until blended.
Want a ribbon effect? Instead of fully blending, fold lightly so you get faint caramel streaks. -
Optional ultra-smooth move: pour batter through a sieve into a bowl, then into the crust.
This catches sneaky lumps and gives you that “bakery slice” finish.
Step 5: Choose Your Baking Method
Option A: Traditional Water Bath (Most Crack-Resistant)
-
Wrap the outside of your springform pan with 2 layers of heavy-duty foil,
covering the bottom and sides. - Place the wrapped pan in a roasting pan.
- Pour the filling into the crust and smooth the top.
-
Place the roasting pan on the oven rack, then carefully pour hot water into the roasting pan
until it reaches about halfway up the springform pan’s sides. - Bake at 325°F for 65–80 minutes.
Option B: Easier “Steam Pan” Method (Less Hassle, Still Gentle)
- Place a metal pan or oven-safe skillet on the rack below your cheesecake.
- Fill it with hot water right after you put the cheesecake in the oven.
- Bake at 325°F for 60–75 minutes.
How to Know It’s Done (Without Playing Cheesecake Roulette)
- Jiggle test: edges look set, center has a slight wobble like gelatinnot liquid slosh.
-
Thermometer test (best): center reads about 145–150°F.
It will continue cooking a bit as it rests, so you’re aiming for “almost there,” not “over there.”
Step 6: Cool It Slowly (This Is Where Cheesecakes Earn Their Calm Reputation)
- Turn off the oven when the cheesecake is done.
- Crack the oven door open and let the cheesecake sit inside for 45–60 minutes.
- Remove from oven. If using a water bath, lift the springform pan out of the roasting pan and remove foil.
- Cool at room temperature for another 45–60 minutes.
- Refrigerate, uncovered, until fully chilledat least 6 hours, overnight preferred.
Serving: Caramel Glamour Without the Mess
Cheesecake loves to be cold; caramel loves to be warm. The compromise:
warm your caramel sauce briefly so it’s pourable (10–15 seconds in the microwave),
then drizzle right before serving.
- Classic finish: caramel drizzle + flaky sea salt.
- Crunch finish: toasted pecans or toffee bits.
- Chocolate-caramel moment: a thin chocolate ganache under the caramel.
- Apple-caramel vibe: spoon cinnamon sautéed apples on top.
Storage and Make-Ahead Tips
- Fridge: cover and store for 4–5 days.
-
Freezer: freeze slices (or the whole cake) wrapped tightly, up to 1 month for best texture.
Thaw overnight in the fridge. - Make-ahead win: cheesecake is often better the next day because the texture firms and the flavors settle in.
Troubleshooting (Because Cheesecake Is a Custard With Opinions)
“Why did it crack?”
- Overbaking: the number one reason. Pull it when the center still has a gentle wobble.
- Too much air: overmixing makes it puff and collapse.
- Thermal shock: sudden temperature changes can crack the top. Cool slowly.
Fix: cover cracks with caramel, whipped cream, or fruit. Congratulationsyour cheesecake is now “intentionally topped.”
“My batter has lumps.”
- Most likely the cream cheese wasn’t soft enough.
- Next time, let it sit out longer (or warm it gently). You can also strain the batter through a sieve.
“My caramel turned grainy.”
- Crystallization happens when sugar crystals form on the sides and seed the sauce.
-
Prevent it by using a clean pan, avoiding stirring once melting starts,
and swirling the pan gently instead. - If it turns grainy, sometimes reheating gently with a splash of water or cream can smooth it out.
“My crust is soggy.”
- Water bath leaked. Use heavy-duty foil, double-wrap, and avoid tears.
- Pre-bake the crust so it’s set before adding filling.
Flavor Variations (Same Technique, Different Personality)
- Salted caramel cheesecake: add flaky sea salt on top and a pinch in the filling.
- Caramel turtle cheesecake: pecans + chocolate drizzle + caramel layers.
- Espresso caramel cheesecake: add espresso powder and top with cocoa dust.
- Caramel apple cheesecake: fold in a little applesauce or top with sautéed apples and extra caramel.
Real-Life Caramel Cheesecake Experiences (The Fun, the Fumbles, the Glory)
The first time I made caramel cheesecake “for a casual get-together,” I learned a vital truth:
cheesecake does not understand the phrase casual. It demands planning, patience, andif you’re honestan emotional support spatula.
I had the crust ready, the cream cheese softened, and the confidence of someone who had watched exactly two short videos and decided,
“Yes, I am now a cheesecake person.”
The caramel, however, had other plans. I stared at the sugar as if glaring could speed it up (it cannot),
then panicked when it started turning color and tried to stir it like it was soup.
It seized up into something that looked like edible aquarium gravel.
After a brief moment of self-reflection (and a longer moment of “should I pretend this is toffee?”),
I started again using a clean pan, calmer heat, and a gentle swirl. Suddenly: glossy caramel, warm amber, smells-like-a-candy-shop victory.
Lesson one: caramel is 60% technique and 40% vibesand the vibes should be patient.
Cheesecake lesson two arrived right after: overmixing is sneaky. The batter looked smooth, so I kept going.
More mixing! More power! More… air. The cheesecake baked up like it was auditioning to be a soufflé,
then cooled and sank with the drama of a soap opera fainting couch. It tasted great, but the top looked like it had been through something.
Now I mix on low and stop early. Cheesecake doesn’t need enthusiasm; it needs restraint.
Then there’s the cooling phaseaka the part where you must do nothing, which is historically difficult for humans.
I used to yank the cheesecake out like a pizza, proud and hurried. Cracks happened.
When I finally tried the slow cool (oven off, door cracked), the top stayed smoother, the texture turned silkier,
and the whole dessert felt more “bakery” and less “science fair.”
It’s almost like custards appreciate being treated gently. Wild.
The best caramel cheesecake I ever served was at a potluck where someone brought “just fruit” (rude),
and another person brought chips. My cheesecake arrived like a fully dressed celebrity:
caramel drizzled at the last minute, a pinch of flaky salt, and a handful of toasted pecans for crunch.
People who claimed they were “not dessert people” suddenly became second-slice people.
One friend asked if it was “hard to make,” and I said the honest answer: it’s not hard, but it is picky.
It’s like hosting a fancy guestprep your house, don’t rush them, and everybody has a better time.
My favorite serving trick now is the “choose-your-own-caramel-adventure” setup:
slice the chilled cheesecake, then set out warm caramel, extra flaky salt, chocolate drizzle, and toasted nuts.
It turns dessert into a tiny event without extra baking. Also, if your cheesecake top isn’t perfect,
nobody cares because they’re too busy customizing it like a sundae bar with better manners.
Final experience-based truth: caramel cheesecake is a make-ahead dessert that rewards you for being calm today
so tomorrow’s you can eat like a legend.