Table of Contents >> Show >> Hide
- Why Cucumber, Pineapple, and Mint Work So Well Together
- Ingredients for Cucumber, Pineapple and Mint Popsicles
- Step-by-Step: How to Make Cucumber, Pineapple and Mint Popsicles
- The Science of Perfect Popsicle Texture
- Storage and Food Safety Tips
- Serving Ideas and Fun Twists
- Nutrition Snapshot
- Make-Ahead Strategy for Busy Weeks
- Real-Life Experiences with Cucumber, Pineapple and Mint Popsicles
- 1. The First Batch Is Always for Learning
- 2. Kids Have Strong Opinions (Use Them)
- 3. Mint Can Be a Hero or a Villain
- 4. How You Cut the Fruit Actually Matters
- 5. Popsicles as a Hydration Strategy
- 6. Your Freezer Has “Hot Spots”
- 7. Don’t Underestimate Presentation
- 8. The Best Part: You Can’t Really Mess This Up
- Conclusion
If summer had a mascot, it would probably be a popsicle. And not the neon-blue mystery kind that stains your tongue for three days, but a frosty bar packed with real fruit, crisp cucumber, and just enough mint to make you feel like you’re at a spa instead of standing in front of your freezer. This cucumber, pineapple, and mint popsicles recipe takes inspiration from a classic eHow-style tutorial and blends it with what food bloggers, dietitians, and popsicle-obsessed parents recommend for perfect homemade ice pops.
In this guide, you’ll get a step-by-step recipe, smart substitutions (vegan, no added sugar, kids vs. adults), and practical tips on texture, freezing time, and storage drawn from modern popsicle science and real kitchen experience. Think of it as a mini popsicle workshopminus the sticky countertops.
Why Cucumber, Pineapple, and Mint Work So Well Together
This combo isn’t just trendy; there’s real logic behind it:
- Pineapple brings bright sweetness, tropical aroma, and a naturally frothy texture when blended, which helps create a smoother, less icy popsicle.
- Cucumber adds clean, cooling freshness and extra hydration without overpowering the fruit flavor. Its high water content helps the popsicle feel lighter and more refreshing on hot days.
- Mint acts like a built-in flavor booster, giving a cool, herbal note that makes the pops taste more complex and less sugary.
Similar recipes from American food blogs and healthy dessert sites often pair this trio with coconut water or coconut cream, lime juice, and a modest amount of sugar or alternative sweetener to balance tartness and keep the texture pleasantly soft.
Ingredients for Cucumber, Pineapple and Mint Popsicles
This recipe is inspired by an eHow-style formula that uses six core ingredients and a basic popsicle mold setup.
Base Recipe (Makes About 8 Standard Popsicles)
- 2 cups fresh pineapple chunks (about half of a medium pineapple, core removed)
- 1 cup sliced cucumber (Persian or English cucumber, peel on; seeds are fine)
- 3–4 fresh mint leaves (more if you love mint)
- 1 cup coconut water (unsweetened)
- 1/4 cup granulated sugar, honey, or agave syrup (adjust to taste)
- Juice of 1 lime (about 2 tablespoons)
- Popsicle molds and sticks
Optional Add-Ins and Variations
- Extra creaminess: Swap half of the coconut water for canned coconut milk or coconut cream for a richer texture.
- No added sugar: Use very ripe pineapple and skip the sweetener, or use a few drops of liquid stevia as seen in many sugar-free popsicle recipes.
- More tang: Add extra lime juice or a few pieces of frozen lime zest.
- Fiber boost: Stir in 1–2 teaspoons of chia seeds after blending for a pudding-like bite once frozen.
Step-by-Step: How to Make Cucumber, Pineapple and Mint Popsicles
Step 1: Prep Your Produce
Wash the cucumber, mint, and lime thoroughly. Peel and core the pineapple, then chop it into small chunks so it blends evenly. Slice the cucumber into coins or small chunksno need to peel if you’re using thin-skinned varieties like Persian or English cucumbers.
Step 2: Build the Flavor in the Blender
Add the pineapple, cucumber, coconut water, sugar (or other sweetener), and lime juice to a blender. Blend on high until completely smooth. The mixture should look like a slightly frothy juicepineapple naturally foams a bit when blended, which is a good sign for popsicle texture.
Taste the mixture. If it’s too tart, add a bit more sweetener. If it’s too sweet, squeeze in more lime. Remember that once frozen, flavors dull slightly, so the liquid should taste a little bolder than you want the final popsicle to taste.
Step 3: Add the Mint
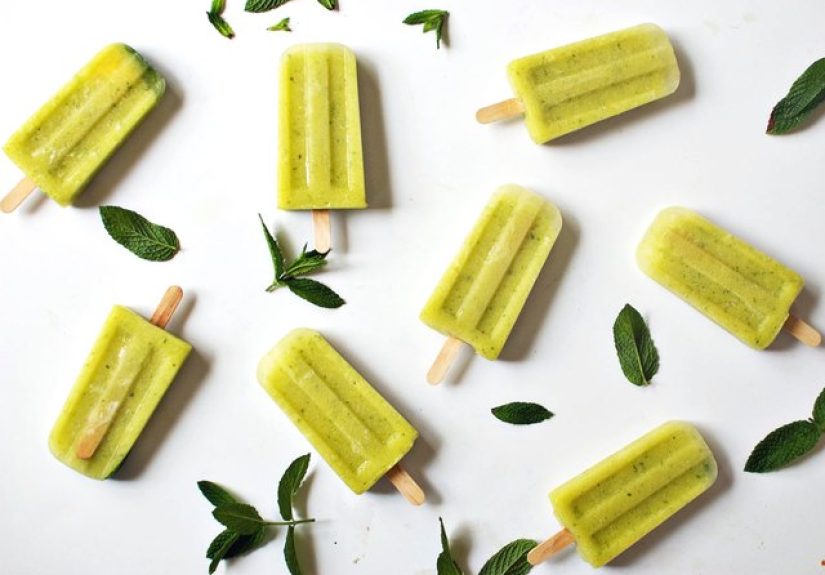
Tear the mint leaves into smaller pieces and add them to the blender. Pulse just a few timesenough to break the mint into tiny flecks without completely blending it into a green liquid. Many fruit-and-mint recipes recommend pulsing at the end so you still see pretty green specks in the final popsicle instead of a muddy color.
Step 4: Fill the Popsicle Molds
Pour the mixture carefully into popsicle molds, leaving about 1/4 inch at the top to allow for expansion as the liquid freezes. Some popsicle pros suggest using a small pitcher or even a piping bag to keep things neat, especially if you’re working with kids.
Insert the sticks. If your sticks tend to float, you can soak them in warm water for a few minutes to help them stay centereda trick shared in pineapple-cucumber-mint popsicle tutorials.
Step 5: Freeze Until Solid
Place the molds on a flat surface in your freezer. How long they need depends on your freezer temperature and the mold size, but most fruit popsicles take at least 4–6 hours to fully set. Many sources suggest freezing overnight for best results, especially if you’re planning to unmold them for a party.
Once they’re solid, briefly run warm water over the outside of each mold to loosen them, then gently wiggle the sticks to slide the popsicles out.
The Science of Perfect Popsicle Texture
Why do some homemade popsicles turn out silky and others taste like frozen ice cubes? It mostly comes down to water, sugar, and fat balance.
- Sugar: Sugar lowers the freezing point of the mixture, making popsicles softer and less icy. Recipes that include fruit plus a bit of added sugar, honey, or agave often freeze to a pleasant bite rather than a hard brick.
- Fruit vs. water: Traditional fruit popsicles tend to use roughly 3/4 cup liquid for every cup of fruit. Too much water leads to more ice crystals; too much fruit can make them dense.
- Fat for creaminess: When you add coconut milk, Greek yogurt, or avocado, you’re adding fat that interrupts ice crystal formation and gives a creamier, “paleta-style” texture.
Our cucumber, pineapple, and mint mix stays mostly on the light and icy side, but you can nudge it creamier by swapping some of the coconut water for canned coconut milk.
Storage and Food Safety Tips
Once you’ve gone to the trouble of prepping, blending, and freezing, you’ll want your popsicles to stay delicious as long as possible.
- Don’t store in the mold: Food safety and cooking sites recommend transferring fully frozen popsicles to an airtight container or freezer bag instead of leaving them in the mold, which can allow freezer burn.
- Use within 2–3 months: Many experts suggest enjoying homemade fruit pops within about 2–3 months for the best flavor and texture. After that, they can start to dry out or pick up off flavors.
- Lay flat to freeze: Lay popsicles flat on a tray while freezing so they freeze evenly and the sticks stay vertical. After they’re frozen, you can stack or stand them however you like.
Serving Ideas and Fun Twists
Once you’ve mastered the base recipe, you can have a ridiculous amount of fun with creative variations:
- Spa-water popsicles: Add thin slices of fresh cucumber and extra mint leaves directly into the molds before pouring the blended mixture. It looks like fancy spa water on a stick.
- Striped popsicles: Freeze a thin layer of cucumber-mint mixture first, then pour in pineapple-heavy mixture to create stripes. Let each layer firm up in the freezer for 30–45 minutes before adding the next.
- Kids’ vitamin pops: Swirl in a bit of Greek yogurt for extra protein and a creamy swirl. Some children’s nutrition blogs suggest using popsicles as a vehicle to sneak in more fruit and yogurt.
- Adults-only version: For a cocktail-party twist, replace a small portion of the coconut water with tequila or rum and keep them clearly labeled and out of kids’ reach. Remember that alcohol also affects freezing, so go light or you’ll end up with slush instead of solid pops.
Nutrition Snapshot
Exact nutrition will vary, but compared with store-bought popsicles that often contain high-fructose corn syrup, artificial coloring, and preservatives, a cucumber, pineapple, and mint popsicle made with real fruit, coconut water, and minimal added sugar is generally:
- Lower in artificial ingredients and colorings
- Moderate in natural sugars from fruit
- Hydrating thanks to cucumber and coconut water
- A small source of vitamin C and other antioxidants from pineapple and lime
If you’re watching sugar closely, you can reduce or omit the sweetener entirely and rely on very ripe pineapple, following the approach of many sugar-free or low-sugar fruit popsicle recipes.
Make-Ahead Strategy for Busy Weeks
One of the best things about homemade popsicles is how easily they fit into make-ahead meal prep. You can:
- Blend a double batch of cucumber, pineapple, and mint base.
- Pour half into popsicle molds and half into ice cube trays for smoothies later.
- Freeze, then transfer everything to labeled freezer bags.
When you want a quick dessert, you’ve got the popsicles ready to go. When you want a smoothie, toss a few of those frozen cubes into a blender with extra water or yogurt. Food sites that specialize in freezer tips highlight that freezing fruit purees and popsicles is a great way to avoid wasted summer produce while still enjoying peak flavor later on.
Real-Life Experiences with Cucumber, Pineapple and Mint Popsicles
Once you actually start making these popsicles at home, a few practical lessons pop up (pun absolutely intended) that don’t always fit neatly into a recipe card. Here are some “from the freezer trenches” experiences that can help you fine-tune your next batch.
1. The First Batch Is Always for Learning
The first time you try this recipe, treat it like a test run. Maybe you discover your pineapple wasn’t quite sweet enough, so the pops come out a little too tart. Or your freezer runs cold and the pops freeze rock-hard. Make mental notes: “Next time, I’ll add a tablespoon more sweetener,” or “I’ll pull them out 10 minutes before serving so they’re softer to bite.” That tiny bit of experimentation is all it takes to dial them in.
2. Kids Have Strong Opinions (Use Them)
If you live with kids, consider them your built-in tasting panel. Many parents report that children are surprisingly honest about texturesome prefer crunchy ice, some like things creamy and smoothie-like. Try offering one version with pure pineapple and cucumber and another with a splash of coconut milk. Ask them which one they’d “order again.” You’ll end up with a popsicle that actually gets eaten instead of forgotten in the back of the freezer.
3. Mint Can Be a Hero or a Villain
Mint is powerful. A few leaves give a refreshing, almost spa-like flavor, but too much can start to feel like you’re gnawing on frozen toothpaste. Many home cooks find their personal sweet spot is around 3–6 small leaves per batch, pulsed at the end rather than fully blended. If you’re serving someone who’s nervous about mint, start with less and add more next time. You can always garnish with extra mint on the plate for those who love that herbal kick.
4. How You Cut the Fruit Actually Matters
It sounds fussy, but uniform fruit pieces make your life easier. When the pineapple is chopped into small chunks, it blends quickly and evenly, which prevents stringy bits that can get weirdly crunchy once frozen. The same goes for cucumber: small pieces mean a smoother blend and a more even texture in the final popsicle. If your blender struggles, add the coconut water first so the blades have something to grab onto.
5. Popsicles as a Hydration Strategy
These cucumber, pineapple, and mint popsicles also work as an unofficial hydration hack. On hot days, especially if you’ve been working in the yard, at the gym, or chasing kids around, holding a frosty, fruit-based popsicle feels more fun than drinking another glass of water. The combination of cucumber, coconut water, and pineapple makes these pops naturally thirst-quenching. They’re not a replacement for proper fluid intake, of course, but they do make staying cool and hydrated a lot more pleasant.
6. Your Freezer Has “Hot Spots”
Not all spots in your freezer are equally cold. You might notice that popsicles in the back freeze faster than the ones near the door. After a batch or two, you’ll learn the sweet spotoften the center or back of a shelf. If one side freezes faster, just rotate the mold halfway through the freezing time. It’s a tiny step, but it can prevent one side of the mold from freezing harder, making unmolding more uneven.
7. Don’t Underestimate Presentation
Sure, they’re “just popsicles,” but a little presentation goes a long way. Serving cucumber, pineapple, and mint popsicles on a tray of crushed ice with a few lime wedges and extra mint leaves instantly transforms them into a party-worthy dessert. It also makes them melt more slowly because they’re surrounded by cold instead of warm air. Plus, it looks impressive in photosperfect if you’re sharing your recipe online or trying to recreate that polished eHow vibe at home.
8. The Best Part: You Can’t Really Mess This Up
At the end of the day, as long as your mixture tastes good before it goes into the molds, you’re going to end up with something refreshing. Maybe the texture is a little icier than planned or the mint flecks all sank to the bottom. No big deal. Every batch teaches you something, and the “mistakes” are still cold, fruity, and extremely snackable. By your second or third round, you’ll have your personal house recipe that’s even better than anything you can grab off a supermarket shelf.
Conclusion
Cucumber, pineapple, and mint popsicles are one of those simple kitchen projects that deliver way more payoff than effort. They’re refreshing, customizable, kid-friendly, and easily upgraded for adults. With a basic blender, some good fruit, and a freezer, you can create a summery treat that tastes like vacation and feels a step up from store-bought ice pops loaded with artificial colors and corn syrup.
Blend, taste, tweak, freeze, and enjoyonce you’ve tried this combo, you’ll want to keep a batch in your freezer all season long.