Table of Contents >> Show >> Hide
- Why Replace the Chain and Sprockets as a Set?
- How to Tell It’s Time
- Parts and Tools You’ll Want Ready
- Choose the Right Chain and Sprockets
- Step-by-Step: How to Replace Chain and Sprockets
- Step 1: Prep the bike and loosen key fasteners
- Step 2: Remove the old chain
- Step 3: Remove the rear wheel and swap the rear sprocket
- Step 4: Swap the front sprocket
- Step 5: Fit the new chain length
- Step 6: Install the master link (rivet-style)
- Step 6 (alternate): Clip-style master link notes
- Step 7: Reinstall the rear wheel, align, and set chain slack
- Step 8: Final checks before riding
- Common Mistakes (and How to Avoid Them)
- Cost, Time, and DIY Value
- Aftercare: Make the New Set Last
- DIY Experiences: What Riders Commonly Learn the Hard Way (Extra Notes)
- Conclusion
Your motorcycle’s chain and sprockets are basically the world’s angriest bicycle drivetrain: more power, more speed, more grime,
and way less forgiveness if something goes sideways. The good news? Replacing a chain and sprockets at home is a very doable DIY job
with the right tools, a little patience, and a healthy respect for torque specs (because “tight enough” is not a unit of measurement).
This guide walks you through how to replace your chain and both sprockets step-by-step, how to choose the correct parts, and how to
avoid the classic mistakes that turn a Saturday project into a Sunday group-therapy session.
Why Replace the Chain and Sprockets as a Set?
Chains and sprockets wear together. A stretched chain doesn’t mesh cleanly with sprocket teeth, and worn sprocket teeth chew up a new chain fast.
If you install a fresh chain onto tired “shark fin” sprockets, the drivetrain can feel rough, wear accelerates, and your adjustment range disappears quicker than
snacks at a road-trip gas station.
The typical best practice for most street bikes is simple: replace the front sprocket, rear sprocket, and chain together unless you have a very specific
reason not to.
How to Tell It’s Time
Common signs your chain and sprockets are worn
- Hooked sprocket teeth (they start to look like waves or shark teeth instead of having a clean, even profile).
- Tight spots when rotating the rear wheel (slack changes a lot as the wheel turns).
- Constant re-adjusting (you keep taking slack out and it keeps coming back).
- Rust, stiff links, or kinked sections that don’t loosen up after cleaning and lubrication.
- Noise and “snatchy” driveline feel, especially on/off throttle.
- Axle adjusters near the end of their travel (you’re running out of room to tighten the chain).
Quick reality check
Chain slack specs vary by bike, and they can be surprisingly specific. Always check your owner’s manual for the correct slack range and measurement method.
When checking slack, rotate the wheel and measure at the tightest point.
Parts and Tools You’ll Want Ready
Parts
- New chain in the correct size/pitch for your bike (common sizes include 520, 525, 530don’t guess).
- New front sprocket (countershaft sprocket).
- New rear sprocket.
- Master link that matches your chain type (rivet-style is common on street bikes; clip-style is common on some dirt/dual-sport setups).
- New lock washer / retainer for the countershaft sprocket nut if your bike uses one (recommended whenever removed).
- Threadlocker (if your service manual calls for it on sprocket bolts).
Tools
- Rear stand (or center stand) to safely lift/support the bike
- Socket set and wrenches
- Breaker bar (front sprocket nuts can be extremely tight)
- Torque wrench (non-negotiable if you want this to stay a hobby instead of a cautionary tale)
- Chain tool (breaker + press + rivet, if you’re installing a rivet master link)
- Angle grinder or file (optional but helpful to remove rivet heads cleanly before pressing pins out)
- Caliper (helpful for verifying rivet flare/peen diameter if you’re riveting)
- Rags, gloves, and a chain-safe cleaner + chain lube
Safety notes (because motorcycles already provide enough excitement)
- Work on a stable surface. A wobbly bike is a bad coworker.
- Wear eye protection when grinding or riveting.
- Keep fingers out of pinch points between chain and sprockets.
- If anything feels unclear, consult the service manual for your exact model (especially torque specs and any special locking hardware).
Choose the Right Chain and Sprockets
1) Match chain size and type
Your bike is designed for a specific chain pitch/width (like 520/525/530). Use the size listed in your owner’s manual or on the OEM parts listing.
Also match the chain type: O-ring and X-ring chains seal grease inside the rollers and typically last longer for street use.
2) Pick sprocket materials based on how you ride
- Steel sprockets: longest life, great for street and commuting.
- Aluminum rear sprockets: lighter but can wear faster (popular for racing/off-road priorities).
- Hybrid options: some rear sprockets combine a steel tooth ring with a lightweight carrier.
3) Stock gearing vs. gearing changes
If you change tooth count, you change gearing. Fewer teeth up front or more teeth in the rear generally increases acceleration but raises cruising RPM.
More teeth up front or fewer teeth in the rear generally lowers cruising RPM but can soften acceleration.
If you’re new to drivetrain work, it’s usually smartest to keep stock tooth counts for your first DIY replacement. Save the gearing experiments for after you’ve
earned your “I can rivet a master link without sweating through my shirt” badge.
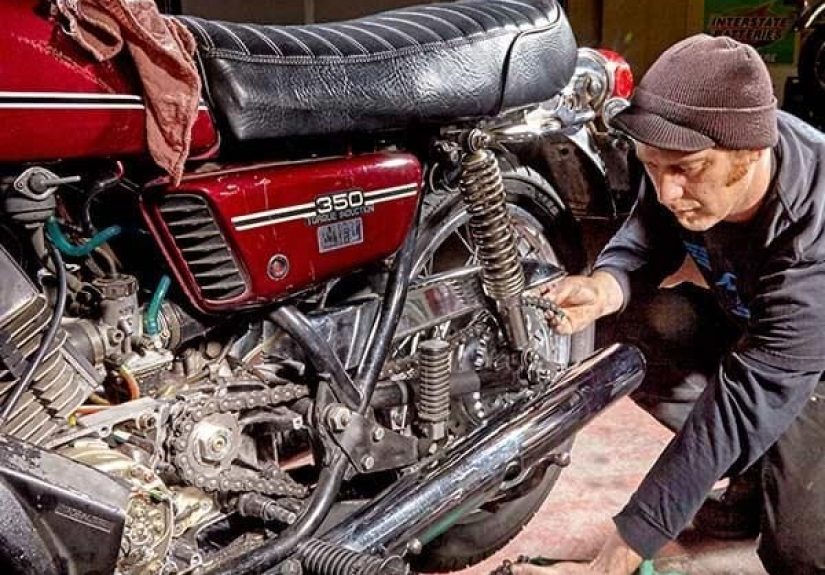
Step-by-Step: How to Replace Chain and Sprockets
Step 1: Prep the bike and loosen key fasteners
- Put the bike in neutral and lift it securely (rear stand or center stand).
- Locate your front sprocket cover and remove it so you can access the countershaft sprocket.
-
Before removing the chain, loosen the countershaft sprocket nut/bolt.
This is easier with the old chain still installed because it helps resist rotation. - Loosen (do not remove) the rear axle nut and back off the chain adjusters to create slack.
Tip: Many bikes use a locking device on the front sprocket nut (a tab washer/lock washer).
You’ll typically need to flatten the bent tab before the nut will turn.
Step 2: Remove the old chain
-
If it has a clip master link: remove the clip (cover it with a rag so it doesn’t launch into another ZIP code),
then slide the plate off and separate the chain. -
If it’s riveted: grind/file the rivet heads slightly, then use a chain breaker tool to press the pins out.
Don’t brute-force a mushroomed rivet through the chain tool like it owes you moneyprep it first. - Pull the chain out and set it aside (prepare for your hands to look like you high-fived a charcoal grill).
Step 3: Remove the rear wheel and swap the rear sprocket
- Remove the rear axle and roll the rear wheel out, supporting the caliper/bracket as needed.
- Remove the rear sprocket carrier (often cush-drive mounted). Inspect the cush rubbers while you’re there.
-
Remove the sprocket nuts/bolts. Clean the mounting surface and inspect for damage.
Install the new rear sprocket in the same orientation as the old one. -
Tighten rear sprocket fasteners to the correct torque spec (use the service manual).
Apply threadlocker if the manual specifies it.
Step 4: Swap the front sprocket
- With the nut now loosened, remove the countershaft sprocket nut/bolt and any locking hardware.
- Slide the old sprocket off. Note the orientation (some sprockets are offset and only go one correct way).
- Clean the area (this spot collects chain fling like it’s a hobby).
-
Install the new sprocket, reinstall locking hardware (new if recommended), and torque the nut/bolt to spec.
If a tab washer is used, bend the tab back into place as required.
Step 5: Fit the new chain length
Many replacement chains come longer than needed. You’ll size it to your bike. The safest approach:
match the link count of the old chain if gearing is unchanged and the old chain length was correct.
- Route the new chain over the front sprocket and around the rear sprocket.
- Pull both ends together on the rear sprocket area and check how many links you need.
- Use the chain tool to press out pins and remove extra links until length is correct.
Important: Some motorcycles come with an endless chain from the factory (no master link) and require more involved disassembly for replacement.
If your bike is one of them, consult the service manual before proceeding.
Step 6: Install the master link (rivet-style)
Rivet links are common on street bikes because they’re strong and secureonce installed correctly. The key phrase is:
installed correctly.
- Grease the master link pins and O-rings/X-rings (usually the chain kit includes the correct grease).
- Insert the master link from the inside of the chain, install O-rings, then install the outer plate.
-
Use the chain tool’s press function to press the outer plate on until side-plate spacing matches the other links.
Go slowly and check frequentlyover-pressing can bind the link. -
Switch the tool to rivet/peen mode and flare the rivet pin ends per the chain manufacturer’s guidance.
Many manufacturers specify a target flared diameter rangemeasure with calipers if possible. - Flex the master link by hand to confirm it moves freely like the other links.
Step 6 (alternate): Clip-style master link notes
If your chain uses a clip link, ensure the clip is fully seated and oriented correctly (the closed end of the clip generally faces the direction of chain travel).
Many riders also apply a small dab of silicone/RTV as extra insurance, but follow your chain maker’s recommendations.
Step 7: Reinstall the rear wheel, align, and set chain slack
- Reinstall the rear wheel and axle. Keep everything lightly snug so you can adjust alignment.
-
Adjust chain slack using the axle adjusters equally on both sides.
Use your manual’s specified slack range and measurement method. -
Rotate the wheel several times and find the tightest point.
Measure slack there. Set slack within spec at the tight spot. -
Align the rear wheel carefully. Swingarm marks are a starting point, but not always perfectly precise.
If your bike has alignment tools/marks or you use a measuring method, be consistent side-to-side. - Torque the rear axle to spec, then recheck slack (tightening the axle can slightly change adjustment).
- Tighten adjuster lock nuts (if equipped).
Step 8: Final checks before riding
- Reinstall the front sprocket cover/guard.
- Ensure all fasteners are torqued and any locking tabs are secured.
- Lubricate the chain (wipe excess so it doesn’t redecorate your wheel).
- Spin the rear wheel by hand: look/listen for binding, clicking, or misalignment.
- Test ride gently, then recheck slack and fasteners after a short ride.
Common Mistakes (and How to Avoid Them)
1) Forgetting to loosen the front sprocket nut first
Loosening the countershaft sprocket nut is usually easiest while the old chain is still installed.
If you remove everything first, you may end up inventing new words while trying to hold the drivetrain still.
2) Over-riveting (or under-riveting) the master link
Too little flare can risk the plate walking off. Too much can crack rivet ends or bind the link.
Follow the chain maker’s flare guidance and verify free movement.
3) Using the wrong slack spec or measuring in the wrong place
Slack is measured midway between sprockets, but exact procedures vary by bike (stand type, load condition, etc.).
Your owner’s manual is the final boss here.
4) Misalignment
A misaligned wheel accelerates wear and can make the bike feel weird under power.
Take extra time aligning; your chain (and sanity) will thank you.
5) Reusing one-time locking parts
If your bike uses a lock washer/tab washer or staked hardware, replace it if the manual recommends replacement.
Locking hardware exists because motorcycles vibrate like they’re trying to shake off bad decisions.
Cost, Time, and DIY Value
A quality chain and sprocket set can range widely depending on bike and materials. DIY also often requires a chain tool and torque wrench if you don’t already own them.
The upside: once you have the tools, future chain swaps are cheaperand you’ll know the job was done carefully, not “fast and vaguely confident.”
Many riders can complete the job in an afternoon, especially after watching a couple reputable how-to videos and reading their service manual first.
For your first attempt, plan extra time. Rushing is where mistakes are born.
Aftercare: Make the New Set Last
- Check slack regularly, especially during the first few rides after installation.
- Clean and lube based on your riding conditions (rain, dust, commuting, etc.).
- Inspect sprockets occasionally for abnormal wear and ensure fasteners remain tight.
- Look for tight spots and address issues early (alignment, damaged link, incorrect riveting).
A little routine maintenance can add a lot of life to a chainkind of like stretching, but for metal.
DIY Experiences: What Riders Commonly Learn the Hard Way (Extra Notes)
If you ask a group of riders about swapping chains and sprockets at home, you’ll hear the same themes again and againusually followed by a laugh that sounds like
“I survived, but I still remember.” The most common surprise is how stubborn the front sprocket nut can be. On paper it’s just a nut with a torque spec; in real life it’s
a nut that has lived through heat cycles, road grime, and vibration, and it’s now emotionally attached to the countershaft. Many DIYers discover that a longer breaker bar
(and the correct method to keep the rear wheel from turning) is less of a “nice-to-have” and more of a “this is happening today” requirement.
Another classic experience: the first time you use a chain tool, you realize it’s not a single toolit’s a tiny mechanical personality test. Breaking the old chain often goes smoothly
only after you learn to grind or file the rivet head a bit first. Without that prep, the tool feels like it’s working… right up until it feels like it’s about to snap something expensive.
Pressing the new master-link side plate is the next “oh wow, precision matters” moment. Too loose and you’ll worry it’s unsafe; too tight and the link binds, turning your brand-new chain into
a rhythmic “tick-tick” soundtrack. Most DIYers end up pressing in small increments and comparing side-plate spacing to nearby links like they’re doing chain orthodontics.
Riveting the master link is where confidence and caution shake hands. A lot of riders describe the first rivet as a slow-motion event: quarter-turn, check, quarter-turn, check, measure, repeat.
The fear is cracking the rivet or over-flaring it, but the bigger lesson is that “correct” isn’t a vibeit’s a measurement. If you have calipers, you’ll use them. If you don’t, you’ll immediately
understand why people buy calipers. The win is when the link flexes freely afterward and looks just like the factory rivets. The relief is real.
Chain slack and alignment create their own little drama. Many riders learn that the swingarm hash marks are helpful, but not always perfectly accurate. That’s why some people measure from the swingarm pivot
to the axle or use alignment tools. Another common “aha” moment is finding the chain’s tight spot. Slack can vary as the wheel turns, and if you set slack at a loose spot, the tight spot can become
too tightpotentially stressing the drivetrain and suspension. The first time you rotate the wheel and watch the slack change, you suddenly understand why manuals insist on checking at the tightest point.
Finally, almost everyone has a story about the post-install recheck. You finish, torque everything, lube the chain, and feel like a herothen after a short ride, you measure slack again and it’s different.
That’s normal: things settle, adjusters seat, and new chains can “bed in.” The common experience is learning to do a gentle shakedown ride, then recheck slack, axle torque, and master link condition.
It’s not paranoia; it’s good craftsmanship. And once you’ve done it once, the next chain swap feels less like surgery and more like maintenancestill serious, but a lot less mysterious.
Conclusion
Replacing a motorcycle chain and sprockets yourself is one of the most satisfying DIY maintenance wins: better throttle feel, smoother power delivery, and the confidence
that your drivetrain is in great shape. Take your time, use the correct tools, follow your service manual’s torque specs and slack procedure, and treat the master link
installation like the important safety step it isbecause it is.
Do it carefully once, and you’ll have a skill you can use for years (plus a chain tool you’ll insist is “an investment,” even if it’s mostly an excuse to buy a cool tool).