Table of Contents >> Show >> Hide
- Get to Know Jack’s Shape Before You Start
- What You’ll Need
- How to Draw Jack Skellington in 11 Steps
- Step 1: Sketch a Simple Stick Figure Pose
- Step 2: Add a Big Circle for Jack’s Head
- Step 3: Block In the Torso and Hips
- Step 4: Flesh Out the Arms and Legs
- Step 5: Draw the Eye Sockets and Nose
- Step 6: Add Jack’s Famous Stitched Smile
- Step 7: Refine the Skull and Neck
- Step 8: Sketch the Bat Bow Tie and Collar
- Step 9: Draw the Suit, Coattails, and Details
- Step 10: Ink Your Drawing and Erase Guidelines
- Step 11: Shade and Add a Spooky Background
- Quick Tips for a Better Jack Skellington Drawing
- Fun Variations to Try
- Common Mistakes (and How to Fix Them)
- Real-Life Drawing Experience: What I Learned from Sketching Jack
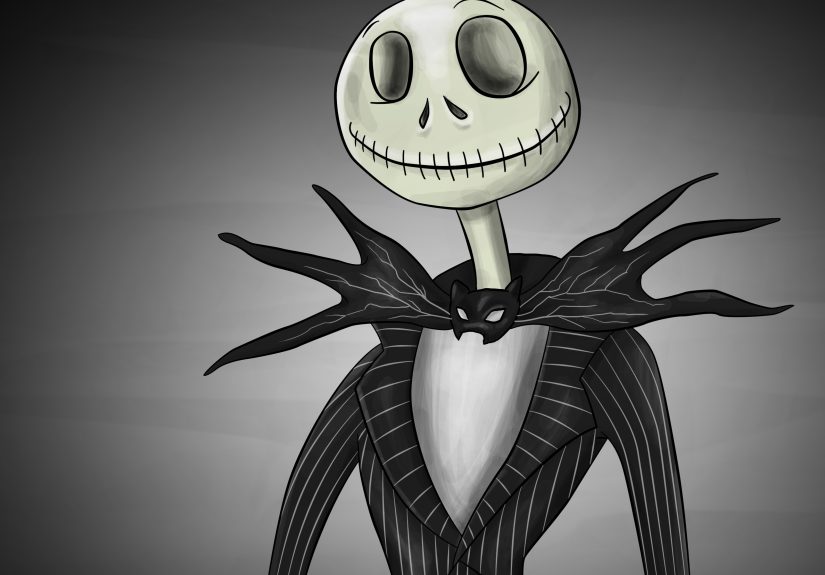
If you’ve ever watched The Nightmare Before Christmas and thought, “Wow, I wish I could draw Jack Skellington without him looking like a lopsided lollipop,” you’re in the right place. In this guide, we’ll walk through how to draw Jack in 11 clear steps, using simple shapes and easy art tips. Whether you’re sketching for Halloween decorations, fan art, or just because you love the Pumpkin King, this tutorial will help you get his spooky charm just right.
Get to Know Jack’s Shape Before You Start
Jack Skellington is basically a walking design lesson in exaggeration. He has:
- A large, perfectly round skull with huge empty eye sockets
- A thin, stick-like neck and extremely long limbs
- A narrow, V-shaped torso in a pinstripe suit
- His signature stitched smile and bat-shaped bow tie
Keep those features in mind as you draw. Jack isn’t about realistic anatomy; he’s all about spooky elegance and stretchy proportions. If he looks slightly unnatural, that’s a good sign he’s a skeleton, after all.
What You’ll Need
- Sketching paper or a sketchbook
- Pencil (HB or 2B is great for sketching)
- Eraser (kneaded or regular)
- Black fineliner or pen for inking
- Black and gray colored pencils or markers
- Optional: ruler or straightedge for background elements
How to Draw Jack Skellington in 11 Steps
Imagine there’s a picture next to each stepbecause if you were turning this into a full tutorial, you’d snap a photo after every stage. For now, follow along and visualize the progress as you go.
-
Step 1: Sketch a Simple Stick Figure Pose
Start with a light stick figure. Draw a vertical line for Jack’s spine, then a small horizontal line for the shoulders and another for the hips. Add long lines for the arms and legs. Jack is very tall and lean, so exaggerate the length of his limbs and keep everything slender. Decide if you want him standing straight, leaning, or gesturing dramatically with one hand.
Don’t worry about details yet; this is just the skeleton of your skeleton.
-
Step 2: Add a Big Circle for Jack’s Head
On top of the spine, draw a large circle for the skull. Make it bigger than you think you shouldJack’s head is oversized compared with his body. Lightly add a vertical guideline down the center of the circle and a horizontal guideline across the middle. These will help you place the facial features later.
-
Step 3: Block In the Torso and Hips
Turn the shoulder line into a narrow, upside-down triangle for Jack’s chest. The point of the triangle should face downward, where his slim waist will be. Below that, sketch a small, slightly wider shape for the hips. Think of his torso as a stylized suit, not a realistic ribcage. Keep everything narrow to emphasize his tall, bony look.
-
Step 4: Flesh Out the Arms and Legs
Using your stick-figure lines as a guide, draw Jack’s arms and legs as long, thin cylinders or tapered tubes. They should look almost like straight lines, with just a slight curve at the elbows and knees. Add simple shapes for his hands: small ovals for palms and long, thin rectangles or “stick” shapes for fingers. Don’t fuss over every knuckle yetjust get the basic shapes in place.
-
Step 5: Draw the Eye Sockets and Nose
Go back to the head. Inside the circle, draw two large, slightly tilted ovals for Jack’s eye sockets. They should sit on the horizontal guideline and be evenly spaced across the vertical one. Make them big and empty; that hollow, expressive look is a big part of Jack’s charm.
For the nose, draw two small, vertical ovals or “teardrop” shapes near the center of the face, just below the eye line. They shouldn’t touchthink of them as two tiny holes in the skull.
-
Step 6: Add Jack’s Famous Stitched Smile
Draw a long, curved line that stretches from one side of the face to the other. This is Jack’s mouth. It should curve upward slightly at the ends to give him that mischievous, mysterious expression.
Then, add small vertical lines crossing the mouth line to create stitches. Space them evenly, like railroad ties across the smile. You can add more or fewer stitches depending on your style, but keep them fairly thin and neat.
-
Step 7: Refine the Skull and Neck
Clean up the outline of the skull. Smooth the circle into a slightly more skull-like shape, but don’t overcomplicate itJack’s head is basically a round ball with a subtle jaw curve at the bottom. Erase extra guidelines that you no longer need.
Below the head, draw a narrow, cylindrical neck. It should look long but not thickthink “pencil neck” and you’re close. Connect the neck to the top of the torso.
-
Step 8: Sketch the Bat Bow Tie and Collar
At the base of Jack’s neck, draw a small oval or diamond shape for the center of the bow tie. From each side, extend two bat wings. The wings should be jagged, with pointed tips to resemble a stylized bat in flight.
Then, draw the sharp, pointed suit collar behind the bow tie. The collar usually forms two long triangles that frame his neck and chest. This detail gives him that elegant, spooky formalwear vibe.
-
Step 9: Draw the Suit, Coattails, and Details
Refine the torso into a suit jacket. Add a center seam, a few buttons, and long coattails that extend down from his hips. The tails can flare out slightly to suggest movement, especially if you drew Jack in a dramatic pose.
Add pinstripes to the suit by drawing thin, straight lines running down the jacket, sleeves, and pants. Don’t stress about perfect spacingslight irregularities can give the drawing a hand-drawn, lively feel. Just keep the stripes generally parallel and vertical.
-
Step 10: Ink Your Drawing and Erase Guidelines
Once you’re happy with the sketch, go over your final lines with a black pen or fineliner. Trace the outline of the head, facial features, suit, bow tie, and limbs. Use slightly thicker lines for the outer edges and thinner lines for inner details like pinstripes and stitches to create depth.
When the ink is completely dry, gently erase the pencil lines. You should be left with a clean, bold Jack Skellington drawing ready for shading or color.
-
Step 11: Shade and Add a Spooky Background
With your black and gray pencils or markers, add soft shading around the edges of Jack’s skull, under the eyes, and beneath the neck to suggest depth. Light shading along one side of his body can give him a gentle spotlight effect, as if he’s standing in front of the moon.
For extra atmosphere, sketch in a simple background: the iconic curled hill, a glowing full moon, some pumpkins, or a graveyard. Keep the background shapes simple so Jack remains the star of your drawing.
Quick Tips for a Better Jack Skellington Drawing
1. Don’t Be Afraid to Exaggerate
Jack is all about exaggerated proportions. If he looks too “normal,” stretch his limbs a bit more, narrow his torso, or enlarge his head. A slightly unreal body makes him feel more like the Pumpkin King and less like a guy in a cheap costume.
2. Keep the Eyes Expressive
Even though Jack technically doesn’t have pupils, you can change his expression with the shape and tilt of his eye sockets. Tilt them up at the outer corners for a friendlier look, or angle them downward for a more ominous expression. Slight adjustments go a long way.
3. Use Reference Images
Having a screenshot or official artwork nearby helps you capture his personality. Try pausing the movie or using a still image as a reference for his posture, outfit, and facial expression. You’re not copying; you’re studying how his design works.
4. Practice the Head Separately
If the full figure feels overwhelming, practice drawing just Jack’s face a few times. Once you get comfortable with the circle, eyes, nose, and stitched smile, adding the body becomes much easier.
Fun Variations to Try
- Chibi Jack: Make the head bigger and the body shorter for a cute, cartoonish version.
- Jack in a Santa Hat: Draw the classic red Santa hat and a fluffy collar to reference his “Sandy Claws” look.
- Jack with Zero: Add his ghost dog floating by his side for extra Halloween-town charm.
- Silhouette Style: Fill Jack in completely black against a bright moon background for a strong graphic look.
Common Mistakes (and How to Fix Them)
Head Too Small
If Jack’s head looks tiny, don’t be afraid to redraw it larger. His design is intentionally top-heavy. A bigger skull makes his tall, thin body feel more dramatic rather than awkward.
Arms and Legs Too Thick
If his limbs feel bulky, lightly erase and slim them down. Imagine you’re drawing lines of wire or dry twigs instead of full muscles. Thin, smooth limbs are key to making him recognizable.
Flat-Looking Face
Add gentle shading under the eyes, across the bottom of the skull, and around the edges to suggest roundness. Even simple crosshatching or soft pencil smudging can keep his head from looking like a cardboard cutout.
Real-Life Drawing Experience: What I Learned from Sketching Jack
Drawing Jack Skellington is one of those projects that looks easy at first glance“It’s just a skeleton in a suit!”and then humbles you the moment you start. The first time I tried to sketch him, his head looked more like a squashed potato, and his legs were two completely different lengths. But that’s exactly why he’s such a great character to practice with: every little adjustment teaches you something about proportion, balance, and style.
One of the biggest lessons I learned was the value of starting with gesture lines. Before worrying about details like pinstripes or the bat bow tie, I focused on the flow of the pose. A quick stick figure helped me decide whether Jack was standing proudly, leaning forward, or gesturing like he was about to break into song. When the pose felt right, everything else fell into place more easily. If the underlying gesture looked stiff, no amount of fancy shading could fix it.
I also realized how much personality you can squeeze out of simple shapes. Jack doesn’t have pupils, eyebrows, or a detailed nose, yet he can look curious, worried, excited, or mischievous depending on how you tweak the curve of his mouth or the tilt of his eye sockets. I spent a full sketching session just drawing headsno bodiesexperimenting with subtle changes. Some versions looked like he was plotting Christmas; others looked like he was questioning all his life choices. It was a great exercise in expressive design.
Another helpful moment came when I switched from paper to digital drawing. On a tablet, I could instantly undo, resize, and warp shapes, which made it easier to test different proportions. I’d draw his head, realize it needed to be 20 percent bigger, then quickly transform it without redrawing everything. After that experiment, I went back to traditional paper and pencil with a better understanding of what proportions worked. Even without the undo button, my hand “remembered” what felt right.
Teaching this character to kids is also surprisingly fun. Younger artists tend to worry that their drawing has to match the “official” version exactly. With Jack, I encourage them to lean into their own style: if their skull is a little more oval, or the smile stretches extra wide, that’s fine. We talk about how Tim Burton’s character designs are intentionally quirky and offbeat, so a slightly imperfect Jack actually fits the spirit of the movie. By the end of a lesson, you typically have a whole lineup of unique Pumpkin Kings, each with its own charm.
Finally, drawing Jack reminded me that fan art can be a powerful way to practice fundamentals. You’re not just copying a character you love; you’re training your eye to see shape, proportion, and contrast. Each time you sketch himmaybe with a new pose or a different backgroundyou sharpen your skills a little more. And if your first attempt ends up looking like Jack Skellington’s distant cousin who had a rough night? No problem. That’s what erasers, new sheets of paper, and second tries are for.