Table of Contents >> Show >> Hide
- What “Creative Commons” Means on YouTube
- How to Find Creative Commons Videos on YouTube in 4 Easy Steps
- Common Mistakes to Avoid
- How to Reuse Creative Commons YouTube Videos More Safely
- Bonus Tip for Power Users: Use the YouTube Data API
- Quick FAQ
- Conclusion
- Experience Add-On: Real-World Scenarios and Lessons Learned (500+ Words)
Need video clips for a school project, a YouTube edit, a presentation, or a blog postand don’t want a copyright surprise waiting in your inbox like an uninvited raccoon? You’re in the right place.
YouTube makes it possible to find videos published under a Creative Commons license, but the process is not always obvious if you’re new to the platform (or if YouTube moved a button again while nobody was looking). The good news: once you know where the filters live and what to check in the video description, it becomes a fast, repeatable workflow.
In this guide, you’ll learn 4 easy steps to find Creative Commons videos on YouTube, plus how to verify the license, avoid common mistakes, and give proper credit so you can reuse content more confidently.
What “Creative Commons” Means on YouTube
Before jumping into the steps, let’s clear up one thing: Creative Commons is not the same as “free for anything.” It’s a licensing system that lets creators give permission for reuse under specific rulesmost importantly, attribution (credit).
On YouTube, creators can choose a Creative Commons Attribution license for eligible videos. That means other users may be allowed to reuse the content, including in some commercial contexts, as long as they follow the license terms and credit the original creator properly.
Translation: “Free to reuse” still comes with homework. The homework is called attribution.
How to Find Creative Commons Videos on YouTube in 4 Easy Steps
Step 1: Search for the Topic You Need (Be Specific)
Start with a normal YouTube search, but use a phrase that matches the footage you actually want. The more specific you are, the better the results.
Examples of smart searches:
- “sunset drone footage city skyline”
- “typing on laptop b-roll office”
- “rain sounds black screen”
- “classroom science experiment close up”
If your first search is too broad, YouTube may return a soup of unrelated videos, Shorts, and random content with titles like “EPIC VLOG #274.” Save yourself time and add context words like b-roll, footage, tutorial, timelapse, or no copyright (even though “no copyright” is not a legal license by itself).
Pro tip: search for the visual subject first, then filter by license. Don’t rely only on the phrase “Creative Commons” in the search box because many uploaders don’t put it in their titles.
Step 2: Open Filters and Choose “Creative Commons”
This is the step most people miss.
- Run your YouTube search.
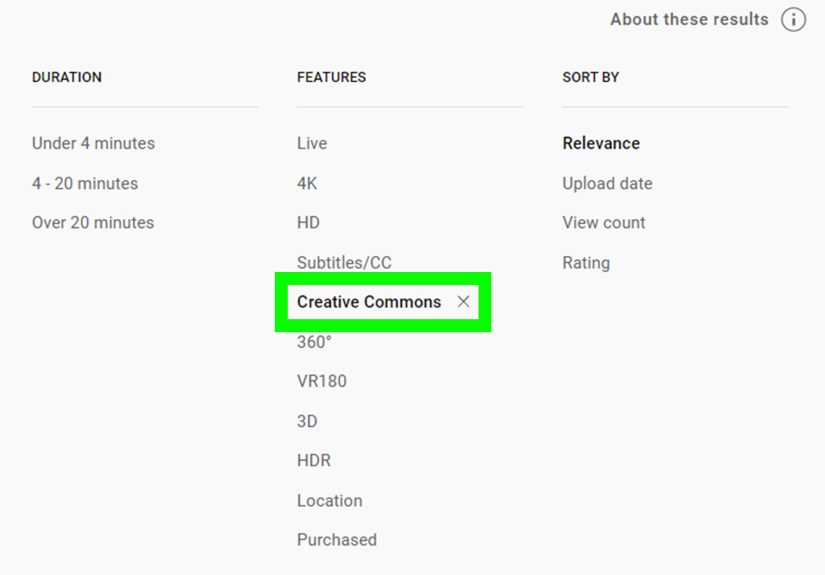
- Click Filter (desktop) above the results.
- Find the license-related filter options and select Creative Commons.
Once selected, YouTube will narrow the results to videos that are marked with a Creative Commons license.
Important: The YouTube interface changes over time, and filters can look slightly different depending on device, app version, and region. On mobile apps, filter menus may emphasize things like Upload Date, Type, Duration, and Subtitles/CC. If you don’t see a Creative Commons option in the app, switch to desktop or use the mobile browser version for a more complete workflow.
Also, don’t confuse Subtitles/CC with Creative Commons. “CC” in subtitles means closed captions, not the Creative Commons license. Same letters. Very different consequences.
Step 3: Open the Video and Verify the License in the Description
Filtering helps, but verification is the real safety step.
After you click a video, check the description area (and any “Show more” sections). YouTube’s own help guidance recommends checking the video description for license information. This is where you confirm whether the video is actually listed under a Creative Commons license and identify the creator details you’ll need for attribution.
What to check before downloading or reusing:
- License label (look for Creative Commons / attribution wording)
- Creator/channel name (who owns the upload)
- Video title (you’ll need this for credit)
- Source URL (the video link itself)
- Any extra requirements in the description (some creators ask for credit in a certain format)
If the description is vague, missing, or looks suspicious (“free use bro trust me”), slow down. A proper CC workflow is based on clear licensing and attribution info, not vibes.
Another smart move: check whether the video contains third-party material (music, movie clips, logos, or TV footage). Even if the upload is marked one way, mixed-content videos can still create rights headaches.
Step 4: Save Attribution Info Before You Use the Video
This step is boring, but it saves lives. (Okay, maybe not lives. Definitely edits.)
Before you download, clip, or remix anything, copy the credit information into a note. Creative Commons best-practice guidance often recommends using the TASL format:
- Title
- Author
- Source
- License
This gives you a clean record for your video description, blog post, slide deck, or class assignment. It also makes you look like someone who actually reads the instructions (rare and powerful).
Simple attribution template (copy and reuse):
“[Video Title]” by [Creator/Channel Name], via YouTube ([source URL]), licensed under Creative Commons Attribution.
If you edited the clip, it’s a good idea to add a note like “cropped,” “trimmed,” “color-adjusted,” or “combined with other footage.” That makes your credit more transparent and more professional.
Common Mistakes to Avoid
1) Mixing up Closed Captions (CC) with Creative Commons (CC)
This is the classic trap. YouTube’s filter menus may show “Subtitles/CC,” and that means captions, not licensing. Captions help accessibility. They do not grant reuse rights.
2) Assuming all YouTube videos can be reused if you “give credit”
Credit is required for many licenses, but credit alone does not override copyright. Most YouTube videos are uploaded under the standard YouTube license, not Creative Commons.
3) Skipping the description check
The search filter is useful, but the description is where you verify the details you’ll need. Make it a habit: Filter first, verify second, use third.
4) Forgetting that music can trigger separate issues
Even when a video is reusable, music inside that video can create separate copyright problems. YouTube’s Content ID system may automatically detect matches and apply actions like monetization, blocking, or tracking.
5) Not keeping a screenshot or note of the license info
YouTube pages can change. Descriptions can be edited. A quick screenshot and a saved note give you a record of what you saw when you used the video.
How to Reuse Creative Commons YouTube Videos More Safely
Finding Creative Commons videos is only half the job. Reusing them responsibly is what keeps your project clean and your stress level low.
Best Practices for Safer Reuse
- Use the original source link in your attribution whenever possible.
- Credit in a visible place (video description, credits screen, article footer, or slide notes).
- Be specific about edits if you changed the footage.
- Double-check commercial use if your project is monetized or client-facing.
- Keep an attribution log for all reused media in one document.
If you’re building content at scale (YouTube channels, agencies, school media teams), create a simple spreadsheet with columns for Title, Creator, URL, License, Date Accessed, and Notes. Five minutes of organization now can save five hours later.
Bonus Tip for Power Users: Use the YouTube Data API
If you’re a developer (or working with one), YouTube’s Data API can filter video results by license using the videoLicense parameter. There’s even a creativeCommon option for returning only Creative Commons videos.
This is especially useful for:
- Content research tools
- Automated media collection workflows
- Internal dashboards for editors or teachers
- Large-scale video curation projects
If that sounds too technical right now, no problemstick with the 4-step manual method above. It works great for everyday use.
Quick FAQ
Can I monetize a video that includes Creative Commons footage?
In many cases, yesif the license terms allow commercial use and you follow attribution requirements. But always verify the license and watch for third-party content issues, especially music.
Does a Content ID claim mean I got a copyright strike?
No. A Content ID claim is not the same thing as a copyright strike. They are different systems on YouTube.
Can I just write “credits to the owner”?
That’s not enough. Use a real attribution with the title, creator, source, and license. The more precise your credit, the better.
What if I can’t find the license info anymore?
If the page changed and you don’t have a record, it’s safer to pause and verify before publishing. This is why saving attribution details at the time of use is so important.
Conclusion
Finding Creative Commons videos on YouTube is easy once you know the routine: search, filter, verify, and credit. Those four steps help you move faster without gambling on copyright issues.
The biggest mistake people make is treating “free-looking” content like “free-to-use” content. Don’t do that. Use the Creative Commons filter, check the description, record your attribution, and you’ll be in much better shape for class projects, content marketing, YouTube videos, and creative edits.
In short: be creative, but keep receipts.
Experience Add-On: Real-World Scenarios and Lessons Learned (500+ Words)
One of the most common experiences with Creative Commons videos on YouTube is how quickly the process goes from “easy” to “wait… what does this mean?” the first time someone tries it. New creators often start with the right intentionthey want legal footage, they want to credit people, and they don’t want copyright troublebut they assume YouTube will make every license detail obvious. Sometimes it does. Sometimes it absolutely does not.
A typical example is a student building a class presentation. They search for “volcano eruption footage,” find a great clip, and assume that because it appears in search results it can be used. Later, they realize the video is under the standard YouTube license, not Creative Commons. The fix is simple (go back, apply filters, verify the description), but the lesson sticks: search results are not permission. The filter and the description are the permission trail.
Another common experience happens with beginner YouTubers creating commentary or faceless videos. They find reusable clips, edit them well, add a voiceover, and feel confidentuntil they remember they forgot to save the source links. Then comes the scavenger hunt: checking browser history, searching YouTube again, opening ten tabs, and trying to remember which clip came from which channel. This is exactly why experienced editors build a small attribution routine. Even a basic notes app works: copy the title, creator name, video URL, and license note as soon as you choose the clip. It feels slow for the first few projects, but it becomes second nature and saves a ton of time later.
A third scenario shows up in monetized content. A creator uses a clip that appears to be licensed for reuse, gives proper credit, and still receives a Content ID claim because of music or another element inside the footage. This can be confusing and frustrating, especially for newer creators who think attribution should prevent all claims. In practice, attribution is necessary, but it does not magically neutralize every third-party issue. The experience teaches an important workflow habit: review the actual content, not just the label. If a clip contains popular music, TV audio, or layered content from multiple sources, treat it with extra caution.
Teams and agencies often learn a different lesson: consistency beats memory. When multiple people edit content, one person may credit perfectly while another writes “source: YouTube.” That inconsistency creates risk. The best teams solve this by using a shared attribution format and a simple tracking sheet. Once the team agrees on a standard TASL-style credit template, quality improves immediately. Credits become cleaner, publishing gets faster, and nobody has to guess what “good enough” means.
There’s also a positive side to all of this. Creators who learn how to find and credit Creative Commons videos properly usually become much more efficient content researchers overall. They start writing better search queries, filtering results faster, and organizing media in a way that scales. In other words, this is not just a copyright skillit’s a production skill. It helps with editing speed, project management, and professional habits.
The big takeaway from these real-world experiences is simple: the 4-step process works, but it works best when paired with a repeatable system. Search smart. Filter by Creative Commons. Verify the description. Save attribution immediately. That little routine is what separates “I hope this is okay” from “I know exactly where this clip came from and how I’m allowed to use it.”