Table of Contents >> Show >> Hide
- Why Cabinet Crown Molding Is Worth the Effort
- Tools and Materials Checklist
- Before You Cut Anything: Plan Like a Pro
- Cutting Crown Molding for Cabinets (Without Losing Your Mind)
- Step-by-Step: How to Install Kitchen Cabinet Crown Molding
- Finishing: The Difference Between “DIY” and “Dang, That Looks Pro”
- Troubleshooting Common Crown Molding Problems
- Quick FAQ
- Conclusion
- Real-World Experiences: What DIYers Learn the Hard Way (So You Don’t Have To)
Kitchen cabinets without crown molding can look a little… unfinished. Like you wore a suit but forgot the belt. Cabinet crown molding is that crisp,
architectural “top hat” that closes the gap to the ceiling (or at least distracts your eye from it) and makes even budget cabinets look more custom.
The good news: installing kitchen cabinet crown molding is totally DIY-friendly if you plan your cuts, keep the molding’s angle consistent, and accept
one universal truthyour kitchen corners are almost certainly not perfectly square. (They never are. It’s a law of physics.)
Why Cabinet Crown Molding Is Worth the Effort
Crown molding on kitchen cabinets does three big things:
- Makes cabinets look taller and more “built-in” by finishing the top edge cleanly.
- Helps hide small gaps between cabinet tops and ceiling lines (especially in older homes).
- Adds stylefrom simple modern profiles to classic multi-piece stacks.
Tools and Materials Checklist
Tools
- Miter saw (or compound miter saw)
- Measuring tape and pencil
- Speed square or combination square
- Level (or laser level if you’re feeling fancy)
- Nail gun (brad/finish) or hammer and finish nails
- Coping saw (highly recommended for inside corners)
- Caulk gun
- Sandpaper (120–220 grit)
- Stud finder (optional, more useful for wall crown than cabinet crown)
Materials
- Crown molding (wood, MDF, or polyurethanepick what matches your cabinets and budget)
- Wood glue or construction adhesive (light use; don’t go full peanut-butter mode)
- 1×2 or 1×4 backing strips / build-up boards (often needed for cabinet crown)
- Wood filler (for stain-grade) or lightweight spackle (for paint-grade)
- Paintable caulk
- Primer and paint (or stain/clear coat, if stain-grade)
Optional “Make Life Easier” Items
- Angle finder (for weird corners)
- Painter’s tape
- Extra scrap molding for test cuts
- Scribe molding (thin trim to hide gaps near ceilings)
Before You Cut Anything: Plan Like a Pro
1) Measure cabinet runs (and buy extra)
Measure the total linear footage across the tops of your upper cabinetsinclude long runs, returns on cabinet sides, and any “wraps” around a cabinet
that ends in the open. Then add waste. For cabinet crown, 10–15% extra is a solid baseline; bump to 20% if you’re new to coping or
your layout has lots of corners.
Example: You measure 34 linear feet total. Add 15%: 34 × 1.15 = 39.1 feet. Round up to 40 feet. The leftover isn’t waste; it’s your
insurance policy against “oops.”
2) Know your crown molding “spring angle”
Crown molding sits at an angle between the cabinet face and the “ceiling plane” (or the build-up strip you attach). That angle is called the
spring angle. Common spring angles are 38°/52° (very common) or 45°/45°. If you’re not sure what
you have, check the packagingor do a quick test with scrap pieces and an angle finder.
Why this matters: consistent spring angle = consistent fit. If you hold the molding slightly differently from cut to cut, your corners will open up and
you’ll invent new words.
3) Decide how you’ll attach it: direct-to-cabinet vs. build-up strips
Many modern cabinets have full overlay doors that leave little “lip” at the top for nailing. That’s why a lot of cabinet crown installations use
backing strips (often 1x2s or 1x4s) attached to the cabinet tops. The strips give you:
- A wider surface to nail into
- More control over how far the crown drops down the cabinet face
- A cleaner look (less chance of nails landing in awkward spots)
If your cabinet tops are hidden by a soffit, you might attach crown directly to the face frame or cabinet box. But if the cabinet top is open to the
ceiling, build-up strips are often the difference between “custom finish” and “why is this wiggling?”
4) Mark a consistent reference line
Cabinets can be level while ceilings are not. If you’re running crown up to the ceiling, you may need to “split the difference” visually. Use a level or
laser to mark a light reference line across cabinet runs where the bottom edge of your crown will land. This helps keep everything aligned, especially
across multiple cabinet sections.
Cutting Crown Molding for Cabinets (Without Losing Your Mind)
The two cutting approaches
-
Nested (upside-down) cutting: You hold the crown upside down against the miter saw fence as if the fence is the wall and the saw table
is the ceiling. This avoids complex bevel settings, but you must hold the molding at the correct spring angle every single time. -
Compound cutting: You set both miter and bevel angles on a compound miter saw. This can be very accurate, but it’s easier to mess up if
you’re not consistent with spring angle and charts/settings.
For most DIY cabinet crown installs, nested cutting is popular because it’s simpler once you create a quick jig or stop block to hold the crown at the
correct angle. Whichever method you choose, do test cuts on scrap first.
Inside corners: cope them (your future self will thank you)
Inside corners on cabinets are rarely perfect. Even if your cabinets are square, the walls behind them might not be. A coped joint
usually fits tighter and stays looking good longer than a mitered inside corner.
- Cut the first piece square (a straight cut) and install it into the corner.
- On the mating piece, cut a 45° miter as if you were making an inside-corner miter.
- Darken the mitered edge with pencil so the profile line is easy to see.
- Use a coping saw to cut along the profile line, removing the back material so the face profile “hooks” over the first piece.
- Lightly back-cut (angle the coping cut) so only the front edge makes contact for a tight seam.
- Test fit, trim as needed, then install.
This sounds intimidating until you do it once. After that, coping becomes your secret weapon for corners that are “90-ish degrees.”
Outside corners: clean miters (and don’t assume 45°)
Outside corners are usually mitered. But here’s the trap: not all outside corners are exactly 90°. If you cut two perfect 45° miters and your corner is
92°, the joint will open like a clam.
If your corner angle is off, use an angle finderor make a quick template method: hold overlapping boards at the corner, mark the meeting line, and use
that line to set your saw angle. The goal is simple: match your kitchen, not an imaginary perfect kitchen.
Long runs: use scarf joints instead of butt joints
If one cabinet run is longer than your molding length, don’t butt two pieces together end-to-end. Use a scarf joint (typically 45°),
overlap the pieces, and place the joint where it’s least noticeable. A scarf joint hides the seam better and resists separating over time.
Step-by-Step: How to Install Kitchen Cabinet Crown Molding
Step 1: Add backing strips (if needed)
Attach 1×2 or 1×4 strips to the tops of your cabinets where the crown will nail. Use wood glue and brad/finish nails. Keep the strips consistent so the
crown sits at the same height across runs. If your crown needs to drop down farther to look proportional, build the strips out accordingly.
Step 2: Dry-fit everything (yes, everything)
Dry-fitting is where you catch mistakes while they’re still “mistakes” and not “permanent memories.” Hold each cut piece in place before nailing. Check:
- Corner fit (tight seams)
- Consistent height across cabinet faces
- Alignment along the run (no twisting)
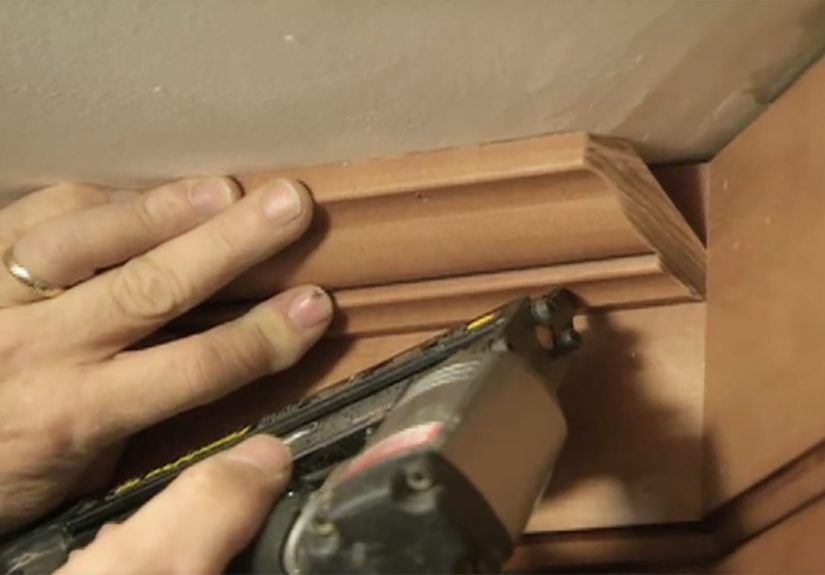
Step 3: Install the first straight piece
Start with the longest straight run if possible. It sets the visual line for the rest. Apply a thin bead of glue to contact surfaces (optional but helpful),
position the crown, and tack it with nails into the backing strip and/or cabinet frame.
Nail spacing: about every 8–12 inches is typical, plus near joints. Don’t overdo it. You want secure, not “pincushion chic.”
Step 4: Work outward, one corner at a time
After the first piece, install adjacent pieces that connect to it. For inside corners, install the square-cut piece first, then the coped piece. For outside
corners, sneak up on a perfect miter with test cuts. If you cut slightly long, you can trim. If you cut short… congratulations, you’ve made a very expensive
sample.
Step 5: Add returns on exposed cabinet ends
If a cabinet run ends and the crown molding is visible from the side, you’ll want a returna small piece that wraps back to the cabinet so
you don’t see end grain. Returns can be fiddly, but they’re the detail that makes it look finished.
- Cut the miter for the end of the run.
- Cut a tiny matching mitered piece that “returns” to the wall/cabinet face.
- Glue the return piece in place and pin it with a brad nail if possible.
Step 6: Check for gaps and decide: trim, caulk, or scribe
Small gaps happen. Decide how to handle them:
- Micro gaps at seams: paintable caulk (paint-grade only)
- Larger gaps at ceiling line: scribe molding or a second trim piece
- Bad corner fit: recut or re-cope (don’t try to “caulk your way out” of a 1/4-inch problem)
Finishing: The Difference Between “DIY” and “Dang, That Looks Pro”
Fill nail holes the right way
Use wood filler for stain-grade molding and paintable spackle or filler for paint-grade. Let it dry fully, sand smooth, and wipe dust away. If you’re
painting, primer helps prevent “ghosting” where patched areas show through.
Caulk the seams (for paint-grade installs)
Run a thin bead of paintable caulk along seams where crown meets cabinets and at joints. Smooth with a damp finger or caulk tool. Let it cure per the label
before painting.
Paint or touch up
For the cleanest finish, many people prime/paint crown before installing, then do a final touch-up after filling and caulking. If you install raw wood and
then paint everything, protect countertops and backsplashes wellpaint has a mysterious ability to teleport.
Troubleshooting Common Crown Molding Problems
Problem: My inside corner has a gap
- Fix: Cope the corner (or re-cope) instead of relying on a perfect miter.
- Tip: Back-cut the cope slightly so the front edge closes tight.
Problem: My outside corner opens at the face
- Fix: Your corner probably isn’t 90°. Measure the angle and split it for your miter settings.
- Tip: Sneak up on the cut with test scraps. Your saw lies sometimes.
Problem: Crown looks wavy across cabinets
- Fix: Use a reference line and ensure backing strips are consistent.
- Tip: If ceilings are uneven, consider adding scribe molding at the top edge.
Problem: Pieces shift when I nail them
- Fix: Use more secure backing, and tack one end first, then align and nail along the run.
- Tip: A helper holding the far end can save you from wrestling 10 feet of trim solo.
Quick FAQ
Should I use glue, nails, or both?
Nails are the main mechanical hold. A small amount of glue helps keep seams tight and reduces the chance of movement. Avoid heavy adhesive blobs that squeeze
out everywhere.
What nail size should I use?
It depends on your crown thickness and what you’re nailing into, but brad/finish nails commonly range around 1 1/4″ to 2″. The goal is to bite into the
backing strip or cabinet frame without blasting through the other side.
Do I have to cope inside corners?
You don’t have to, but coping is usually more forgiving and gives tighter-looking joints when things are slightly out of squareso it’s strongly
recommended.
What if my cabinets stop short of the ceiling?
That’s normal. Crown molding can still work beautifully. You may choose a taller profile or a stacked (multi-piece) crown build-up to bridge the visual gap,
or add a thin scribe at the top edge if the ceiling line is uneven.
Conclusion
Installing kitchen cabinet crown molding is part measurement, part geometry, and part “please let this corner behave.” The winning formula is:
plan carefully, keep your spring angle consistent, test cuts on scrap, cope inside corners, and finish with clean caulk and touch-up paint.
Do it right, and your cabinets will look like they came that way from day onejust with fewer factory robots and more sawdust in your socks.
Real-World Experiences: What DIYers Learn the Hard Way (So You Don’t Have To)
Let’s talk about the stuff that doesn’t show up in the “perfect” tutorial photosthe real-life moments that happen when you’re standing on a step stool,
holding crown molding with one hand, trying to operate a nail gun with the other, and wondering if pizza delivery counts as a finishing tool.
First experience: the left/right confusion is real. Crown molding is basically symmetrical chaos. Many people cut a beautiful angle… on the
wrong end. The fix is simple: label everything. Mark each piece with “top,” “bottom,” “left end,” and “right end,” and write where it goes:
“over sink,” “left of hood,” etc. It feels excessive until it saves you $40 in trim.
Second: test cuts are not optional. Almost everyone who skips test cuts eventually ends up doing “test cuts” anywayexcept the test cut is
now your actual molding. Make a couple of short scrap pieces your official practice crew. Dial in your saw setup, your spring angle, and your confidence.
Third: your corners are lying to you. A corner that looks square often isn’t. This is why coping inside corners becomes a “why didn’t I do
this sooner” moment. People who try to miter every inside corner often end up filling gaps, sanding, filling again, and still noticing the seam every time
they make coffee. Coping doesn’t magically make you a trim carpenter, but it makes your joints way more forgiving.
Fourth: backing strips are the unsung heroes. If you have full overlay doors or minimal cabinet face frame to nail into, adding a backing
strip feels like “extra work” until the crown suddenly has something solid to grab. Many DIYers report that once backing is installed, the actual crown
installation goes from “wrestling match” to “okay, I get it now.”
Fifth: cut long, sneak up. The most common regret is cutting pieces to the exact measurement on the first try. In trim work, “exact” is a
moving target because tiny angle changes alter where the ends land. Cutting slightly long and trimming down is the calmer path. Cutting short is the path of
making “creative design choices,” like suddenly adding a decorative block you didn’t plan for.
Sixth: finishing is where the magic happens. The install can be pretty good, but the caulk/fill/sand/paint stage is what makes people say,
“Wait… you did this yourself?” A thin bead of paintable caulk at the right seams, nail holes filled smoothly, and a clean coat of paint can hide a whole
lot of minor imperfections. (Not a 1/4-inch gap. But, you know, the normal human stuff.)
Finally: pace yourself. Crown molding projects go better when you treat them like a series of small wins: one run, one corner, one return.
Most folks who end up frustrated tried to do everything in one marathon session. Trim work rewards patience. Also snacks. Definitely snacks.