Table of Contents >> Show >> Hide
- What “Shiplap” Means for a Ceiling (and Why It’s Different Than a Wall)
- Before You Buy Boards: Plan Like a Person Who Likes Free Weekends
- Tools and Supplies Checklist
- Prep Work: The Part That Makes the Install Look “Pro”
- How to Install Shiplap on a Ceiling (Step-by-Step)
- Step 1: Plan your first row and expansion gaps
- Step 2: Cut and pre-finish if you’re painting or staining
- Step 3: Install the first board
- Step 4: Continue rows and stagger seams
- Step 5: Keep boards tight and straight
- Step 6: Cut around lights, vents, speakers, and fans
- Step 7: Install the last row (the “math row”)
- Finishing: From “Boards on Ceiling” to “Wow, That Looks Intentional”
- Troubleshooting Common Shiplap Ceiling Problems
- Time, Cost, and Realistic Expectations
- Conclusion
- Real-World Experiences and Lessons (The 500-Word “What People Wish They Knew” Section)
- SEO Tags
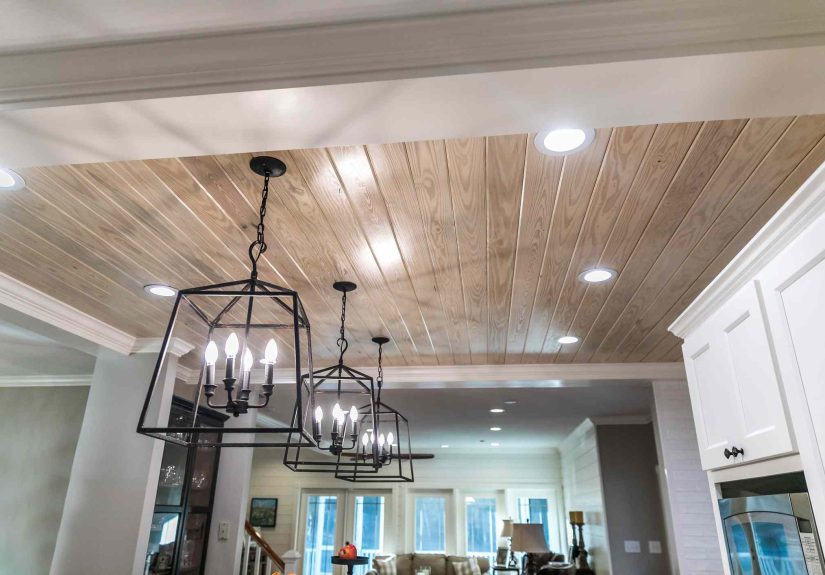
A shiplap ceiling is the home-improvement equivalent of putting on a crisp white shirt: instantly cleaner, brighter,
and somehow your living room starts acting like it has its life together. It can warm up a plain space, cover a tired
ceiling texture, and add that “I totally meant to do that” architectural detailwithout requiring you to become a full-time carpenter.
This guide walks you through how to install shiplap on a ceiling the right way: planning, prep, layout, fastening,
cutouts for lights and vents, finishing, and the mistakes that make people invent brand-new words. I’ll keep it fun,
but the steps are real and field-tested. (Safety note: if you’re a teen, do this with an experienced adultceilings,
ladders, and power tools are not a “learn by vibes” situation.)
What “Shiplap” Means for a Ceiling (and Why It’s Different Than a Wall)
Shiplap boards have a rabbeted edge so each board overlaps the next. On a ceiling, gravity is the main character,
so your fastening strategy matters more than it does on a wall. You want boards that stay tight, don’t sag, and don’t
telegraph every wavy joist line like a confession.
Common shiplap ceiling materials
- Real wood (pine, cedar, poplar): Classic look, easy to cut, can move with humidityacclimation matters.
- Pre-primed / prefinished boards: Faster finish work, fewer ladder trips with a paintbrush.
- MDF shiplap-style planks: Smooth and paint-friendly, but not ideal in damp spaces unless rated/finished appropriately.
- PVC/composite: Great for high-moisture areas, but can look less “real wood” unless you choose carefully.
Before You Buy Boards: Plan Like a Person Who Likes Free Weekends
1) Measure and estimate material
Measure your ceiling’s length and width and multiply for square footage. Then add 10% extra for waste,
odd cuts, and the inevitable “Oops, that board was the ‘practice board.’”
Example: A 12 ft × 14 ft ceiling is 168 sq ft. With 10% waste, plan for about 185 sq ft.
If your boards cover 6 in × 8 ft each (4 sq ft per board), you’ll want around 47 boards (185 ÷ 4 ≈ 46.25).
2) Choose board direction
Most ceilings look best when boards run the long direction of the room. Structurally, you’ll typically install
boards perpendicular to ceiling joists so you have consistent fastening points. If your joists run the “wrong”
way for your design, you can add furring strips to create a new attachment grid.
3) Decide your “starting line” strategy
- Edge-to-edge: Start along one wall and work across. Simpler layout, common for most DIY installs.
- Centered/symmetrical: Snap a centerline so both sides end with similar-width boards (great if the room is very visible).
Tools and Supplies Checklist
Tools
- Stud finder (or a reliable way to locate joists)
- Chalk line
- Level (laser level is a treat, but not required)
- Measuring tape, pencil
- Miter saw or circular saw (for straight cuts)
- Jigsaw or oscillating multi-tool (for cutouts)
- Finish/brad nailer (optional but common) or hammer + finish nails
- Drill/driver (for furring strips or occasional screws)
- Ladder and/or sturdy work platform
- Safety gear: eye protection, hearing protection, dust mask
Supplies
- Shiplap boards (buy extra for waste)
- Construction adhesive (optional but recommended for many ceilings)
- Finish nails or brad nails (size depends on board thickness and what you’re fastening into)
- Furring strips (optional, if your ceiling needs a flatter/stronger fastening surface)
- Wood filler, caulk
- Primer/paint or stain/sealer (unless prefinished)
- Trim (optional): crown molding or simple perimeter trim
Prep Work: The Part That Makes the Install Look “Pro”
Step 1: Clear the ceiling and cut power
Remove light fixtures if needed (or drop them safely out of the way), and turn off the breaker for any ceiling wiring
you’ll work near. If you’re unsure, get help from a qualified adult or electrician. The goal is shiplap, not sparks.
Step 2: Check the surface
Shiplap can go over drywall in good condition. If the ceiling is very uneven, crumbling, or has sagging drywall,
fix that first. Wood planks will not magically correct a ceiling that’s already doing the wave.
Step 3: Acclimate the boards
Bring the boards into the room and let them adjust to temperature and humidity for at least 36 hours (often longer for real wood).
Stack them flat with spacers so air can circulate. This helps reduce gaps or buckling after installation.
Step 4: Find joists and snap lines
Locate ceiling joists and mark them along the perimeter. Then snap chalk lines across the ceiling so you can hit framing
consistently as you install. This is the difference between “secure ceiling” and “why is this board making a noise?”
Optional Step: Add furring strips for a flatter, easier install
If your joists are uneven, if you want boards to run parallel to joists, or if you need a stronger nailing surface,
install furring strips (typically 1×3 or similar) perpendicular to joists. Space them evenly (many systems use
16 in or 24 in on center depending on product guidance). Furring strips also make it easier to keep rows straight.
How to Install Shiplap on a Ceiling (Step-by-Step)
Step 1: Plan your first row and expansion gaps
Your first row controls the whole ceiling. Use a level or laser line and choose the straightest wall as your reference.
Leave a small expansion gap at the walls (the trim will cover it). If your shiplap profile is designed for a small reveal
or “nickel gap,” follow the product’s spacing guidance. For tight-fit styles, keep boards snug while still allowing
natural wood movement.
Step 2: Cut and pre-finish if you’re painting or staining
Painting overhead is… a personality test. Many DIYers find it easier to prime/paint boards before they go up,
then do touch-ups after. If you’re staining, apply stain and a protective topcoat before installation (and let it cure).
Pre-finishing can also help reduce visible seasonal gaps because edges are already sealed.
Step 3: Install the first board
- Cut the first board to length.
- If using adhesive, run a bead along the back (avoid heavy blobs that squeeze out into joints).
- Lift the board into position on your layout line.
- Fasten into joists or furring strips along your chalk lines.
Tip: If your shiplap has a “top flange” or a fastening lip, align it so fasteners are less visible.
If you must face-nail in a spot, do it where trim or the next board will hide the evidence.
Step 4: Continue rows and stagger seams
Stagger end joints like brickwork for strength and looks. Aim to keep butt joints landing on framing whenever possible.
Use scrap blocks or spacers if your product calls for a consistent reveal.
Example staggering pattern: If row one starts with a full board, row two might start with a board cut to 1/3 length,
row three with a board cut to 2/3 length, and so onso seams don’t stack into a single “zipper line” down the ceiling.
Step 5: Keep boards tight and straight
- Check alignment often: Every few rows, step back and sight down the lines.
- Use a tapping block: A scrap piece helps nudge boards tight without damaging edges.
- Correct drift early: A tiny angle becomes a huge problem by row eight. Ask me how DIYers learn this.
Step 6: Cut around lights, vents, speakers, and fans
Measure twice, mark clearly, and cut carefully. For round fixtures, trace a template (cardboard works) before cutting.
For rectangular vents, mark the opening and use a jigsaw or oscillating tool. If the fixture box needs adjustment for
the new ceiling thickness, use appropriate box extenders and follow electrical safety standards.
Step 7: Install the last row (the “math row”)
The last row often needs to be ripped lengthwise to fit. Measure the remaining gap at several points (walls are rarely
perfectly parallel), subtract your expansion gap, and cut accordingly. If the last row is narrow, pre-drilling can help
prevent splitting during fastening.
Finishing: From “Boards on Ceiling” to “Wow, That Looks Intentional”
Fill, caulk, and sand lightly
- Fill visible nail holes with paintable wood filler.
- Caulk along perimeter gaps where trim won’t fully cover or where you want a seamless paint finish.
- Sand only as neededespecially if boards are prefinished.
Paint or seal
For painted shiplap ceilings, use a primer that matches your board material, then two thin coats of paint.
For stained ceilings, use a clear topcoat rated for interior wood surfaces. In bathrooms or humid spaces, choose finishes
designed to handle moisture and keep ventilation strong.
Add trim for a clean edge
Perimeter trim (simple 1x boards or crown molding) hides expansion gaps and gives the ceiling a finished frame.
If your home has character, trim can be the difference between “farmhouse chic” and “DIY cabin-core.”
Troubleshooting Common Shiplap Ceiling Problems
“My rows are drifting out of square.”
Stop and correct it early. Re-snap a chalk line reference, and gently adjust the next few boards back to true.
Sometimes it helps to add furring strips if the ceiling framing is inconsistent.
“I can see uneven waves.”
That’s usually the ceiling surface or joists telegraphing through. Furring strips or a plywood underlayment can create
a flatter base. (It’s extra work, but it’s also extra sanity.)
“Gaps appeared after a few weeks.”
Wood moves. Acclimation helps, sealing/painting all sides helps, and maintaining consistent indoor humidity helps.
Small seasonal changes are normal; dramatic gaps can mean the boards weren’t acclimated or the room’s humidity swings widely.
“Nail holes are everywhere.”
Use a fastening method that hides nails where possible (like nailing in a flange or along overlap edges) and keep face-nailing
to a minimum. Fill and touch up carefully. The goal is “subtle texture,” not “constellation map.”
Time, Cost, and Realistic Expectations
A small room ceiling can be a weekend project. Larger ceilings, lots of cutouts, or adding furring strips can push it longer.
Costs vary wildly based on material choice (real wood vs MDF vs prefinished). Budget for boards, fasteners, adhesive, trim,
paint, and a little extra for “surprise trips” to the store.
Conclusion
Installing shiplap on a ceiling is absolutely doable with careful layout, consistent fastening into framing, and a little patience.
The winning formula is simple: prep the surface, mark joists, keep the first row perfectly straight, stagger seams, cut cleanly around fixtures,
and finish with trim and paint for a crisp final look. Do those things, and your ceiling will go from “background” to “main character” in the best way.
Real-World Experiences and Lessons (The 500-Word “What People Wish They Knew” Section)
Most shiplap ceiling projects don’t fail because the boards are “hard.” They fail because the ceiling is a liar. It looks flat
from the floor, but once you start holding eight-foot boards overhead, you discover your house has a subtle opinion about geometry.
The most common real-world experience people report is that the room isn’t perfectly square and the joists aren’t perfectly consistent.
That’s why snapping chalk lines and checking alignment every few rows feels a little obsessivebut it’s the good kind of obsessive,
like labeling pantry jars instead of doom-scrolling.
Another shared lesson: the first row is everything. People often assume they can “fix it later,” and later turns out to be
a mythical place where boards magically straighten themselves. If your first board is off by even a little, you may not notice until row six,
when the seams start drifting and your last board becomes a weird wedge shape. A practical trick many DIYers use is to dry-fit the first few
boards (even temporarily) before committing, especially if the ceiling has a visible focal point like a chandelier or ceiling fan.
Cutouts for lights and vents are also where confidence goes to get humbled. The smart move is making a cardboard template or using painter’s tape
to mark the exact footprint, then transferring those marks to the board while it’s on sawhorsesnot while it’s balanced on a ladder while you
hold a pencil in your teeth. People also learn quickly that fixture boxes sometimes need extenders when you add ceiling thickness. It’s not a big deal,
but it is a “pause and do it right” moment.
Finishing is where people discover their true feelings about painting overhead. Many end up loving pre-primed boards or pre-painting before install,
because it turns the final coat into a quick touch-up instead of a full-contact sport. If you’re staining, the shared wisdom is to seal well,
especially in kitchens and baths, because humidity can turn a beautiful wood ceiling into a seasonal science experiment.
Finally, there’s the classic experience of underestimating how much time ladders add. Everything takes longer when your tools are on the floor,
your arms are overhead, and your helper has mysteriously disappeared “to grab water” for 18 minutes. The fix is simple: set up a small work table
or cart, keep fasteners and measuring tools at height, and batch your tasks (measure/cut a few boards at once, then install). People who do that
consistently report a smoother project, fewer mistakes, and fewer dramatic monologues directed at inanimate wood.