Table of Contents >> Show >> Hide
- Why Saltwash Is the Secret Sauce for a Buffet Makeover
- Plan Your Look Before You Pick Up a Brush
- Tools and Materials Checklist
- Step-by-Step: Buffet Makeover With Saltwash Paint Additive
- Step 1: Remove hardware and label everything
- Step 2: Clean like the paint depends on it (because it does)
- Step 3: Fix wobble, dents, and drama
- Step 4: Scuff-sand (or degloss) for adhesion
- Step 5: Decide if you need primer
- Step 6: Mix Saltwash with paint (the “icing consistency” rule)
- Step 7: Apply texture strategically (less “everywhere,” more “on purpose”)
- Step 8: Let it dry fully, then sand back to reveal character
- Step 9: Add a second coat (optional) for depth
- Step 10: Seal it so it survives reality
- Step 11: Reattach hardware and style it like it’s in a magazine
- Saltwash Mixing and Texture Control (So You Don’t Panic-Sand)
- Topcoat Choices for a Buffet: Wax vs Poly (and Why Your Buffet Probably Wants Poly)
- Troubleshooting: Fix the Common “Oh No” Moments
- Timeline and Cost (So You Can Plan Like a Sane Person)
- FAQ: Quick Answers Before You Start
- Experiences and Lessons DIYers Share (500+ Words of Real-World Wisdom)
- Conclusion: Your Buffet, But Better (and With a Backstory)
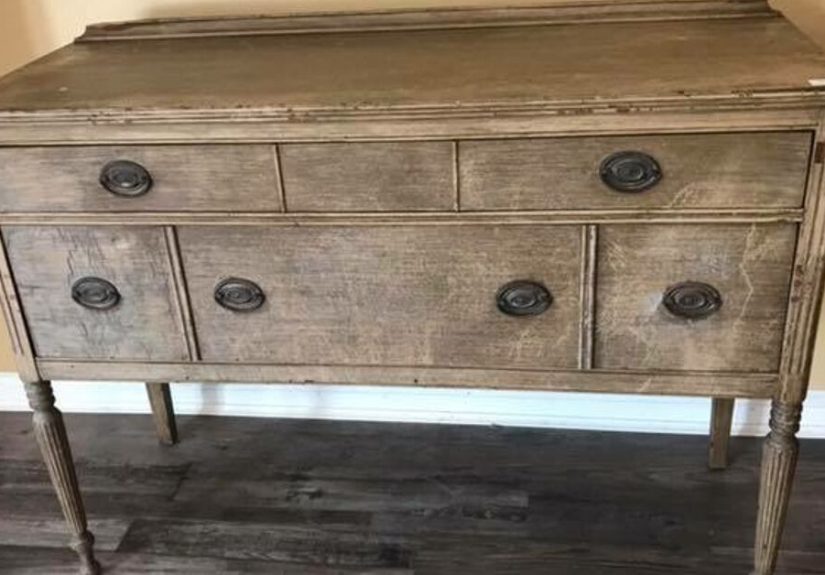
A buffet is basically the overachiever of furniture: it holds your dishes, your “I might host someday” serving trays,
and (let’s be honest) a collection of random candles that have never met a match. If yours looks a little tiredscratches,
water rings, or that mysterious sticky spot that defies sciencethis is your sign to give it a glow-up.
Enter Saltwash paint additive: a powder you mix into paint to create a textured, timeworn finish that
feels like “coastal cottage meets vintage market find,” without the “I dragged this home in the rain” part. In this guide,
you’ll learn how to prep a buffet properly, mix Saltwash the right way, apply texture like you totally meant it, and seal it
so it can survive real life (including the occasional spaghetti night).
Why Saltwash Is the Secret Sauce for a Buffet Makeover
Saltwash is a paint additive powder that thickens paint into a paste, so you can build raised texture,
then sand it back for a distressed, layered look. Think: subtle grit, chalky dimension, and that “old-world patina” vibe
that makes a new coat of paint look like it has a backstory.
The magic is in the control. You can go:
- Soft and sandy (light texture along edges and corners)
- Weathered coastal (more texture, more sanding back, more drama)
- Modern rustic (texture kept minimal, with crisp hardware for contrast)
Best part: it works great on buffets because the wide, flat doors and drawer fronts are basically begging for a finish
that isn’t “flat paint… again.”
Plan Your Look Before You Pick Up a Brush
A buffet makeover goes smoother when you decide the “final vibe” up front. Otherwise, you might sand it, repaint it,
re-sand it, and eventually name it “Project Regret.”
Three easy style directions
- Coastal Cottage: warm whites, pale blues, soft grays; heavier sanding on edges; matte or dead-flat look.
- Modern Farmhouse: creamy neutral body, darker top or contrasting doors; controlled distressing; black pulls.
- Vintage European: muted greens/blacks; textured panels; rub-through highlights; antique brass hardware.
Pick a “wear map”
Real old furniture shows wear where hands and life happen: corners, drawer pulls, door edges, and the base. Plan to focus
your Saltwash texture and sanding there. Random sanding in the middle of a door can look… enthusiastic.
Tools and Materials Checklist
You don’t need a pro shopjust the right basics and a little patience (okay, and maybe a snack).
Supplies
- Saltwash paint additive powder
- Interior paint (acrylic/latex or furniture paint)
- Mixing container and stir sticks (or a drill mixer)
- Chip brush (great for texture), angled brush, and/or small foam roller
- Sandpaper: 120–150 grit (prep), 220 grit (smoothing), 320–400 grit (between coats)
- Degreaser/cleaner and lint-free rags
- Tack cloth or damp microfiber for dust removal
- Wood filler (for dents), putty knife, and caulk (optional for seams)
- Primer (bonding primer if laminate/very glossy)
- Topcoat: water-based polyurethane/polycrylic (recommended for a buffet)
- New hardware (optional but highly satisfying)
Safety basics
- Gloves and eye protection
- Dust mask/respirator for sanding (especially if the piece is old)
- Ventilation (open windows, fans, and common sense)
Always follow the label instructions on cleaners, primers, and topcoats, and get an adult to help if you’re newer to
sanding or working with chemical cleaners.
Step-by-Step: Buffet Makeover With Saltwash Paint Additive
Step 1: Remove hardware and label everything
Take off knobs, pulls, hinges (if you’re painting doors separately), and any removable shelves. Put screws in labeled bags.
Future-you will be grateful. Very grateful.
Step 2: Clean like the paint depends on it (because it does)
Buffets live hard lives: fingerprints, cooking residue, furniture polish, and the occasional “who spilled syrup here?”
Clean thoroughly and let it dry fully. Paint hates grease. Grease always wins unless you clean it first.
Step 3: Fix wobble, dents, and drama
Tighten screws, reglue loose joints, and fill dents with wood filler. Let filler cure, then sand smooth. If you have gaps
where trim meets panels, a small bead of paintable caulk can make the finish look custom instead of “I built this during a
sneeze.”
Step 4: Scuff-sand (or degloss) for adhesion
If your buffet is wood with an old finish, scuff-sand to knock down sheen and give primer/paint something to grip.
If it’s laminate or super glossy, don’t skip this. You’re not trying to sand it rawyou’re trying to dull it.
Typical approach:
- 120–150 grit for glossy surfaces and dings
- 220 grit to smooth after repairs
Wipe away dust with a tack cloth or damp microfiber before moving on.
Step 5: Decide if you need primer
Primer is your insurance policyespecially on laminate, slick finishes, or stained wood that might bleed through.
A bonding primer can dramatically reduce peeling risk on hard-to-paint surfaces.
-
Use bonding primer if the buffet is laminate, has a glossy factory finish, or you’ve had paint peel on
similar pieces before. -
Use stain-blocking primer if you suspect tannin bleed (common with certain woods) or if the piece has
strong stains.
Apply primer in thin, even coats and let it dry as directed. Lightly sand (320–400 grit) to remove brush marks and wipe clean.
Step 6: Mix Saltwash with paint (the “icing consistency” rule)
Saltwash works best when mixed into paint until it’s thicklike frosting or icing that holds a soft peak.
Mix small batches so it stays workable.
- Pour paint into a mixing container first.
- Add Saltwash powder gradually while stirring.
- Stir often as you work so the mixture stays consistent.
If you’ve never used it before, test on a scrap board or the back edge of a door first. Your first batch is for learning,
not for perfection.
Step 7: Apply texture strategically (less “everywhere,” more “on purpose”)
This is where your buffet starts looking expensive. Use a chip brush (or stippling brush) to dab and sweep the Saltwash paint
onto the places where natural wear would happen.
Great texture zones:
- Door panel edges and corners
- Drawer edges and around pulls
- Bottom rail and feet (lightlythis area gets kicked)
- Trim details (because texture loves detail)
Keep the top surface smoother than the rest if you actually use your buffet for serving. Texture is gorgeous, but tortilla chips
don’t love mountains.
Step 8: Let it dry fully, then sand back to reveal character
Once dry, sand lightly to knock down rough peaks and create the distressed look. Start gentle. You can always sand more,
but you can’t un-sand your way out of a crisis.
- 220 grit for controlled distressing
- 320 grit for soft smoothing and blending
Focus sanding on raised texture and edges. Wipe dust away between passes so you can actually see what you’re doing.
Step 9: Add a second coat (optional) for depth
Many Saltwash finishes look best with layering:
- Option A: One textured coat + one smoother coat (rolled/ brushed) to balance dimension and durability
- Option B: Two colors (light base, darker top) then sand back to reveal the underlayer for “aged” depth
If you do a second color, apply it thinner than the first. Thick paint plus thick texture can turn into “accidental stucco.”
Step 10: Seal it so it survives reality
A buffet is a high-touch, wipe-down piece. For that reason, a clear protective topcoat is usually worth it.
Wax can be beautiful, but it’s not always the best match for constant use and cleaning.
Apply your clear coat in thin coats with a good synthetic brush or foam applicator. Let it dry, then lightly sand (320–400 grit)
between coats for a smooth, wipeable finish.
Step 11: Reattach hardware and style it like it’s in a magazine
New hardware is the fastest way to make the whole makeover look intentional. Add matching pulls, align them carefully, and
tighten everything. Then style the top with a tray, a lamp, and something living (like a plant) to prove you’re thriving.
Saltwash Mixing and Texture Control (So You Don’t Panic-Sand)
Mixing ratio: start simple, adjust as needed
A common approach is an approximate 1:1 ratio of powder to paint, adjusted until it looks like thick icing.
The exact amount varies with paint type and how heavy you want the texture, so treat it like cooking: measure at first, then
trust your eyes.
Consistency cheat sheet
- Thicker paste = bolder texture, more sanding back, more rustic
- Slightly looser paste = softer texture, easier blending
Application tools change the final look
- Chip brush: classic Saltwash texture, slightly irregular (in a good way)
- Stencil/stippling brush: more controlled dabbing texture
- Putty knife: patchy, plaster-like texture in small areas (use sparingly)
- Sponge: softer, organic texture for subtle dimension
Topcoat Choices for a Buffet: Wax vs Poly (and Why Your Buffet Probably Wants Poly)
Wax: pretty, velvety, and a little high-maintenance
Wax can look amazing on textured paint, especially if you want a soft sheen and a hand-rubbed feel. But wax generally needs
periodic refreshing and can be less ideal for heavy cleaning and frequent use.
Water-based poly/polycrylic: durable, wipeable, practical
For a buffet that holds dishes, serves food, or gets wiped down often, a water-based protective finish is typically the more
durable option. Many water-based topcoats are designed to stay clear and protect against scuffs and scratches, and some
can be recoated relatively quickly (often in a couple of hours, depending on product and conditions).
Which sheen looks best over Saltwash?
- Dead flat / flat: most “authentic” vintage look; hides texture transitions
- Satin: still soft but easier to clean; great for buffets
- Gloss: usually too shiny for a distressed finish (unless you’re doing high-drama modern)
Troubleshooting: Fix the Common “Oh No” Moments
Problem: Paint peels or scratches off easily
This is almost always a prep/adhesion issue. Clean more thoroughly, scuff-sand to remove sheen, and use a bonding primer on
slick surfaces before repainting.
Problem: Texture looks clumpy
You may have added powder too fast or didn’t stir frequently. Mix gradually, stir often, and consider smaller batches.
If it’s already on the piece, let it dry and sand back to soften the look.
Problem: Too much texture everywhere
Sand it down with 220 grit until it looks intentional, then apply a thinner, smoother coat over larger flat areas to calm the
finish down.
Problem: Brush marks in smooth areas
Lightly sand with 320–400 grit and apply a thin coat with a foam roller (then “tip off” edges with a brush).
Thin coats beat thick coats every time.
Problem: Topcoat looks streaky or milky
Too-thick coats and high humidity can cause cloudy looks while drying. Apply thinner coats, allow full dry time, and sand lightly
between coats. Many water-based clears dry clearer as they cure, but patience is part of the process.
Timeline and Cost (So You Can Plan Like a Sane Person)
A realistic buffet makeover usually takes 1–3 days depending on dry time, repairs, and how many coats you apply.
If you rush curing and start stacking plates immediately, your buffet may “remember” (in dents) forever.
- Day 1: Clean, repair, sand/degloss, prime (if needed)
- Day 2: Saltwash coat(s), sanding back, paint details
- Day 3: Topcoat(s), hardware, styling
Cost varies by what you already own, but it’s often far less than replacing a solid buffetespecially if you thrifted it or
inherited it from someone with great taste and questionable storage.
FAQ: Quick Answers Before You Start
Can I use regular wall paint?
You can, but furniture paint or quality interior enamel tends to hold up better to handling and cleaning. If you use wall paint,
a durable topcoat becomes even more important.
Do I have to sand if I use a bonding primer?
Some bonding primers are formulated to reduce sanding needs on glossy surfaces, but scuff-sanding still improves results.
A quick dulling of shine is usually faster than fixing peeling later.
Can I do Saltwash on laminate or veneer?
Yeswith the right prep. Clean thoroughly, scuff-sand lightly (especially on laminate), and use a bonding primer for best adhesion.
Veneer is thinner than you think, so sand gently.
Should I texture the buffet top?
If you use the top for serving or storage, keep it smoother for easy wiping. Texture shines on doors, drawer fronts, and trim.
Experiences and Lessons DIYers Share (500+ Words of Real-World Wisdom)
If you ask a group of DIYers what surprised them most about a Saltwash buffet makeover, you’ll hear a pattern: the technique is
forgiving, but the prep is not. People who love their final finish usually say they spent more time cleaning and
scuff-sanding than they expectedand they’re weirdly proud of it afterward. (As they should be. Adhesion is the foundation
of happiness.)
One common “aha” moment is learning that Saltwash texture looks different depending on where you place it.
DIYers who dabbed texture evenly across every flat panel often reported the piece looked busy, like it was trying on too many
accessories at once. The finishes that get the most compliments tend to follow a wear pattern: heavier texture near edges,
corners, around pulls, and along trim detailsthen calmer, smoother coverage on big open areas. That mix reads as age and
authenticity rather than “I discovered texture and got excited.”
Another experience DIYers mention is the importance of small batches. Saltwash thickens paint into a paste,
and as you work, it can settle or change slightly. People who mixed a giant bucket sometimes found the texture shifted from
creamy to chunky halfway through, which can leave one door looking subtly different from another. A practical habit is mixing
enough for one or two doors at a time, stirring often, and remixing fresh when needed. It’s not glamorous, but it keeps the
texture consistentand consistency is what makes the finish look professional.
When it comes to sanding back, many DIYers say the first pass feels scarybecause you’re sanding something you just painted,
which goes against every instinct you ever had in kindergarten. The best results usually come from slow sanding:
start with a finer grit than you think you need, work in light strokes, and step back often. Several DIYers describe a “sweet
spot” where the texture softens, edges start to glow, and suddenly the buffet looks like it belongs in a boutique. That sweet
spot is easier to hit when you sand in phases rather than going full speed like you’re trying to erase the past.
Topcoat experiences are also telling. People who waxed their buffet loved the velvety look but sometimes wished they had chosen
a tougher clear finish when the piece lived in a dining room or kitchen. Buffets get touched, bumped, wiped, and occasionally
decorated with a bowl of lemons that sweats like it’s training for a marathon. DIYers who used a water-based clear coat often
reported easier cleanup and less worry about everyday wear. The shared lesson is simple: match the sealer to the life
the buffet actually lives, not the life you imagine where no one ever sets a drink down without a coaster.
Finally, a surprisingly common “best decision” is updating hardware. DIYers say that even a beautiful paint finish can feel
unfinished if the old knobs are scratched, mismatched, or stuck in the early 2000s. Swapping to modern pulls, antique brass,
or matte black hardware often makes the buffet look intentionally designed. It’s like the difference between a good haircut
and a good haircut plus stylingsuddenly the whole look makes sense. If you’re on the fence, consider this your gentle
nudge: hardware is the jewelry of furniture, and your buffet deserves to sparkle a little.
Conclusion: Your Buffet, But Better (and With a Backstory)
A Saltwash buffet makeover is one of those DIY projects that feels high-impact without being “tear down a wall” level stressful.
The keys are simple: prep thoroughly, apply texture with intention, sand back slowly, and seal it for the way you actually use
the piece. Do that, and your buffet goes from “fine, I guess” to “wait… where did you buy that?”
And when someone compliments it, you can smile and say, “Oh this old thing?” while privately enjoying the fact that you created
a custom finish with paint, powder, and a tiny bit of bravery.


