Table of Contents >> Show >> Hide
- What You’ll Need
- Before You Start: Quick Sizing Tips
- How to Make a Paracord Combat Bracelet: 14 Steps
- Step 1: Choose Your Cord and Buckle
- Step 2: Measure Your Wrist
- Step 3: Calculate the Finished Bracelet Length
- Step 4: Cut the Paracord
- Step 5: Seal the Ends
- Step 6: Find the Middle of the Cord
- Step 7: Attach the Cord to One Buckle End
- Step 8: Thread the Other Buckle End and Set the Length
- Step 9: Arrange the Core Strands
- Step 10: Make the First Cobra Knot
- Step 11: Make the Mirror Knot
- Step 12: Continue Weaving to the End
- Step 13: Finish the Bracelet Cleanly
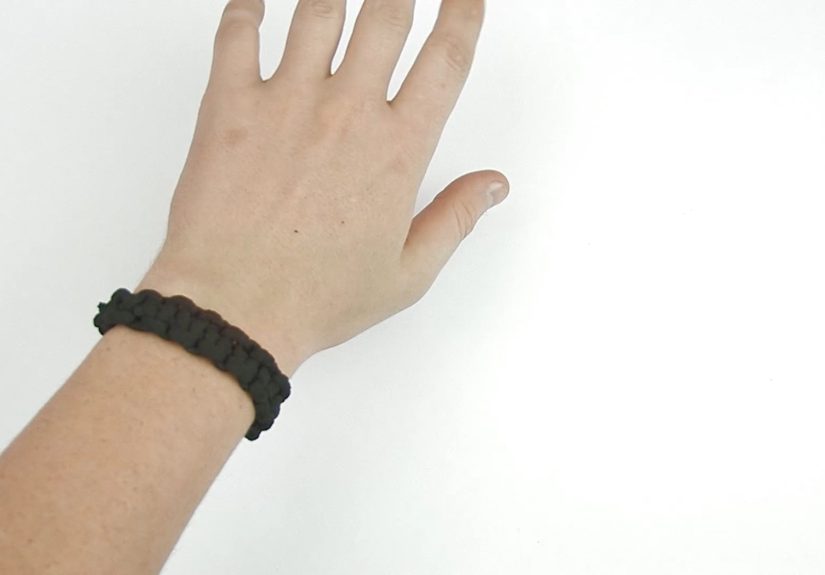
- Step 14: Test the Fit and Wear It
- Common Mistakes to Avoid
- Why People Love Paracord Bracelets
- Is a Paracord Bracelet Actually Useful?
- Experience Section: What Making a Paracord Combat Bracelet Actually Feels Like
- Conclusion
- SEO Tags
If you’ve ever wanted a bracelet that says, “Yes, I enjoy practical gear, and yes, I also enjoy tiny repetitive crafts that turn my brain into warm soup,” welcome home. A paracord combat braceletmore commonly called a paracord survival bracelet or cobra-weave braceletis a simple project that looks rugged, fits nicely on your wrist, and gives you a compact length of utility cord if you ever need it.
The “combat” label sounds dramatic enough to arrive wearing boots, but the build itself is beginner-friendly. At its core, this bracelet is just paracord, a buckle, a measuring tool, scissors, and a lighter. The magic comes from the cobra weave, a classic knotting pattern that creates that chunky, woven look most people recognize instantly. Once you learn it, you can make bracelets for hiking, camping, gifts, emergency kits, or just because your hands need something to do while your coffee cools.
In this guide, you’ll learn how to make a paracord combat bracelet in 14 clear steps, how to size it correctly, how much cord to cut, and how to avoid the classic beginner mistakes like twisting the core, running out of cord, or accidentally making something that fits your wrist only if you stop breathing. Let’s make one the right way.
What You’ll Need
- 550 paracord, usually 8 to 10 feet for one average bracelet
- 1 side-release buckle
- Measuring tape or ruler
- Scissors or a sharp knife
- Lighter
- Optional: tape, clip, or small jig to hold the buckle steady while weaving
Before You Start: Quick Sizing Tips
The bracelet should not be sized exactly to your wrist measurement. A comfortable paracord bracelet is typically set a bit longer than your wrist circumference, because the weave tightens and thickens the project. A common rule is to measure your wrist and add about 1 inch for the finished bracelet length, not counting the buckle teeth. For cord length, many makers use roughly 1 foot of paracord per inch of finished bracelet, while others estimate by multiplying wrist size by 12 for a single-color bracelet. Translation: cut a little extra. Nobody has ever cried because they had 6 extra inches of cord. Plenty of people have cried because they were 2 inches short.
How to Make a Paracord Combat Bracelet: 14 Steps
Step 1: Choose Your Cord and Buckle
Start with standard 550 paracord and a side-release buckle. One-color bracelets are easiest for beginners, but two-color versions look great and help you see the weaving pattern more clearly. Pick a buckle size that matches the cord neatly and feels comfortable on your wrist. If your buckle is too bulky, your bracelet can feel more like a door hinge than wearable gear.
Step 2: Measure Your Wrist
Wrap a piece of paracord or a soft measuring tape around your wrist where you want the bracelet to sit. Mark the point where the cord overlaps, then lay it flat against a ruler. Write the number down. Do not guess. “My wrist is probably medium-ish” is how craft chaos begins.
Step 3: Calculate the Finished Bracelet Length
Take your wrist measurement and add about 1 inch. That gives you a comfortable target length for the bracelet body between the buckle ends. For example, if your wrist measures 7.5 inches, set the bracelet body to about 8.5 inches. This little adjustment makes the bracelet easier to wear and easier to buckle without pinching your skin like an overenthusiastic crab.
Step 4: Cut the Paracord
For an average adult bracelet, cut about 8 to 10 feet of cord. If you’re using two colors, cut equal lengths and join them, or use a two-strand setup from the start depending on your preferred method. When in doubt, go longer. Thick weaves, tighter knots, and larger wrists all eat more cord than beginners expect.
Step 5: Seal the Ends
Use a lighter to carefully melt the cut ends of the cord so they don’t fray. You only need enough heat to soften the nylon. Don’t torch it like you’re trying to contact aliens. If the end mushrooms slightly, pinch or flatten it carefully with a tool or the metal side of the lighter while it’s still warm.
Step 6: Find the Middle of the Cord
Fold the cord in half to locate the center. This center loop is what you’ll use to attach the cord to one side of the buckle. Finding the exact middle now helps the bracelet stay balanced later, and it also prevents that awkward moment when one working end is heroic and the other is basically unemployed.
Step 7: Attach the Cord to One Buckle End
Push the folded loop through one half of the buckle, then pull the loose ends through that loop to form a girth hitch, also called a cow hitch. Pull it snug against the buckle. You should now have two long working ends hanging down from the buckle, with the middle fold secured in place.
Step 8: Thread the Other Buckle End and Set the Length
Take the two loose ends and thread them through the other half of the buckle. Slide that buckle piece until the distance between the buckle ends matches your finished bracelet length. Measure the length between the buckle bodies, not including the prongs. Double-check now, because fixing size problems later is like realizing your cake is the wrong flavor after frosting it.
Step 9: Arrange the Core Strands
Lay the bracelet flat so the two center strands run straight between the buckle ends. These are your core strands. Make sure they are not twisted. The core should lie flat and parallel, because the cobra weave wraps around this center. A twisted core leads to a bracelet that looks crooked and behaves like it has opinions.
Step 10: Make the First Cobra Knot
Take the left working cord and pass it over the center strands, making a loop on the left. Then bring the right working cord over the left cord, behind the center strands, and up through the left-side loop. Pull both ends evenly to tighten. Congratulations: you’ve made the first cobra knot, the building block of the whole bracelet.
Step 11: Make the Mirror Knot
Now reverse the process. Take the right working cord across the center strands to form the next loop, then bring the left working cord over that, behind the center, and through the loop on the right. Pull tight. The second knot should mirror the first. This alternating pattern is what keeps the bracelet straight, flat, and professional-looking.
Step 12: Continue Weaving to the End
Repeat the left-side knot, then the right-side knot, all the way down the bracelet. Keep the knots snug and push them upward as you go so the weave stays compact. If the bracelet starts spiraling or rotating instead of lying flat, you probably repeated the same side twice. Undo that section and continue with the alternating pattern. It’s annoying, yes, but less annoying than pretending the twist was “intentional design.”
Step 13: Finish the Bracelet Cleanly
When you reach the end, tie the final knot tightly against the buckle. Trim the excess cord, leaving a short tail of about 1/4 to 1/2 inch. Melt the ends carefully and press them into the nearby cord with the side of the lighter or a metal tool so they fuse in place. Avoid using your fingers unless you enjoy learning heat-related life lessons in real time.
Step 14: Test the Fit and Wear It
Snap the buckle closed and try the bracelet on. It should feel secure but not too tight, and the buckle should close easily. If it fits well, you’re done. If it’s too loose or too snug, take a deep breath, admire your handiwork, and remember that the second bracelet is always faster and neater than the first.
Common Mistakes to Avoid
Cutting Too Little Cord
This is the paracord version of running out of gas one block from home. Always cut a little more cord than you think you need, especially if you’re still learning how tight to pull your knots.
Forgetting to Alternate Sides
The cobra weave depends on alternating left and right knots. If you repeat the same side twice, the bracelet can start to twist. A flat braid is a happy braid.
Measuring the Bracelet Incorrectly
Measure the bracelet body between the buckle ends and don’t count the buckle prongs. This tiny detail saves a lot of resizing frustration later.
Melting the Ends Too Aggressively
You want the ends sealed, not scorched into tiny black meteorites. Use light, controlled heat and press the softened end gently into place.
Why People Love Paracord Bracelets
Paracord bracelets sit at the nice intersection of useful, affordable, and oddly satisfying. They can hold several feet of cord in a wearable format, and that cord can help with temporary repairs, tying gear, replacing a broken shoelace, bundling items, or handling countless small outdoor tasks. They also make solid beginner projects because the tools are simple, the learning curve is gentle, and the finished result actually looks like something you’d want to keep.
They’re also customizable. You can make a simple single-color bracelet, a two-tone version, a wider king cobra bracelet, or a bracelet with reflective cord for visibility. Once you learn the basic cobra weave, you can riff on it for other projects like zipper pulls, key fobs, dog collars, and lanyards. It’s the craft equivalent of learning one guitar chord and suddenly feeling invincible.
Is a Paracord Bracelet Actually Useful?
Yes, with a small reality check. A paracord bracelet is best viewed as compact utility cord you can wear, not as a miracle object that replaces a real emergency kit. It’s handy for everyday outdoor fixes and light-duty situations, but it should not replace dedicated climbing gear, rescue equipment, or specialized medical tools. Think of it as a clever backup, not the star of a disaster movie.
That said, the usefulness is real. If a tent line snaps, a strap breaks, or you need to secure loose gear, having cord on your wrist can feel pretty smart. It’s one of those projects that blends function with fun, which is a nice trick for something made out of rope and patience.
Experience Section: What Making a Paracord Combat Bracelet Actually Feels Like
The first time I made a paracord combat bracelet, I expected it to be one of those “quick little DIYs” that takes 10 minutes and a cheerful smile. Reader, it did not. It took longer than expected, involved at least one muttered speech to the buckle, and taught me that “alternating left and right” sounds embarrassingly easy until your hands are full of slippery cord. Still, once the pattern clicked, it became one of the most relaxing small projects I’d tried in a long time.
What surprised me most was how much the setup matters. Measuring carefully, adding that extra inch, and laying the center cords flat made a bigger difference than any fancy trick. On my first attempt, I rushed the measuring stage and ended up with a bracelet that fit like a determined handshake. On the second attempt, I slowed down, checked the length with a ruler twice, and suddenly everything felt smoother. It was a humbling reminder that most “craft talent” is actually just patience wearing a fake mustache.
I also learned that tension is everything. Pull the knots too loose and the bracelet looks floppy. Pull them too tight and the weave gets stiff, narrow, and harder to finish neatly. There’s a sweet spot where each knot feels snug but not strangled. Once I found that rhythmleft side, tighten; right side, tighten; scoot the knots upwardit became almost meditative. It’s the sort of project that lets your brain settle down while your hands stay busy, which is probably why so many people keep making one bracelet after another.
Another fun part is the customization. I started with a basic one-color bracelet because I figured I should walk before attempting tactical fashion. Then I tried a two-color version, and suddenly the cobra pattern looked sharper and more dramatic. A bright reflective cord version felt more visible and practical for camping gear, while an earth-tone bracelet looked like it belonged next to a pocketknife and a thermos full of coffee. Same method, totally different vibe.
There’s also something satisfying about ending up with a finished object that isn’t just decorative. Plenty of crafts are beautiful, but this one feels useful in a grounded, no-nonsense way. You can wear it on a hike, toss a spare in a glove box, make one for a friend, or stash a few as simple gifts. It’s inexpensive, portable, and doesn’t demand a craft room the size of a garage. You just need cord, a buckle, and enough determination to outsmart a knot pattern.
By the time I’d made a few, I noticed the same thing many DIY makers notice: the project gets better every round. The first bracelet teaches the process. The second teaches consistency. The third starts to look suspiciously like you know what you’re doing. And that’s probably the best part of making a paracord combat bracelet. It starts as a practical craft, but it ends up being a small confidence builderone knot at a time, one tiny victory after another, and only a mild chance of talking to your scissors like they’re part of the team.
Conclusion
Learning how to make a paracord combat bracelet is one of those low-cost, high-satisfaction skills that pays off quickly. It’s approachable for beginners, practical enough for outdoor use, and customizable enough to keep things interesting after your first try. Once you understand the basic cobra weave, you can make better-looking bracelets, experiment with colors, and even branch into more advanced patterns. So grab some cord, measure carefully, and start weaving. Worst case, you make a slightly lopsided bracelet. Best case, you pick up a useful skill and a new hobby in one afternoon.