Table of Contents >> Show >> Hide
- What You’re Making (and Why It Works)
- Supplies You’ll Need
- How to Make Brown Paper Witch Broomstick Goody Bags
- How to Make Clear Treat Bag Brooms
- Hocus Pocus-Inspired Design Ideas (Without Overcomplicating Your Life)
- Fill Ideas That Look Great and Travel Well
- Assembly-Line Strategy (Because You’re Not Trying to Craft Until Midnight)
- Budget and Smart Material Choices
- Safety and Classroom Notes
- Troubleshooting (Because Paper Bags Have Opinions)
- Wrap-Up: Your Party Favors, But Make Them Magical
- Extra: Real-World Crafting Experiences (What It’s Like to Actually Make These)
If Halloween had a love language, it would be “tiny themed favors that make people squeal.” And if you want your party
table to look like it was styled by three delightfully dramatic witches (who definitely have opinions about candles),
witch broomstick goody bags are the move. They’re quick, cheap, and ridiculously charmingplus they double as décor.
This DIY is a classic for a reason: you take humble brown paper lunch bags (or clear treat bags), snip them into fringe,
slide in a “handle,” tie it up, and suddenly you’re the craft sorcerer of the neighborhood. The best part? You can make
these as subtle “Salem-inspired” favors or go full theatrical with purple-and-black ribbon, spooky tags, and a little
sparkle that says, “Yes, I absolutely planned this.”
What You’re Making (and Why It Works)
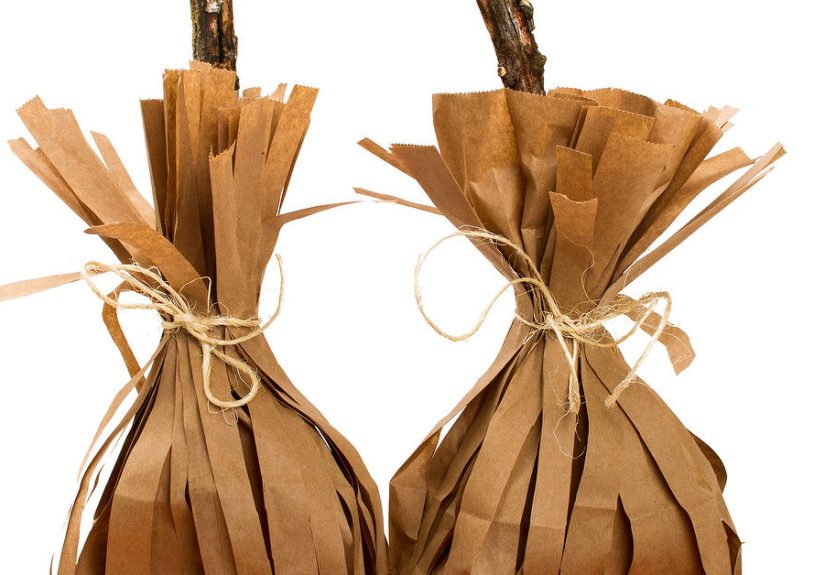
A broomstick goody bag is basically a treat bag dressed up like a mini broom: the “bristles” are fringed paper, and the
“handle” is a twig, dowel, striped straw, or Halloween pencil. The design is genius because it’s forgivingno one is
measuring fringe length with a ruler on October 30thand it scales beautifully from “I need 8 favors” to “help, I’m
making 30 for a classroom.”
Supplies You’ll Need
Pick one of the two main styles below. The brown-paper version looks rustic and witchy (very Salem-core). The clear-bag
version shows off the candy and feels more “party favor” polished.
Option A: Brown Paper Lunch Bag Brooms (Most Popular)
- 2 brown paper lunch bags per broom (standard size works great)
- Scissors
- Ribbon, twine, raffia, or yarn (black/orange/purple looks especially festive)
- “Handle” material: clean twigs, wooden dowels, paper straws, or Halloween pencils
- Fillers: candy, small toys, stickers, glow bracelets, mini play-dough, etc.
- Optional: gift tags, markers, hot glue or tape, tissue paper, confetti, faux spider rings
Option B: Clear Treat Bag Brooms (Fast + Show-Offy)
- Clear cellophane treat bags (medium size)
- Shredded kraft paper, raffia, or brown tissue paper (for bristles)
- Ribbon/twine
- Twigs/dowels/pencils/straws for handles
- Fillers (candy looks especially cute here)
How to Make Brown Paper Witch Broomstick Goody Bags
This method uses two bags to create fuller “bristles” and a sturdier bodyaka the difference between “cute” and “cute and
won’t fall apart in a child’s backpack.”
Step 1: Create the Broom Bristles
- Take Bag #1 and flatten it.
-
Starting from the top opening, cut thin vertical strips down toward the base, stopping about 1–2 inches above the
bottom so the bag stays intact. -
The strips don’t have to be perfect. In fact, uneven fringe looks more “handmade witch broom” and less “office
paper shredder.”
Step 2: Make the Inner “Candy Pocket”
- Take Bag #2 and cut strips toobut stop halfway down this time.
-
This inner layer helps hold treats without them poking through the outer fringe, and it adds volume so the broom
looks fluffy instead of sad.
Step 3: Nest the Bags
- Open Bag #1 (the one cut almost to the bottom).
- Slide Bag #2 inside it so the fringes line up and look extra full.
- Gently fluff the strips with your fingers to separate them.
Step 4: Fill Your Goody Bag
Add your treats to the inner bag. A good rule: fill it enough to give the broom shape, but not so much that the bag
refuses to close like it’s protesting your life choices.
- Classics: mini candy bars, candy corn, gummy packs
- Non-candy ideas: stickers, mini bubbles, glow sticks, pencil toppers, temporary tattoos
- Hocus-Pocus-ish vibe: “potion” drink packets, mini “spell” note, glittery star confetti
Step 5: Add the Handle
- Slide a twig/dowel/straw/pencil into the bag so it sits behind the treats.
- Leave enough handle sticking out to look broom-like (usually 6–10 inches, depending on your bag size and handle type).
- If using twigs: pick smooth ones, wash and dry them, and avoid anything splintery. (Rustic is cute; splinters are not.)
Step 6: Tie It Off (The “Broom Waist”)
- Gather the top of the bags around the handle.
- Tie tightly with ribbon or twine about 1–2 inches above the treats.
- Snip ribbon tails at an angle for a boutique look, or leave them long and dramatic for full witch-theater energy.
Step 7: Shape and Fluff
Fan out the fringed strips so they look like bristles. If you want them curlier, gently run the strips over the edge of
scissors (like curling gift ribbon, but easier and with less emotional risk).
How to Make Clear Treat Bag Brooms
This is your “I need these done fast and I want the candy to sparkle under string lights” option.
- Put a small handful of shredded kraft paper or raffia into the bottom of a clear bag (this becomes the bristles).
- Add candy on top (small items stack nicely).
- Slide a handle (dowel/straw/pencil) down one side of the bag.
- Gather and tie the bag around the handle with ribbon or twine.
- Fluff the “bristles” by tugging the shredded paper outward a bit.
Hocus Pocus-Inspired Design Ideas (Without Overcomplicating Your Life)
You don’t need to recreate a movie set to capture the vibe. The trick is choosing a few recognizable “witchy” cues and
repeating them consistently.
1) Pick a Color Palette That Screams “Witch Season”
- Classic: black + orange + kraft brown
- Spellbook vibe: purple + black + gold
- Moody cottagecore: olive + cream + twine
2) Add a Simple Tag That Tells the Story
Tags do a lot of heavy lifting. Even a plain kraft tag with a black marker can look intentional.
- “Broom Service”
- “Salem Treats”
- “Potion Kit (Snack Edition)”
- “A Little Witchy Gift for You”
3) Make It Feel Like a “Witch’s Toolkit”
If you’re giving these at a party, tuck in one themed extra besides candysomething that feels like it came from a
friendly witch’s supply drawer.
- A mini glow bracelet (instant “magic ring” energy)
- A Halloween pencil (bonus: it can be the handle)
- A tiny scroll note with a “spell” like: “Open for sweet luck!”
- Star confetti (a pinch is enoughthis is a goody bag, not a glitter bomb)
Fill Ideas That Look Great and Travel Well
The best goody bags survive three things: being carried, being shaken, and being opened by someone with the patience
level of a caffeinated squirrel.
Kid-Friendly Fillers
- Mini chocolate bars or wrapped candies
- Fruit snacks
- Stickers, mini erasers, temporary tattoos
- Glow sticks/bracelets
- Mini bubbles
Adult-Friendly Fillers
- Fancy chocolates or caramel squares
- Mini hand sanitizer or lotion (spooky season = germ season)
- Tea bags or cocoa packets (“potion ingredients”)
- Mini candles (battery tealights for safety)
Assembly-Line Strategy (Because You’re Not Trying to Craft Until Midnight)
If you’re making more than 10, treat this like a tiny production line. It’s faster, neater, and you’ll feel like a
benevolent Halloween CEO.
- Station 1: Pre-cut all fringe on Bag #1 and Bag #2.
- Station 2: Nest bags (Bag #2 inside Bag #1).
- Station 3: Fill with treats (use a measuring cup for consistency).
- Station 4: Insert handles.
- Station 5: Tie and tag.
- Station 6: Fluff bristles and line them up to admire your work.
Time estimate: Once materials are prepped, many people can assemble a broom in about 2–4 minutes. With
help (older kids, friends, willing siblings bribed with candy), you can crank out 24–30 in under an hour.
Budget and Smart Material Choices
These are naturally budget-friendly because the base materials are simple. To keep costs down without sacrificing the
look, focus on one “wow” element (like ribbon or tags) and keep everything else basic.
- Cheapest handles: paper straws or Halloween pencils
- Most authentic handles: yard twigs (cleaned and dried)
- Most elevated look: wooden dowels + satin ribbon
- Best bristle volume: the two-bag method
Safety and Classroom Notes
- Allergies: If these are for a classroom, consider non-food fillers or clearly labeled packaged treats.
- Choking hazards: Avoid small items for younger kids (tiny bouncy balls, mini erasers, etc.).
- Stick safety: If using twigs, keep ends blunt and smooth; pencils/straws are often the safest handle.
- Scissor help: Pre-cut fringe for younger kids and let them do the fun parts: filling, tying, tagging.
Troubleshooting (Because Paper Bags Have Opinions)
Problem: The bag tears while I’m cutting fringe.
Use shorter snips and stop a solid 1–2 inches above the bottom. If your bag is thin, make fringe slightly wider so it
doesn’t shred.
Problem: The handle slides around.
Tie the ribbon tighter and consider adding a small piece of tape inside the bag to anchor the handle against the inner
bag. For dowels, you can also wrap a tiny rubber band around the handle right where the tie sits to add grip.
Problem: The broom looks flat.
Use the two-bag method, fluff the fringe, and add a little more filler so the bag has shape. Tissue paper also helps add
volume without adding weight.
Problem: My fringe looks messy (in a bad way).
Messy can be charmingthis is witchcraft, not a corporate spreadsheet. But if you want it tidier, trim the fringe tips
into a gentle curve or snip off any extra-long strips.
Wrap-Up: Your Party Favors, But Make Them Magical
Witch broomstick goody bags are the sweet spot of Halloween crafting: easy enough for last-minute prep, cute enough for
photos, and flexible enough to match whatever level of spooky you’re feeling. Keep them simple with kraft paper and twine
or dress them up with ribbons and tags that hint at Salem “witchy movie night” vibes. Either way, your guests go home
with treats and you get to enjoy the satisfying feeling of having your life togetherat least in the craft department.
Extra: Real-World Crafting Experiences (What It’s Like to Actually Make These)
Making broomstick goody bags is one of those projects that sounds almost too easyuntil you’re standing in your kitchen
surrounded by brown paper bags like you’re about to host a tiny grocery store grand opening. The good news is that the
process is forgiving, and the “imperfect” details usually make the brooms look more authentic. The better news? Once you
make a couple, your hands learn the rhythm and it becomes almost meditative: snip, snip, fluff, fill, tie, repeat.
In group settings (classrooms, party-prep nights, family craft sessions), the biggest surprise is how naturally this turns
into teamwork. One person becomes the official fringe-cutter, another takes on filling duties, and someone inevitably
appoints themselves Ribbon Manager. If kids are helping, they tend to love stuffing the bags and “testing” the candy
quality (a noble job, apparently). The trick is to give them a task that won’t derail your whole operationpre-cutting
fringe for younger kids prevents accidental “whoops I cut the whole bottom off” moments, while older kids can handle
tying and tagging with minimal drama.
Handles are where experience really shows up. Twigs look the most witchy, but they can be fiddly if they’re too thin,
curved, or splintery. People who’ve made these a few times often switch to pencils or paper straws for consistencyevery
broom ends up the same height, and you don’t have to worry about a pointy end poking through the bag. That said, if you
want the rustic look without the twig hassle, wooden dowels are the “best of both worlds” option. They’re straight, smooth,
and still feel like a proper mini broomstick.
Another very real discovery: your filler choices affect how the broom behaves. Heavy candy (big chocolate bars) can make
the bag slump, while lightweight fillers (mini packs, wrapped pieces, tissue paper) help it hold shape. A simple hack is
to add one crumpled piece of tissue paper at the bottom or sides of the inner bagsuddenly the broom looks fuller without
needing more treats. For adults, adding a tea bag packet or cocoa packet gives the bag a fun “potion ingredient” vibe, and
it also adds that satisfying flat shape that stacks nicely.
If you’re making a lot, you’ll also notice that ribbon is your secret weapon. A single consistent ribbon color instantly
makes the whole batch look coordinated, even if your fringe cuts vary. People often underestimate how much “finished” a tag
makes things look, too. Even a plain kraft tag with a thick black marker can make the favor feel intentionallike it came
from a cute Halloween shop, not your last-minute crafting sprint. And yes, if you’re tempted to add glitter: a tiny dab can
be magical, but too much becomes a “surprise confetti situation” that will haunt you until Thanksgiving.
Finally, the most universal experience with these broomstick bags is the reaction they get. Guests tend to pick them up,
rotate them like they’re inspecting a rare artifact, and then smile because it’s both playful and nostalgic. It’s a small
detail that makes people feel cared forexactly the kind of party magic you want. And when you’re done, lining them up on
a table (bristles fanned out, ribbons fluttering) is weirdly satisfying. You’ll catch yourself thinking, “Okay, I get why
people become Halloween craft people.” Welcome to the coven.