Table of Contents >> Show >> Hide
- Meet the California Poppy (Before You Move In Together)
- When to Plant California Poppy Seeds
- Pick the Perfect Spot: Sun + Drainage (Lean Soil Welcome)
- How to Plant California Poppy Seeds (Step-by-Step)
- California Poppy Care: Minimalism Wins
- Growing California Poppy in Containers (Yes, You Can)
- Troubleshooting: When Your Poppies Get Dramatic
- Design Ideas: Where California Poppies Look the Best
- Seed Saving: Grow Once, Replant Forever (or Until You Run Out of Space)
- Conclusion
- Extra : Real-Life Experiences Growing California Poppy
California poppies are the kind of flower that make you look like you “have a gardener,” even if your main horticultural achievement is keeping a houseplant alive for three weeks. They’re bright, drought-tough, happy in mediocre soil, and they’ll throw a springtime parade with minimal fussthen politely disappear when the weather gets rude. If you want a low-maintenance wildflower that still brings main-character energy, California poppy (Eschscholzia californica) is your plant.
This guide walks you through how to plant California poppy seeds, how to care for them without smothering them with love, and how to keep them blooming longer (or reseeding like they own the place). You’ll also find troubleshooting, container tips, and a real-world “what I learned the hard way” experience section at the end.
Meet the California Poppy (Before You Move In Together)
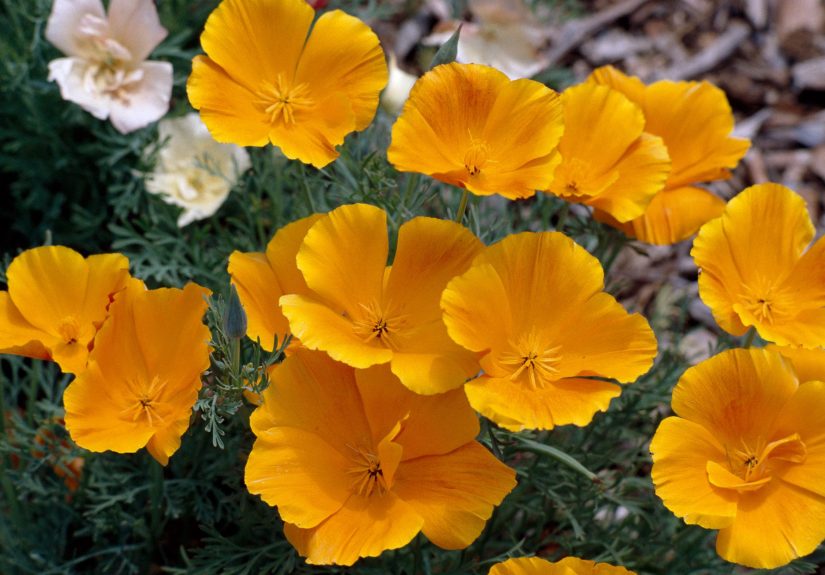
California poppy is a native wildflower of the western U.S. and California’s state flower. In mild climates, it can behave like a short-lived perennial (returning from its root base), but in cold-winter regions it’s typically grown as a self-seeding annual. It’s famous for satiny orange blooms (though cultivars come in cream, yellow, pink, red, and more), plus lacy blue-green foliage that looks delicate while secretly being pretty tough.
Fun quirk: the flowers close at night and on cloudy, windy, or rainy days. Don’t panic. They’re not deadthey’re just taking a nap and refusing to perform without proper lighting.
When to Plant California Poppy Seeds
Timing is the difference between “effortless wildflower meadow” and “I planted something… I think.” California poppies naturally germinate with cool-season moisture and bloom when nights stay fairly cool.
Mild-winter areas (think coastal West, many parts of California, and similar climates)
Fall sowing is the classic move. Scatter seeds after the worst heat has passed and let seasonal rains handle the hard work. Plants usually germinate with fall rains and bloom in late winter through spring, often continuing into early summer depending on your temperatures.
Cold-winter areas (where winter means business)
In places with freezing winters, plant in early spring once the soil is workableabout when you’d sow quick, cool-season crops. You can also try late-fall sowing in some regions for natural stratification, but spring sowing is the simplest and most predictable for many gardeners.
A quick rule of thumb
- Fall sowing = best bloom show in mild climates.
- Early spring sowing = best bet in cold climates.
- Avoid midsummer sowing unless you enjoy nurturing seedlings that refuse to bloom before the season ends.
Pick the Perfect Spot: Sun + Drainage (Lean Soil Welcome)
Full sun isn’t negotiable
California poppy wants full sun. Shade leads to leggy plants, fewer blooms, and general disappointment. If your yard is mostly shade, consider shade-tolerant natives insteadthis one does not do “forest vibes.”
Drainage is the real love language
The biggest deal-breaker is wet roots. California poppies hate soggy soil and standing water. They’re ideal for slopes, rock gardens, sandy beds, and anywhere your hose can’t easily reach (they’ll call that “independence”).
Lean soil = better flowers
Rich soil and lots of nitrogen can push lush foliage at the expense of blooms. Translation: if you pamper them with fertilizer, they’ll grow leaves like a teenager grows laundry pilesfast, dramatic, and not what you asked for.
How to Plant California Poppy Seeds (Step-by-Step)
1) Prep the seedbed
Clear weeds and loosen the top inch or two of soil. You don’t need to dig deeppoppies have a taproot and prefer being left alone once they start.
- Remove competitive weeds first (they can outcompete tiny seedlings).
- Rake the surface so seeds make good contact with soil.
- Skip heavy compost additions unless your soil is pure concrete; even then, go light.
2) Sow shallowly (like, embarrassingly shallow)
California poppy seeds are tiny. They should be sown very shallowoften just pressed into the surface or barely covered. Depending on your method and soil texture, a light cover of about 1/16 inch up to 1/4 inch is plenty. If you bury them like treasure, they’ll stay buried like treasure.
For even distribution, mix seeds with dry sand and broadcast. This helps you avoid the “one dense orange clump and then… nothing for 6 feet” look.
3) Water like you’re starting a campfire: gentle, not a flood
Keep the top layer of soil consistently moist until germination, especially if rain is unreliable. Use a soft spray or watering can rose so you don’t wash seeds away. Once seedlings are established, back offthese are drought-tolerant flowers, not rice.
4) Germination expectations
Germination commonly takes about 1–3 weeks, depending on temperature and moisture. Cooler soils can slow things down, while a steady mild temperature speeds it up.
5) Thin for happier plants
When seedlings have their first true leaves, thin them so each plant has breathing room. Many guides suggest anywhere from 6 to 12 inches apart depending on the variety and the look you want. Crowded poppies can still bloom, but airflow drops and disease pressure goes up.
California Poppy Care: Minimalism Wins
Watering: less is more
After establishment, water sparingly. In many climates, natural rainfall during the growing season is enough. Overwatering is the fastest route to weak growth, fewer blooms, and root issues.
Fertilizer: please don’t
California poppies usually don’t need fertilizer. If your soil is extremely poor and you must do something, use a light hand and avoid high-nitrogen products. Too much nitrogen encourages leafy growth and can contribute to conditions that favor fungal issues.
Mulch: go easy
Thick mulch can prevent self-seeding and reduce germination because seeds need contact with soil and light coverage. If you mulch for weeds, keep it thin and pull it back where you want poppies to reseed.
Deadheading: bloom longer, reseed less
If you want a longer bloom season, deadhead (snip spent flowers). If you want the plant to reseed and return next year, leave some seed pods to mature. You can also do a hybrid strategy: deadhead early for extended bloom, then let late-season pods form to drop seed.
Summer dormancy: the “don’t take it personally” phase
In hot-summer areas, California poppies often bloom in spring and early summer, then the tops can die back and look brown and tired. That’s normal dormancy. You can cut back scruffy growth to tidy the bed and sometimes encourage a second flush when weather cools again.
Growing California Poppy in Containers (Yes, You Can)
While poppies prefer being direct-sown in the ground, you can grow them in containers if you respect their two demands: drainage and not being transplanted a hundred times.
- Choose a deeper pot than you think you need (taproots like depth).
- Use a gritty, well-draining mix (potting mix + added perlite/pumice is helpful).
- Direct sow in the final container if possible. If you start indoors, do it in cells and transplant earlyvery earlyand gently.
- Water carefully: containers dry faster, but soggy soil still causes problems.
Troubleshooting: When Your Poppies Get Dramatic
Problem: “I have leaves but no flowers.”
- Not enough sun (move them, or accept foliage as your new aesthetic).
- Too much fertilizer, especially nitrogen.
- Nights too warmCalifornia poppies often flower more freely with cooler nights.
Problem: Seedlings vanished overnight
- Birds can snack on freshly sown seed.
- Heavy watering can wash seed away.
- Weed competition can smother seedlings.
Fix: rough up the soil surface, reseed lightly, and water with a gentle mist until established.
Problem: Powdery mildew shows up
Powdery mildew can appear as white powdery patches on leaves and shoots, especially when conditions favor it (moderate temperatures, shade, and poor airflow). Cultural prevention usually does a lot:
- Grow in full sun.
- Space plants for air circulation.
- Avoid excess nitrogen.
- Water earlier in the day so foliage dries quickly; some guidance notes overhead rinsing can knock spores off when done at the right time.
Problem: “My poppies are reseeding like a glitter bomb.”
Yep, they can do that. Deadhead more consistently, remove seed pods before they split, or pull seedlings while small. If you want a wildflower garden look, let them roam a bitbut set boundaries like a responsible adult.
Design Ideas: Where California Poppies Look the Best
1) Wildflower meadow or slope
Poppies shine when planted in driftsespecially on hillsides with good drainage. Broadcast seeding is ideal, and mixing seeds with sand helps you spread them evenly.
2) Rock gardens and dry borders
Their drought tolerance and love of lean soil make them perfect companions for other low-water plants. They’re also great for that stubborn strip of soil by the driveway that laughs at irrigation.
3) Companion planting (native-friendly mix)
For a “you totally planned this” look, pair California poppy with other spring-blooming wildflowers and natives with similar needs, such as baby blue eyes, tidy tips, lupines, and globe gilia. The goal: sun-loving plants that don’t need rich soil or constant watering.
Seed Saving: Grow Once, Replant Forever (or Until You Run Out of Space)
After flowering, poppies form long seed pods. Let pods dry on the plant until they turn tan and feel papery, then collect them before they split open and fling seeds like confetti.
- Snip mature pods into a paper bag.
- Let them dry a few more days indoors.
- Shake or crumble pods to release seeds.
- Store seeds in a labeled envelope or jar in a cool, dry place.
Pro tip: If you’re growing fancy cultivars (double blooms, special colors), saved seed may not “come true” next year. You might get a surprise remixsometimes delightful, sometimes… aggressively orange.
Conclusion
If you remember only three things, make them these: plant California poppy from seed (they dislike transplanting), give them full sun and sharp drainage, and water lightly after they’re established. Treat them like a capable friend rather than a fragile celebrity: they’ll show up, do their job beautifully, and then take a well-earned break when the heat kicks in. Whether you’re building a wildflower meadow, brightening a dry border, or turning a boring patch of dirt into spring fireworks, California poppy is an easy win.
Extra : Real-Life Experiences Growing California Poppy
The first time I tried growing California poppies, I did what many well-meaning plant parents do: I tried too hard. I picked a “nice” bed with rich soil, tucked the seeds in like they were going to sleep, watered daily like I was raising koi fish, and waited for my Pinterest-worthy bloom explosion. What I got instead was a short-lived green fuzz and a powerful lesson in letting tough plants be tough.
Experience lesson #1: Don’t bury the seeds like you’re hiding evidence. California poppy seeds are tiny, and the best germination I’ve ever seen came from the “scatter, pat, and walk away confidently” method. One season, I sowed two patches: one I covered with about a quarter inch of soil (carefully, lovingly), and another I barely pressed into the surface. The surface-sown patch sprouted like it had somewhere important to be. The buried patch showed up late and sparselike it missed the memo.
Experience lesson #2: Overwatering is the sneakiest form of sabotage. When seedlings appear, it’s tempting to keep the soil wet “just in case.” But once poppies establish, too much water makes them floppy and more prone to problems. The healthiest plants I’ve grown were on the edge of my yard where the sprinkler barely reachesbecause poppies prefer a little independence. Now I water during germination, then I gradually reduce watering until they’re basically living off vibes and occasional rain.
Experience lesson #3: Summer dormancy can look like failureuntil you recognize it. In a hotter area, my poppies bloomed wildly in spring, then turned brown and scruffy by early summer. I thought I’d done something wrong. I hadn’t. The plant was doing its normal “it’s too hot, I’m out” routine. Cutting back the ragged tops made the bed look cleaner, and when temperatures cooled later, I even got a second flush of flowers.
Experience lesson #4: If you want them next year, plan for reseeding. One year I deadheaded every spent bloom because I loved the neat look. The next spring, the poppies were… not there. Turns out, I’d been extremely efficient at preventing seed production. Now I deadhead early to extend bloom, then later I let some pods mature so the patch can reseed naturally. It’s the gardening version of “save a little for later.”
Experience lesson #5: Expect personality. Poppies close their flowers on cloudy mornings and reopen when the sun returns. The first time it happened, I walked outside like, “Who hurt you?” Now I consider it a weather indicator. Bright open flowers? Sunny day. Closed blooms? Bring a jacketor at least lower your expectations.
After a few seasons, California poppy became my go-to recommendation for friends who want an easy wildflower garden. The trick isn’t fancy techniqueit’s restraint. Give them sun, give them drainage, start them from seed where they’ll live, and then let them do what they evolved to do: bloom like a sunrise and make you look way more skilled than you feel.