Table of Contents >> Show >> Hide
- Why Teaching “Shake” Is More Than a Party Trick
- Before You Start: Set Your Dog Up for Success
- How to Teach Your Dog to Shake Hands: 13 Steps
- Step 1: Start With a Calm Sit
- Step 2: Hold a Treat in a Closed Fist
- Step 3: Mark the Moment Your Dog Lifts a Paw
- Step 4: Repeat Until Paw Lifting Becomes Predictable
- Step 5: Open Your Hand and Let the Paw Touch Your Palm
- Step 6: Add the Verbal Cue “Shake”
- Step 7: Gently Hold the Paw for One Second
- Step 8: Build Duration Slowly
- Step 9: Fade the Treat From Your Hand
- Step 10: Practice With Both Paws Separately
- Step 11: Add Mild Distractions
- Step 12: Reward Randomly Once the Trick Is Solid
- Step 13: Keep It Fun and End on a Win
- Common Mistakes When Teaching a Dog to Shake
- Troubleshooting: What If Your Dog Won’t Lift a Paw?
- How Long Does It Take to Teach a Dog to Shake?
- Tips for Puppies, Adult Dogs, and Senior Dogs
- Fun Variations After Your Dog Learns Shake
- Real-Life Experience: What Teaching “Shake” Often Looks Like at Home
- Conclusion
Note: This article is written for web publishing and synthesizes widely accepted positive-reinforcement dog training guidance from reputable U.S. pet, veterinary, and animal-welfare resources.
Teaching your dog to shake hands is one of those tricks that looks fancy, feels adorable, and secretly teaches useful life skills. Yes, it is cute when your dog politely offers a paw like a tiny furry business executive closing a deal. But beyond the “aww” factor, the shake command can help your dog build confidence, improve focus, accept gentle paw handling, and strengthen the bond between the two of you.
The good news? You do not need to be a professional dog trainer, own a whistle collection, or speak fluent “woof.” You need patience, small treats, a calm space, and a willingness to celebrate tiny wins like your dog just won Best Actor in a Paw-Based Performance. This guide walks you through how to teach your dog to shake hands in 13 clear steps using positive reinforcement, simple cues, and short practice sessions that keep training fun.
Why Teaching “Shake” Is More Than a Party Trick
At first glance, “shake” seems like a cute dog trick for guests, photos, and holiday cards. And it absolutely is. However, teaching your dog to shake hands also helps your dog practice impulse control, body awareness, and communication. Your dog learns that offering a specific behavior earns a reward, which makes future training easier.
The shake command can also make paw handling less weird for your dog. Many dogs dislike having their paws touched because paws are sensitive. When you teach shake with treats, praise, and respect, your dog learns that human hands near their paws can predict good things. This can help later with nail trims, grooming, vet exams, towel drying muddy feet, or checking for burrs after a walk.
Before You Start: Set Your Dog Up for Success
The best dog training sessions are short, cheerful, and realistic. Think “mini lesson,” not “final exam.” Most dogs learn better in 3- to 5-minute sessions than in long, repetitive drills. Puppies, easily distracted dogs, and high-energy breeds may need especially short sessions with frequent breaks.
What You’ll Need
Gather a few small, soft treats that your dog loves. Tiny pieces are best because your dog can eat them quickly without forgetting the lesson halfway through chewing. You can also use part of your dog’s regular kibble if your dog finds it motivating. A clicker is helpful but optional. A marker word such as “yes!” works well if you say it at the exact moment your dog does the right behavior.
Choose a quiet room with minimal distractions. Turn off the TV, put away squeaky toys, and avoid training right when guests arrive or dinner is being served. Your dog should be alert but not bouncing off the furniture like a tennis ball with opinions.
Choose Your Cue
Most people use “shake,” “paw,” or “shake hands.” Pick one cue and use it consistently. If one family member says “shake,” another says “give me your foot,” and a third says “sir, present the paw,” your dog may reasonably file a complaint with management.
How to Teach Your Dog to Shake Hands: 13 Steps
Step 1: Start With a Calm Sit
Ask your dog to sit. A sitting position makes it easier for your dog to lift one paw without wandering away, jumping, or trying to turn the lesson into interpretive dance. If your dog does not know “sit” yet, practice that first using treats and praise. Your dog does not need perfect obedience, but a simple sit gives the shake lesson a clean starting point.
Keep your body relaxed. Sit or kneel in front of your dog so you are not towering over them. Some dogs feel uncomfortable when people lean too far forward, so keep your movements soft and friendly.
Step 2: Hold a Treat in a Closed Fist
Place a small treat in your closed fist and hold it near your dog’s chest or slightly in front of one paw. Let your dog sniff your hand. Many dogs will lick, nose, or gently paw at your fist to investigate. You are waiting for that paw movement.
Do not say “shake” yet. At this stage, your dog does not know what the word means. You are first helping your dog discover the behavior: lifting a paw toward your hand.
Step 3: Mark the Moment Your Dog Lifts a Paw
The instant your dog lifts a paw, say “yes!” or click your clicker, then give the treat. Timing matters. The marker tells your dog, “That exact thing you just did is what earned the reward.” If your dog lifts a paw and you mark three seconds later, your dog may think the reward was for blinking, looking at the rug, or contemplating squirrels.
Do not worry if the first paw lift is tiny. A small shift of weight or a paw barely leaving the floor is a great beginning. Training often starts with rewarding small pieces of the final behavior.
Step 4: Repeat Until Paw Lifting Becomes Predictable
Repeat the closed-fist setup several times. Hold out your treat hand, wait for your dog to paw at it, mark the paw movement, then reward. Over several repetitions, your dog should begin lifting a paw more quickly.
If your dog only sniffs or licks your hand, be patient. Keep your fist still. Many dogs eventually try a paw because licking does not open the magical snack vault. When the paw appears, mark and reward like your dog just invented indoor plumbing.
Step 5: Open Your Hand and Let the Paw Touch Your Palm
Once your dog is regularly lifting a paw, change the picture slightly. Hold out an open palm instead of a closed fist. At first, your dog may be confused because the treat is no longer obviously trapped in your hand. Wait quietly. When your dog places a paw on your palm, mark and reward with a treat from your other hand.
Using the opposite hand for treats helps prevent your dog from thinking the cue means “claw at the snack hand until snacks fall out.” The goal is a polite paw touch, not a tiny excavation project.
Step 6: Add the Verbal Cue “Shake”
When your dog reliably puts a paw on your open palm, add your cue. Say “shake” right before your dog’s paw touches your hand. Then mark and reward. Repeat this many times so your dog connects the word “shake” with the action of placing a paw in your hand.
Do not repeat the cue over and over. Say it once, then wait. Repeating “shake, shake, shake, shake” can teach your dog that the cue is actually a long chant performed by a frustrated human.
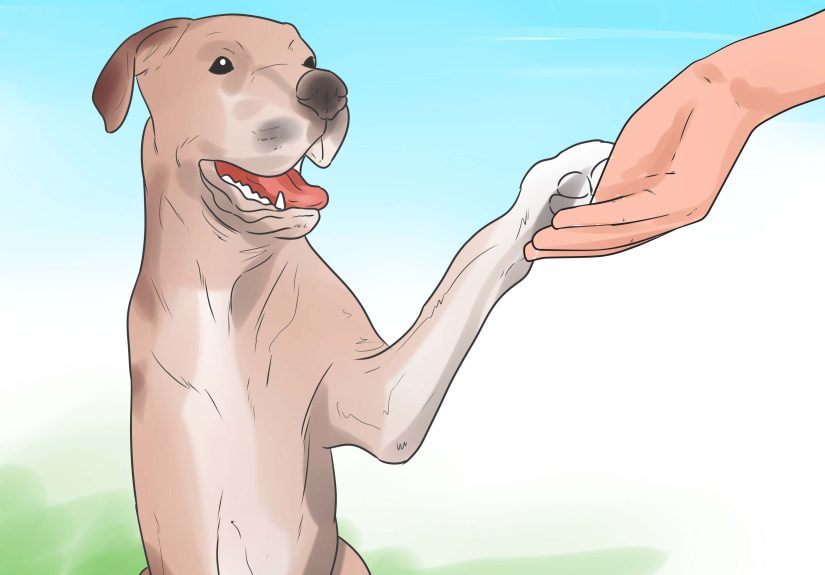
Step 7: Gently Hold the Paw for One Second
After your dog is placing a paw in your hand, gently close your fingers around the paw for about one second. Mark and reward. Keep the hold light and brief. This step turns a paw touch into a real handshake while helping your dog feel comfortable with mild paw handling.
If your dog pulls away, let them. Never grab, squeeze, or force the paw. Go back to rewarding a simple paw touch for a few sessions, then try a shorter hold later.
Step 8: Build Duration Slowly
Once your dog accepts a one-second paw hold, gradually increase the duration to two seconds, then three. Keep sessions upbeat. Reward before your dog becomes uncomfortable. The best training makes your dog think, “I am brilliant and snacks agree,” not “Why is my human holding my foot hostage?”
For most dogs, a short, polite shake is enough. You are not training your dog to sign legal documents.
Step 9: Fade the Treat From Your Hand
At first, food helps your dog understand the game. Over time, you want your dog to respond to the cue and hand signal, not just the smell of chicken. Begin keeping treats in a pouch, bowl, or pocket instead of in your hand. Say “shake,” present your empty palm, mark the correct behavior, then reward from the treat supply.
This teaches your dog that rewards may come after the behavior, even when no treat is visible. That is a major step toward reliable training.
Step 10: Practice With Both Paws Separately
Many dogs naturally prefer one paw, just like people have a dominant hand. Once your dog can shake with one paw, teach the other paw separately. You can present your hand slightly toward the paw you want or use separate cues such as “shake” for one paw and “other paw” for the second.
Do not rush this. Your dog may look at you as if you have changed the terms of the contract without warning. Reward small attempts and keep the mood light.
Step 11: Add Mild Distractions
After your dog can shake in a quiet room, practice in slightly different locations. Try the kitchen, the hallway, the backyard, or near the front door when things are calm. Dogs do not automatically understand that “shake” means the same thing everywhere. Training in different places helps your dog generalize the cue.
Start with easy distractions and gradually increase difficulty. If your dog cannot shake while another person is talking nearby, they probably are not ready to perform during a family barbecue with hot dogs in the air.
Step 12: Reward Randomly Once the Trick Is Solid
When your dog understands the shake command well, you can stop giving a food treat every single time. Continue using praise, affection, or play, and occasionally surprise your dog with a treat. Random rewards can keep learned behaviors strong because your dog never knows when the next paycheck arrives.
However, do not fade rewards too soon. In the early learning stage, pay generously. Dogs, much like humans, tend to appreciate being compensated for quality work.
Step 13: Keep It Fun and End on a Win
End each session while your dog is still interested. Ask for one easy shake, reward it, and finish with praise or play. Ending on success helps your dog look forward to the next session.
If your dog gets frustrated, distracted, or tired, stop. Training should feel like a game, not a mandatory staff meeting. A cheerful 3-minute session is far better than a 20-minute battle of wills.
Common Mistakes When Teaching a Dog to Shake
Moving Too Fast
Many owners want the polished handshake immediately. Dogs learn best when each step is clear. If your dog is confused, go back to the last step they understood and practice there. Progress is not ruined by slowing down; it is usually improved by slowing down.
Grabbing the Paw
Forcing your dog’s paw into your hand may create discomfort or resistance. Instead, let your dog offer the paw voluntarily. This builds confidence and keeps training positive.
Training for Too Long
Long sessions can make dogs bored, tired, or silly. Once your dog starts wandering away, scratching, yawning, or offering every trick they know except shake, the lesson has probably gone on long enough.
Using Treats That Are Too Big
Large treats slow down training and may fill your dog up quickly. Use pea-sized pieces or smaller. Your dog cares more about the number of rewards than the size of each one.
Troubleshooting: What If Your Dog Won’t Lift a Paw?
If your dog does not naturally paw at your hand, try placing your closed fist a little lower or closer to one paw. You can also reward tiny movements, such as shifting weight or slightly lifting a paw. Another option is to start after your dog has learned a paw-related behavior, such as touching a target with a paw.
Some dogs are cautious about paw handling. For these dogs, spend extra time pairing gentle touches near the shoulder, leg, and paw with treats. Keep touch brief and stop before your dog pulls away. If your dog seems painful, limps, guards a paw, or strongly resists handling, check with a veterinarian before continuing.
How Long Does It Take to Teach a Dog to Shake?
Some dogs learn the basics in one session. Others need several days or weeks of short practices. Age, confidence, previous training, motivation, and personality all matter. A food-loving Labrador may offer a paw quickly if snacks are involved. A cautious rescue dog may need more time to trust the process. A dignified senior dog may participate only after deciding your request meets their standards.
The timeline matters less than the relationship. If your dog is learning, engaged, and comfortable, you are doing it right.
Tips for Puppies, Adult Dogs, and Senior Dogs
Puppies
Puppies often learn quickly, but their attention spans are tiny. Keep sessions short and cheerful. Reward calm behavior and avoid encouraging pawing that becomes pushy. If your puppy starts swatting at people for attention, practice asking for shake only when cued and reward polite responses.
Adult Dogs
Adult dogs can absolutely learn new tricks. They may even learn faster than puppies because they have better focus. Use rewards your dog values and practice consistently. If your adult dog has never done trick training before, be patient while they discover that offering behavior is allowed.
Senior Dogs
Senior dogs can enjoy shake training too, but comfort comes first. Arthritis, stiffness, or past injuries may make paw lifting uncomfortable. Keep the movement low, short, and gentle. If your senior dog seems uncomfortable, choose a different trick that is easier on their body.
Fun Variations After Your Dog Learns Shake
Once your dog understands shake, you can build related tricks. “High five” is usually the next easiest step. Hold your palm higher and vertical, then reward your dog for touching it with a paw. “Wave” is similar, except you reward the paw lift before contact. “Other paw” teaches your dog to switch sides. These variations add mental enrichment and make your dog look like they are ready for a talent show, or at least a very enthusiastic video call.
Real-Life Experience: What Teaching “Shake” Often Looks Like at Home
In real life, teaching a dog to shake hands rarely looks as smooth as a professional training video. The edited version shows a dog learning in minutes. The home version may include treat crumbs on the floor, a dog offering a dramatic belly flop instead of a paw, and a human whispering, “Why are you licking my sleeve?” That is completely normal.
Many owners notice that the first breakthrough happens when they stop trying so hard. Instead of grabbing the paw or repeating the cue, they simply hold a treat in a closed fist and wait. The dog sniffs. The dog licks. The dog stares. Then, suddenly, one paw lifts slightly. That tiny paw movement is the golden moment. Mark it immediately and reward. After a few repetitions, the dog often begins to think, “Ah, the paw is the password.”
One helpful experience is to train before mealtime using part of the dog’s regular food. A hungry-but-not-starving dog is often more focused. Another good time is after a short walk, when the dog has burned off a little energy but is not exhausted. Training right after a dog wakes from a nap can work beautifully for calm dogs, while high-energy dogs may need a few minutes of movement first.
Owners of small dogs sometimes find it easier to sit on the floor so the dog does not have to reach too high. Owners of large dogs may need to present the palm lower than expected to keep the movement comfortable. A Great Dane handshake can feel like receiving a polite greeting from a velvet-covered table leg, so balance matters.
Another common experience is “paw inflation.” Once a dog learns that paws earn rewards, they may start offering paws for everything: dinner, attention, opening doors, emotional support during sandwich preparation. This is funny, but it is also a reminder to reward the behavior only when you ask for it. If your dog paws at you without a cue, redirect to sit or simply wait for calm behavior before giving attention.
Some dogs become excited and slap their paw down too hard. For those dogs, reward only gentle paw touches. Hold your hand slightly lower, keep your voice calm, and avoid turning the session into a hype festival. If your dog gets too wild, pause and ask for an easy sit before trying again.
Cautious dogs may need a slower approach. They may not like having their feet handled, especially if they have had stressful nail trims or rough handling in the past. For these dogs, the best experience comes from trust-building. Reward looking at your hand, then leaning toward it, then lifting a paw slightly, then touching your palm. The finished trick may take longer, but the dog gains confidence along the way.
One of the best parts of teaching shake is how quickly it becomes a shared routine. Many dogs begin to brighten when they hear the cue because it predicts attention, praise, and a fun little job. The trick becomes more than a trick. It becomes a friendly conversation: you ask, your dog answers, and both of you leave the moment feeling more connected.
Conclusion
Teaching your dog to shake hands is simple, useful, and ridiculously charming. Start with a calm sit, reward small paw movements, add your verbal cue at the right time, and build the behavior slowly. Use positive reinforcement, keep sessions short, and respect your dog’s comfort with paw handling. Whether your dog learns in one afternoon or over several weeks, the process should feel fun for both of you.
A polished shake command can impress guests, support grooming practice, and give your dog a confidence-boosting skill. More importantly, it reminds your dog that learning with you is safe, rewarding, and maybe even snack-adjacent. And honestly, that is the kind of handshake deal every dog can get behind.