Table of Contents >> Show >> Hide
- Why This DIY Sign Hanger Works So Well
- Materials You’ll Need
- Choosing the Right Wood and Size
- Prep the Wood Like You Mean It
- Paint or Stain? Choose Your Personality
- Design the Lettering Without Making It Look Like a Menu From 2007
- Build the Functional Parts
- How to Hang It Safely
- Styling Ideas for a Better Finished Look
- Common Mistakes to Avoid
- Customization Ideas
- Final Thoughts
- Experience and Inspiration: Living With a Coffee and Wine Sign Hanger
If your daily schedule can be translated into “espresso now, merlot later,” congratulations: you are exactly the kind of person who needs a How To Tell Time – Coffee And Wine DIY Sign Hanger. This charming wall project is part decor, part storage, and part personality test. It says, “I am organized,” while also whispering, “But not in a boring way.”
A good coffee and wine sign hanger does more than hold mugs and glasses. It creates a tiny ritual station in your kitchen, breakfast nook, or home bar. In the morning, it points you toward caffeine and competence. In the evening, it gracefully suggests that spreadsheets are over and cabernet is welcome. That is not just decor. That is emotional support with hooks.
This guide walks you through how to make a funny, functional wall sign that combines a wood sign, mug hooks, and stemware storage into one polished DIY piece. Whether you love farmhouse style, modern rustic decor, or just enjoy making your walls a little less empty and a little more entertaining, this project is a smart weekend build.
Why This DIY Sign Hanger Works So Well
The beauty of this project is that it solves two problems at once. First, it gives you a decorative focal point. Second, it adds practical storage for the beverages that bookend many people’s days. A typical layout includes a playful “How to tell time” phrase, an AM coffee section, and a PM wine section. On one side, hooks hold mugs. On the other, a stemware holder or routed slots cradle wine glasses upside down.
That combination is what makes the piece memorable. It is not just another quote sign trying to survive on charm alone. It earns its place on the wall. It works especially well in small kitchens, coffee bars, apartments, and dining corners where every inch has to pull double duty.
Best Places to Hang It
You can mount your sign hanger above a coffee station, beside a bar cart, near open shelving, or on a kitchen wall that needs a little life. If you are styling a compact space, this project is especially useful because vertical storage frees up precious counter room. A wall that once did nothing suddenly becomes your favorite corner of the house.
Materials You’ll Need
You do not need a full woodworking shop to make this project. That is part of its appeal. Most beginners can build it with a few basic tools and a little patience.
- One wood board or birch plywood panel, about 24 x 10 inches to 24 x 12 inches
- Two to four mug hooks, depending on your design
- A small stemware rack or a wood strip cut to hold wine glass bases
- Sandpaper in 120-grit and 220-grit
- Wood filler, if needed
- Stain or paint
- Foam brush, bristle brush, or lint-free cloth
- Stencil vinyl, contact paper stencil, or pre-made stencil
- Acrylic craft paint or paint marker for lettering
- Painter’s tape
- Drill and screws
- Hanging hardware such as D-rings, sawtooth hanger, or a French cleat for heavier builds
- Clear protective topcoat
If you want the easiest version, buy a ready-made under-shelf stemware holder and attach it to the wine side. If you want the more handmade version, create narrow slots in a wood strip so the base of each wine glass slides in and the bowl hangs below. Both work. One just involves less measuring and fewer opportunities to invent new curse words.
Choosing the Right Wood and Size
Pine is budget-friendly, widely available, and easy to work with, which makes it a strong choice for beginners. Birch plywood is another smart option if you want a smooth, clean surface for lettering. A sign around 24 inches wide usually feels balanced for a piece that needs room for text, mugs, and glasses without becoming a small canoe on your wall.
If you plan to hang heavier mugs or larger red wine glasses, give yourself more width and breathing room. Crowded hardware looks awkward, and awkward hardware is only funny when it is not holding breakable things.
Suggested Layout
- Left side: two mug hooks under “AM” or “Coffee”
- Center: main phrase, such as “How to Tell Time”
- Right side: two wine-glass slots or a stemware holder under “PM” or “Wine”
This layout keeps the piece visually balanced and easy to use. If you want extra symmetry, add a small divider graphic, like a clock face, dot, flourish, or line between the AM and PM sections.
Prep the Wood Like You Mean It
Before you dream about fonts and stain colors, handle the boring grown-up step: surface prep. Good prep is the difference between “cute handmade decor” and “why does this board look like it fought a lawn mower?”
Start by inspecting the board for dents, glue spots, splinters, and rough edges. Fill any unwanted holes, let the filler dry, and sand the surface smooth. Begin with 120-grit sandpaper, then move to 220-grit for a finer finish. Always sand in the direction of the grain. Once the board is smooth, remove all dust with a vacuum, dry brush, or cloth.
If you are staining soft wood like pine, test the color first on the back or on a scrap piece. Wood can be moody. One board drinks stain like a gentleman. Another board behaves like it has unresolved issues. Testing first saves regret later.
Paint or Stain? Choose Your Personality
The finish you choose sets the mood for the whole project.
For a farmhouse look
Use a medium brown stain, white lettering, and matte black hooks. This combo feels classic, cozy, and easy to style with neutral kitchens.
For a modern look
Paint the board black, charcoal, sage, or creamy white. Use simple lettering and sleek hardware. This version feels cleaner and more graphic.
For a vintage or distressed look
Use chalk-style paint, sand the edges lightly after drying, and finish with a soft matte topcoat. A slightly weathered sign looks like it has a story, even if the story is just that you spent Saturday in your garage wearing old sneakers.
Let the finish cure fully before adding lettering. Rushing at this stage is how fingerprints become “texture.”
Design the Lettering Without Making It Look Like a Menu From 2007
The phrase is the star of the show, so keep it readable. A popular format is:
How to Tell Time
AM: Coffee
PM: Wine
You can also try playful variations like “Morning Fuel / Evening Therapy,” “Coffee First / Wine Later,” or “AM Courage / PM Reward.” If your style leans more elegant than cheeky, keep the joke subtle and let the materials do the talking.
Best Font Pairings
Use one decorative script font for emphasis and one clean sans-serif or serif for the supporting text. Too many fancy fonts make the sign harder to read. The goal is stylish, not ransom note.
Three Easy Ways to Add Lettering
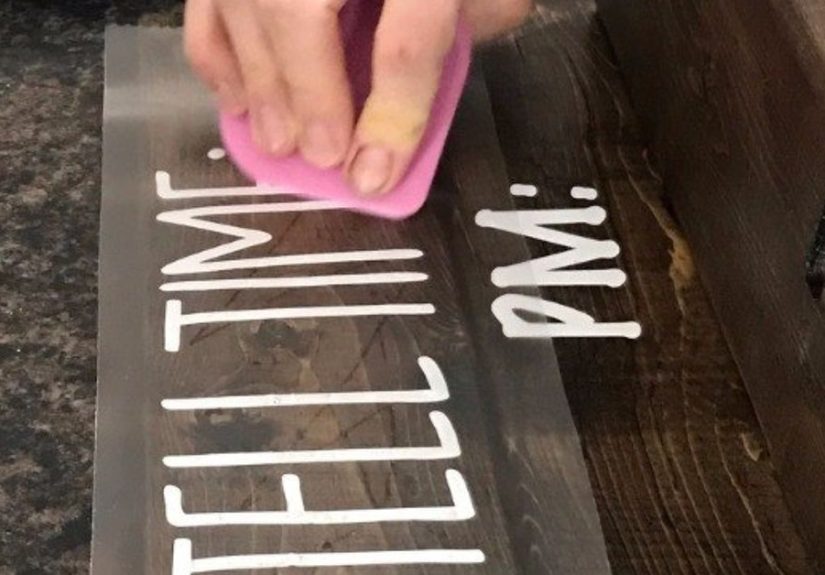
- Stencil vinyl or contact paper: Great for crisp lines and repeatable results.
- Transfer paper and hand painting: Good if you like a more handmade feel.
- Paint markers: Excellent for touch-ups, outlines, or smaller details.
When stenciling, secure the stencil well with painter’s tape and apply paint with a light dabbing motion. Do not overload the brush. Too much paint causes bleed, and nothing ruins a beautiful sign faster than letters that look like they melted during an emotional monologue.
Build the Functional Parts
Now comes the fun part: turning your sign into an actual hanger instead of a very opinionated plank.
Step 1: Mark the mug hook placement
Measure equal spacing for your mug hooks. Give each mug enough room so handles do not knock into each other. Install the hooks low enough to look intentional, but high enough that mugs do not hide your lettering.
Step 2: Add the wine glass holder
You have two main options. The first is to screw a pre-made stemware rack to the back or underside of the wine side. The second is to create a DIY holder using a narrow strip of wood with carefully cut slots. Measure the base of your wine glasses and leave enough clearance for the bowls to hang freely. Store the glasses upside down so they stay easier to access and less likely to gather dust.
Step 3: Test with the real glasses and mugs
Before final assembly, actually hang the mugs and slide in the glasses. This sounds obvious, but plenty of DIY projects are built around optimistic assumptions. Your favorite oversized mug does not care about your assumptions. Test fit everything while changes are still easy.
How to Hang It Safely
This is the section that keeps your sign from becoming kitchen confetti. Once you add mugs and stemware, the piece has real weight. If your sign is small and light, sturdy D-rings may be enough. If it is wider, heavier, or made from thicker wood, a French cleat is the smarter choice because it distributes weight more securely and helps the sign sit flush to the wall.
Try to anchor the hanger into studs when possible. If that is not practical, use the right wall anchors for your wall type and load. Decor is charming. Falling decor is a jump scare.
Styling Ideas for a Better Finished Look
Once your sign is built, style the surrounding space so it looks intentional instead of randomly hilarious.
For a coffee bar corner
Pair the sign with a tray of syrups, a canister for beans or pods, stacked saucers, and a small plant. A simple lamp or warm under-shelf light makes the area feel more polished.
For a mini home bar
Add a narrow shelf below the sign for a bottle opener, napkins, a corkscrew, and a couple of favorite bottles. Suddenly you are not just storing glasses. You are curating a vibe.
For gifting
This project makes a terrific housewarming, wedding, anniversary, or Mother’s Day gift. Customize the stain color, the font, or the phrase to match the recipient’s style. Handmade gifts feel more personal, and this one is useful enough that it will not end up in the mysterious closet where decorative baskets go to retire.
Common Mistakes to Avoid
- Skipping test layouts: Always mock up the text and hardware before drilling.
- Using too much stencil paint: Light layers create cleaner edges.
- Ignoring weight: Mugs and glasses are not featherweight. Use hardware accordingly.
- Making the text too small: If no one can read the joke, the sign loses half its charm.
- Choosing style over function: Pretty is good. Pretty and usable is better.
Customization Ideas
If you want to make your coffee and wine DIY sign hanger feel more personal, there are plenty of ways to riff on the basic design.
- Add family name lettering at the bottom
- Swap “wine” for “tea,” “cocktails,” or “hot cocoa”
- Use seasonal colors for holiday decor
- Add a small shelf for pods, spoons, or corks
- Include a chalkboard section for daily messages
- Install LED puck lights above the sign for drama
This is one of those rare DIY projects that can be funny, useful, giftable, and genuinely attractive at the same time. That is a lot of pressure for one board, but it can handle it.
Final Thoughts
A How To Tell Time – Coffee And Wine DIY Sign Hanger is the kind of project that wins people over immediately. It has humor. It has purpose. It turns a blank wall into a conversation piece that also stores things you actually use. That is excellent design in a nutshell: make it charming, make it practical, and make it feel like it belongs in your life.
The best version is not necessarily the fanciest one. It is the one that fits your space, supports your routine, and makes you smile every time you walk by it. If it also makes a guest laugh and say, “Okay, I need one,” then your work here is done.
So sand the board, choose a finish, line up those hooks, and let your wall finally tell the truth about your schedule. Morning runs on coffee. Evening runs on wine. Time management has never looked this good.
Experience and Inspiration: Living With a Coffee and Wine Sign Hanger
One of the best things about this project is how quickly it stops feeling like a craft and starts feeling like part of the home. That is the difference between a random weekend build and a DIY piece you genuinely love. A How To Tell Time sign hanger has a personality that lands immediately, but the longer you live with it, the more practical it becomes. The mugs are where you need them. The wine glasses are off the counter. The wall suddenly has a purpose beyond just existing and collecting nothing but disappointment.
In real life, the charm of this project is in the little moments. In the morning, you reach for your favorite mug, and it is hanging right there like it has been waiting all night to support your ambitions. In the evening, the wine glass section feels like a small reward station. Even if your day was chaotic, your sign is calm, organized, and deeply confident about the order of events: coffee first, wine later. It is hard not to respect that kind of structure.
This project also tends to become a conversation starter faster than expected. Guests notice it almost immediately because it is both decorative and funny. They read it out loud. They laugh. Then they ask where you bought it, which is one of the great joys of DIY because you get to say, with healthy dramatic pause, “I made it.” That sentence alone adds at least 15 percent more satisfaction to the project.
There is also something surprisingly flexible about the design. In one home, it can look rustic and farmhouse-inspired with stained wood and white lettering. In another, it can look sleek and modern with a black background and minimal typography. In a smaller apartment kitchen, it can act as a compact storage solution. In a larger home bar, it becomes a clever accent piece that keeps the room from taking itself too seriously. Few projects manage to be this adaptable without becoming generic.
Many DIYers also end up making more than one. The first version teaches you what spacing works best, how large the text should be, and whether your chosen mugs are secretly too chunky for the hook arrangement. The second version usually comes out even better, which is dangerous because now you are thinking about making one for a friend, your sister, your neighbor, and maybe that one relative who owns seven decorative signs but somehow still deserves another.
What stands out most is how this project blends humor and usefulness without feeling cheesy. That balance is harder to achieve than people think. Too much humor and it looks gimmicky. Too much function and it feels cold. But this sign hanger hits the sweet spot. It says your home has style, but it also says your home understands the emotional importance of beverages. Frankly, that is the kind of energy more decor should bring to the table.
If you are choosing a DIY project based on long-term enjoyment rather than just quick gratification, this one earns its place. It looks good, works hard, photographs well, and makes ordinary routines feel a little more curated. And in the grand tradition of good home projects, it solves a storage problem while also making your space more you. That is not just smart crafting. That is excellent timekeeping.