Table of Contents >> Show >> Hide
- Why an Origami Owl Is a Great Beginner Project
- What You Need
- Origami Terms You Should Know Before You Start
- How to Make an Origami Owl: Step-by-Step
- Step 1: Place the Paper Like a Diamond
- Step 2: Make the First Diagonal Crease
- Step 3: Make the Second Diagonal Crease
- Step 4: Fold the Side Corners to the Center
- Step 5: Fold the Top Corner Down
- Step 6: Create the Ear Tufts
- Step 7: Fold the Bottom Corner Up
- Step 8: Shape the Wings
- Step 9: Make the Beak
- Step 10: Refine the Body
- Step 11: Flip and Press
- Step 12: Add Eyes and Feather Details
- Tips for Better Origami Owl Results
- Common Mistakes and How to Fix Them
- Creative Ways to Use Your Finished Origami Owl
- Why This Craft Never Gets Old
- Personal Experience: What Making an Origami Owl Actually Feels Like
- Final Thoughts
Note: Body-only HTML, English content only, ready for copying and web publishing.
If you have ever looked at a square sheet of paper and thought, “You know what this needs? More personality,” then congratulations: an origami owl is your next tiny masterpiece. This project is one of those rare crafts that feels both charming and oddly impressive. You start with one flat sheet, add a few careful folds, and somehow end up with a wise-looking bird that seems qualified to judge your bookshelf, supervise your desk, or guard your coffee mug.
The best part is that an origami owl can be simple enough for beginners while still looking delightfully clever. You do not need expensive supplies, a giant crafting table, or the patience of a monk who has transcended snack breaks. You just need square paper, a flat surface, and a willingness to crease like you mean it. Many beginner-friendly owl models also build on the same paper-folding habits used in other classic animal designs, which means this project is a sneaky way to improve your general origami skills without feeling like you are doing homework.
In this guide, you will learn how to make a simple flat origami owl from one square sheet of paper. Along the way, you will also learn how to keep your folds clean, how to fix common mistakes, and how to turn your finished owl into décor, gift tags, classroom crafts, party decorations, or a small paper companion that silently watches your life choices. Let’s get folding.
Why an Origami Owl Is a Great Beginner Project
An owl is a fantastic origami subject because the shape is naturally forgiving. Real owls already look a little mysterious, a little round, and slightly dramatic, so even if your folds are not mathematically perfect, the final model can still look intentional. Honestly, the owl may look even wiser when it is slightly lopsided, like it has seen things.
This project also teaches a few core paper-folding habits. You will practice symmetry, use pre-creases to guide later folds, and shape a flat model into a recognizable animal using nothing more than angles and clean edges. That is the magic of origami in a nutshell: one square, a handful of folds, and suddenly your paper has a face.
For beginners, an origami owl is also more approachable than highly complex creatures with skinny legs, long tails, or dramatic wingspans. An owl’s body is compact. Its head is prominent. Its ears, wings, and beak can all be suggested with a few well-placed folds. In other words, the design does not ask you to wrestle a paper octopus on your first day.
What You Need
- 1 square sheet of origami paper, ideally 6 x 6 inches or 8 x 8 inches
- A smooth, flat work surface
- Your fingers or a bone folder for crisp creases
- An optional black pen or marker for eyes and feather details
If your paper has color on one side and white on the other, even better. Two-sided paper creates more contrast and helps the owl’s features stand out. Thinner origami paper is usually easier to fold neatly than thick craft paper, especially for small details. If you are brand new, start with a larger square because tiny paper has a funny way of turning normal hands into clumsy oven mitts.
Origami Terms You Should Know Before You Start
Valley Fold
A valley fold is the most basic fold in origami. You fold the paper toward yourself so the crease dips inward like a valley. If you have ever folded a piece of paper in half to make a card, you have already met the valley fold and survived.
Mountain Fold
A mountain fold is the reverse. You fold the paper away from yourself so the crease rises upward like a ridge. Think of it as the valley fold’s moodier cousin.
Pre-Crease
A pre-crease is a fold you make and then unfold. It sounds pointless until you realize it gives the paper a memory. Later steps become easier because the sheet already knows where it is supposed to bend.
Squash and Reverse Folds
Some owl designs use squash or reverse folds for the beak, ears, or body shaping. In this beginner model, we keep things simpler, but the same principle applies: open a small section, flatten it carefully, and let the existing creases do the hard work. Origami often looks complicated from the outside, but inside it is mostly careful alignment and a surprising amount of trust in geometry.
How to Make an Origami Owl: Step-by-Step
This version creates a flat decorative owl that works well for beginners, classrooms, greeting cards, and seasonal displays. Read through all the steps once before you begin. Your paper will appreciate the confidence.
Step 1: Place the Paper Like a Diamond
Set your square paper on the table so one corner points up, one points down, and the shape looks like a diamond. If your paper has a white side and a colored side, start with the white side facing up. The colored side will become the outside of the owl.
Step 2: Make the First Diagonal Crease
Fold the bottom corner up to meet the top corner. Crease firmly, then unfold. You now have one diagonal guideline running through the center of the paper.
Step 3: Make the Second Diagonal Crease
Fold the left corner to the right corner. Crease well and unfold again. You should now see an X made from two diagonal creases. These lines will help you align the body and keep the owl symmetrical.
Step 4: Fold the Side Corners to the Center
Bring the left corner inward so its edge lines up with the vertical center crease. Repeat with the right corner. The paper should now look like a kite shape. Press the folds sharply. Crisp creases are the difference between “cute owl” and “paper that lost a fight.”
Step 5: Fold the Top Corner Down
Take the top corner and fold it down so the tip sits slightly above the midpoint of the kite shape. This creates the owl’s forehead and helps define the head area. Crease it neatly, but do not rush. A crooked head makes the owl look less wise and more like it stayed up too late scrolling.
Step 6: Create the Ear Tufts
Fold the upper left and upper right edges of that top section outward at slight angles to form two little points. These become the owl’s ear tufts. They do not need to be dramatic. Think elegant woodland professor, not heavy metal concert mascot.
Step 7: Fold the Bottom Corner Up
Lift the bottom corner and fold it upward so the point lands just below the folded top section. This creates the owl’s chest and belly. Adjust the height until the proportions look pleasing. A slightly higher fold makes a chubbier owl. A lower fold makes a taller, leaner owl. Yes, you are now styling a paper bird.
Step 8: Shape the Wings
Take the outer left flap and fold it slightly outward so it angles away from the body. Repeat on the right side. These two flaps become wings. Try to match the angle on both sides. If one wing looks more enthusiastic than the other, open it gently and correct it before moving on.
Step 9: Make the Beak
Use the small center point under the head area to form the beak. Fold a tiny tip downward so it creates a small triangle. Keep this fold subtle. A giant beak can turn your owl into a suspiciously grumpy parrot.
Step 10: Refine the Body
Check the edges and flatten the model. If you want a softer body shape, fold the lower side corners slightly behind the model. This trims the silhouette and makes the owl look rounder. It is a small adjustment, but it adds a lot of polish.
Step 11: Flip and Press
Turn the model over, smooth out any uneven layers, and then flip it back to the front. This helps settle the paper and keeps the folds from springing open. A quick press with your fingers can do wonders.
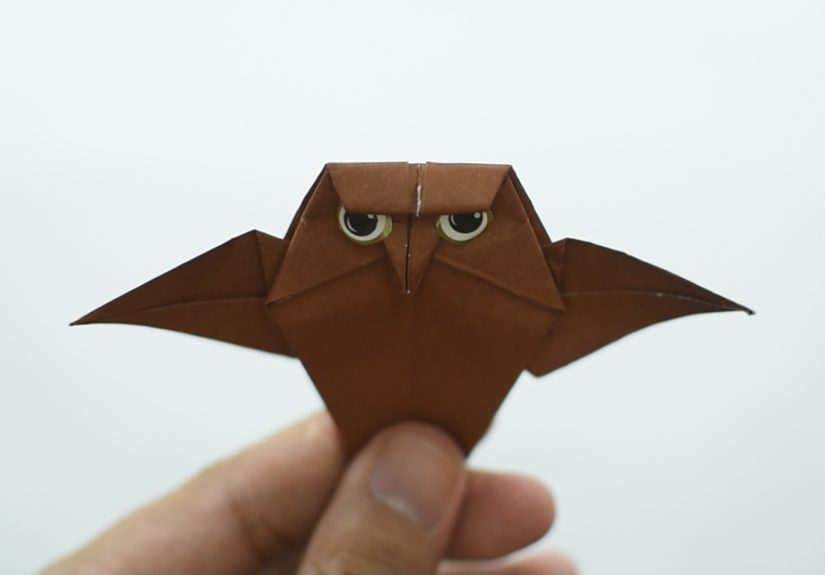
Step 12: Add Eyes and Feather Details
Your owl is technically complete, but this is the fun part. Use a pen, marker, or colored pencil to draw two large eyes, tiny feathers, or a patterned chest. You can also glue the owl onto a card, tag, or scrapbook page. Some people stop at the pure folded form; others add details until the owl looks ready for its own animated film. Both approaches are valid.
Tips for Better Origami Owl Results
Use Larger Paper First
If this is your first attempt, use a larger square. Bigger paper is easier to align and much kinder to beginners. Tiny squares are cute, but they have strong opinions and very little patience.
Crease Firmly, But Do Not Crush
Clean creases make the model look sharp. Run your fingernail gently along each fold, but do not mash the paper so hard that it wrinkles. Origami rewards precision, not brute force.
Check Symmetry Often
After major folds, pause and compare the left side to the right side. Catching a misalignment early is much easier than trying to rescue it six folds later when the owl starts looking like it has been through a wind tunnel.
Practice with Plain Paper First
If you have patterned origami paper that you adore, save it until you have done one test owl. Practicing with simple paper removes the pressure and lets you figure out the proportions before you bring in the fancy stuff.
Common Mistakes and How to Fix Them
The Owl Looks Crooked
This usually means the side folds did not meet the center line evenly. Open them gently, realign with the middle crease, and refold. Precision early on saves a lot of dramatic sighing later.
The Wings Do Not Match
Before you crease the wings hard, compare both sides visually. If one angle is steeper, unfold and correct it while the paper is still cooperative.
The Head Looks Too Small
Refold the top flap a little lower so the head becomes more prominent. Owls look best when the head reads clearly from a distance.
The Paper Is Bulging
That usually means the layers were not flattened after a fold. Turn the model over, smooth it with your fingers, and press from the center outward.
Creative Ways to Use Your Finished Origami Owl
- Glue it onto a greeting card for a teacher, student, or bird lover
- Turn several owls into a garland for fall or Halloween décor
- Use mini owls as gift tags for classroom treats or party favors
- Attach one to a bookmark for a cozy reading accessory
- Frame a set of different colored owls as simple wall art
- Make a whole paper owl family, because one owl is cute and seven is a tiny council
Why This Craft Never Gets Old
Origami has a wonderful way of making a short craft session feel satisfying. You start with something completely ordinary, and by the end you are holding a recognizable little creature made through nothing but folds. There is no drying time, no glitter explosion, and no mystery bag of hardware left over. Just paper, attention, and a result you can actually use or display.
An origami owl is especially fun because it carries so much character. Even when two people follow the same steps, their finished owls rarely look identical. One will seem curious, one will seem stern, and one will absolutely look like it is judging the room. That tiny difference is part of the charm. It makes the craft feel personal, not mass-produced.
Personal Experience: What Making an Origami Owl Actually Feels Like
The first time you make an origami owl, there is a very specific emotional journey involved. It begins with confidence. You place a square sheet of paper on the table and think, “How hard can this be?” This is the same tone people use right before assembling furniture without reading the instructions or attempting bangs with kitchen scissors. Still, optimism is part of the process, and honestly, it helps.
At the beginning, the folds feel simple. A diagonal here, a crease there, a little kite shape in the middle. You feel smart. Capable. Possibly gifted. Then somewhere around the head-and-wings stage, you discover that paper remembers everything. Every lazy crease, every slightly crooked alignment, every moment you said, “Eh, close enough.” Origami is very polite, but it definitely keeps receipts.
And yet, that is exactly why the experience becomes satisfying. You start paying attention. You slow down. You line up edges more carefully. You crease with intention. The project turns into a tiny exercise in patience, focus, and quiet problem-solving. It is creative, but it is also calming. There is something oddly grounding about making one clean fold after another while the rest of the world is busy being loud and chaotic.
Then comes the magic moment: suddenly, the paper stops looking like a series of random triangles and starts looking like an owl. Maybe it is the ear tufts. Maybe it is the wings. Maybe it is the second you draw the eyes and the whole thing gains a suspiciously strong personality. Either way, the flat square becomes a character. That transformation never gets old.
Another great part of the experience is that no two owls feel exactly the same. One might turn out cute and round. Another might look serious, like a librarian who has had enough of whispering. Another might come out slightly crooked but still lovable, which is honestly a fair description of most handmade things. The small variations make the craft feel human. You are not manufacturing identical products; you are making little paper creatures with attitude.
Origami owl projects are also surprisingly easy to repeat without getting bored. Once you know the basic structure, you can play with paper color, size, and decoration. A brown owl feels classic. A black-and-orange owl looks perfect for Halloween. A metallic gold owl looks like it has opinions about interior design. A tiny patterned owl glued onto a gift tag somehow makes the gift look more thoughtful, even if the gift itself is socks. Especially if the gift itself is socks.
If you fold with kids, the experience gets even better. Children tend to treat the finished owl like an actual tiny pet or puppet, which is delightful. If you fold with adults, there is usually a moment where everyone gets unusually competitive about whose owl looks the wisest. This is normal. Crafts are peaceful right up until someone says, “Mine has better wings.”
What stays with you most, though, is the feeling of making something charming from almost nothing. One sheet of paper is such a modest starting point. No batteries. No screens. No complicated setup. Just folding, adjusting, and watching form emerge from flatness. It feels old-fashioned in the best way, like a craft that still works because it taps into something basic and satisfying: our love of turning simple materials into meaningful little objects.
So yes, making an origami owl is about following steps. But it is also about noticing details, laughing at small mistakes, trying again, and enjoying the weirdly wonderful moment when a square of paper starts looking back at you. That is a pretty good return on one sheet of paper.
Final Thoughts
If you want a paper craft that is beginner-friendly, budget-friendly, and charming enough to make people say, “Wait, you made that?” an origami owl is a strong choice. It teaches core folding skills, leaves room for creativity, and produces a result that works as décor, a gift accent, a classroom activity, or a simple desk companion with suspiciously strong emotional presence.
Once you fold one owl successfully, do not be surprised if you immediately want to make three more in different colors. That is how paper-folding hobbies begin. One minute you are trying a cute owl for fun, and the next minute you are discussing paper weight like a person who has absolutely changed. Consider yourself warned.