Table of Contents >> Show >> Hide
- What “Dry Rot” Actually Is (Spoiler: It’s Not Dry)
- How to Tell If You’re Dealing With Dry Rot
- Why Dry Rot Happens: Moisture Is the Real Problem
- Safety First (Because Fungus Doesn’t Pay Your Medical Bills)
- How to Treat Dry Rot in Wood: Step-by-Step
- Step 1: Find and fix the moisture source (non-negotiable)
- Step 2: Decide: repair, reinforce, or replace?
- Step 3: Remove rotted wood back to solid material
- Step 4: Dry the area (yes, actually dry)
- Step 5: Treat the remaining wood to stop fungal activity
- Step 6: Rebuild missing wood (epoxy repair for trim and localized damage)
- Step 7: Seal, protect, and detail the area so water can’t return
- Step 8: Monitor (because homes age, and gravity never sleeps)
- When You Should Call a Professional
- Prevention Checklist: Keep Wood Boringly Dry
- FAQ: Fast Answers to Common Dry Rot Questions
- Real-World Experiences and Lessons Learned (500+ Words)
- Conclusion
Dry rot has one of the biggest PR problems in home maintenance. It sounds like your wood just… got bored and decided to crumble out of spite.
In reality, “dry rot” is a fungus problem that usually starts with a very un-funny thing: moisture. The good news? If you treat it the right way,
you can stop the spread, repair the damage, and keep your house from quietly turning into an antique sponge.
This guide walks you through how to identify dry rot, decide whether to repair or replace wood, apply the right treatments (without turning your living room
into a chemistry lab), and prevent a repeat performance. Expect practical steps, a few contractor-grade tips, and just enough humor to keep you from
stress-eating drywall.
What “Dry Rot” Actually Is (Spoiler: It’s Not Dry)
Wood doesn’t rot because it’s dry. Wood rots because fungi eat it when conditions are rightmainly when the wood stays damp long enough for the fungus to
grow. The term “dry rot” is common in everyday conversation, but it’s a bit misleading: the decay typically begins when moisture is present, even if the wood
later feels dry to the touch.
A widely used rule of thumb in building science is that keeping wood moisture content at or below about 20% makes fungal decay much less likely.
If wood keeps climbing above that zone for long stretches, fungi can move in, throw a party, and start eating the structural “fiber” that gives wood strength.
How to Tell If You’re Dealing With Dry Rot
Common signs (a.k.a. the wood’s cry for help)
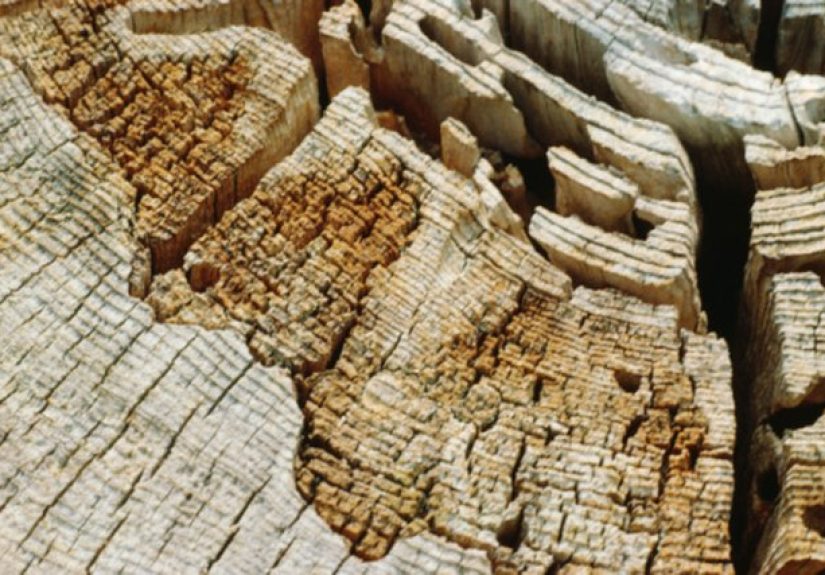
- Crumbly, cracked wood that breaks into cube-like chunks (often called “cuboidal cracking”).
- Wood that feels lighter, brittle, or oddly “crunchy” when probed.
- Discolorationdarkening, dullness, or a “burnt toast” look.
- Musty odor in enclosed areas (crawl spaces, basements, behind cabinets).
- Paint that bubbles, peels, or cracks because moisture is trapped underneath.
- Fungal growth (sometimes white/gray, sometimes rusty-brown) near damp wood.
Two quick tests you can do today
-
The screwdriver test: Push a flathead screwdriver into the suspicious area.
If it sinks in easily or the wood feels spongy, you’re not looking at “character”you’re looking at decay. -
The moisture meter test: A basic moisture meter is one of the smartest cheap tools you can buy for rot prevention.
If readings hang around the danger zone (often near or above 20% for extended periods), you need moisture controlfast.
Dry rot vs. wet rot vs. termites (don’t treat the wrong villain)
-
Wet rot: Usually stays close to the moisture source and feels soft/spongy. It often looks darker and “waterlogged.”
Fixing moisture still matters most. -
Dry rot (common usage): Often shows more cracking and crumbling, and the wood may look dry even though moisture started the problem.
It can spread through connected damp wood. -
Termites/wood-boring insects: Look for frass (insect droppings), tunnels, mud tubes, or hollow-sounding wood.
Insects and fungi sometimes team up, because nature is rude like that.
Why Dry Rot Happens: Moisture Is the Real Problem
If you only remember one thing, make it this: you can’t “chemical” your way out of a moisture problem. Treatments help, repairs help,
replacements helpbut if the wood keeps getting wet, rot will return like a sequel nobody asked for.
Top moisture sources that feed rot
- Roof leaks (especially around flashing, chimneys, skylights, and valleys).
- Window/door leaks from failed caulk, bad flashing, or missing drip caps.
- Plumbing leaks under sinks, around tubs/showers, and behind toilets.
- Crawl space humidity from bare soil, poor drainage, or inadequate moisture control.
- Condensation from poor ventilation (bathrooms, kitchens, attics) or cold surfaces meeting humid air.
- Ground contact where wood touches soil or stays constantly wet from splashback.
Safety First (Because Fungus Doesn’t Pay Your Medical Bills)
Rot often overlaps with moldy conditionsespecially inside walls, under floors, or in crawl spaces. When you disturb decayed or moldy materials,
you can release spores and dust. Keep it simple:
- Wear gloves, eye protection, and at minimum an N95 (or better) mask/respirator.
- Ventilate the area. Use fans to exhaust air outdoors when possible.
- Bag and seal debris so you’re not sprinkling spores through the house like confetti.
-
If you discover large areas of mold/rot or you’re immunocompromised, consider calling a pro.
Sometimes “DIY” stands for “Definitely Involving Yikes.”
How to Treat Dry Rot in Wood: Step-by-Step
Step 1: Find and fix the moisture source (non-negotiable)
Before you repair anything, stop the water. Otherwise, you’re basically shampooing your hair while standing under a running paint roller.
Common fixes include:
- Repair roof leaks and replace damaged flashing.
- Re-caulk and properly flash windows/doors (don’t rely on caulk as the only waterproofing).
- Fix plumbing leaks and replace failed supply lines, traps, or wax rings.
- Improve ventilation (bath fan vented outdoors, kitchen hood, attic ventilation where appropriate).
- Manage crawl space moisture (ground vapor barrier, drainage improvements, dehumidifier if needed).
Step 2: Decide: repair, reinforce, or replace?
Here’s the truth: not all rotted wood should be “saved.” Sometimes replacement is faster, safer, and cheaper long-term.
Use these guidelines:
-
Replace if the wood is structural (joists, beams, sill plates, studs) and decay is more than superficial,
or if you can’t confidently reach solid wood. -
Repair if the damage is localized on non-structural trim (window sills, fascia, door trim) and you can remove rot
back to sound, dry fibers. - Call a pro if the affected area supports loads, spans multiple framing members, or keeps coming back despite repairs.
Step 3: Remove rotted wood back to solid material
Rot is like a bad roommateit doesn’t leave until you physically kick it out. Scrape, chisel, or cut away decayed wood until you hit
firm, intact fibers. If you’re replacing a board or framing member, cut it back to sound wood and plan your splice or sistering properly.
- Use a scraper/chisel for surface rot; use a multi-tool or saw for deeper sections.
- Remove dust and debris so treatments and fillers can bond.
- Don’t forget hidden edgesrot loves to camp out behind paint lines and trim joints.
Step 4: Dry the area (yes, actually dry)
Wood treatments and epoxy repairs work best on wood that’s dry enough. Run fans, use a dehumidifier, and give it time if needed.
If you’re doing an epoxy repair, many pros aim for moisture content below the high teens.
Step 5: Treat the remaining wood to stop fungal activity
Once you’ve removed the damaged wood and fixed the moisture source, you can treat nearby sound wood to reduce the chance of regrowth.
Two common categories:
-
Borate-based treatments (often used for wood-destroying organisms, including decay fungi in protected wood).
Borates are commonly used because they can penetrate and remain effective when wood stays protected from ongoing wetting.
Always follow the product labelthese are pesticides/wood preservatives, not “optional seasoning.” -
Copper-based preservatives (often used as a surface preservative for vulnerable wood, especially in exterior contexts
where appropriate).
Important: Treatments are not a substitute for replacement when wood has lost structural integrity. Think of preservatives like a seatbelt:
incredibly useful, but not a time machine.
Step 6: Rebuild missing wood (epoxy repair for trim and localized damage)
If the rot is on trim, sills, frames, or other non-structural woodwork, epoxy repair can be a durable solution when done correctly.
The basic idea: consolidate remaining fibers, then rebuild the missing shape with epoxy filler.
Epoxy repair workflow
- Remove all soft material until only sound wood remains.
- Confirm dryness with a moisture meter when possible. Epoxy bonds best when wood is sufficiently dry.
- Apply a consolidant/wood hardener to strengthen remaining fibers (follow product instructions).
- Pack in epoxy filler in layers, shaping the profile (sill edge, trim corner, etc.).
- Sand smooth after cure.
- Prime and paint (or seal) to protect against future moisture intrusion.
Done right, epoxy repairs can outlast the original woodespecially when the real moisture problem has been fixed.
Done wrong (on wet wood, or over hidden rot), epoxy becomes a fancy shell over an ongoing decay buffet.
Step 7: Seal, protect, and detail the area so water can’t return
A repair isn’t finished until water is redirected away. That means:
- Prime all bare wood, especially end grain.
- Use quality exterior paint or stain where appropriate.
- Re-caulk jointsbut only after proper flashing/water-shedding details are in place.
- Ensure drip edges and slopes shed water outward, not into seams.
Step 8: Monitor (because homes age, and gravity never sleeps)
Re-check the area after heavy rain or seasonal humidity shifts. If you own a moisture meter, take readings periodically.
Catching moisture early is the cheapest “rot treatment” you’ll ever buy.
When You Should Call a Professional
- Structural framing is affected (joists, beams, sill plates, studs).
- The rot is extensive, hidden, or keeps spreading.
- You suspect termites or other wood-destroying insects are also present.
- The moisture source isn’t obvious (or it’s tied to building envelope issues like flashing, drainage planes, or chronic condensation).
- You uncover widespread mold conditions during demolition.
Prevention Checklist: Keep Wood Boringly Dry
Decay fungi need moisture, oxygen, and a food source (wood kindly provides that last one). You can’t remove oxygen from your house (please don’t try),
and you probably want to keep the wood, so prevention focuses on moisture control.
Quick prevention wins
- Keep gutters clean and downspouts discharging away from the foundation.
- Maintain proper grading so water flows away from the house.
- Vent bathrooms and kitchens to the outside.
- Seal plumbing penetrations and repair leaks immediately.
- Use a crawl space vapor barrier; consider dehumidification in humid climates.
- Keep exterior wood sealed/painted, especially end grain and joints.
- Use naturally durable or appropriately treated wood where exposure risks are higher.
FAQ: Fast Answers to Common Dry Rot Questions
Can I just spray something and call it done?
If moisture is still present, no spray will “win.” Treatments help after you remove decay and fix the moisture source.
Without moisture control, rot is just waiting for its comeback tour.
Does bleach fix dry rot?
Bleach may change surface staining, but it’s not a magic cure for fungal decay inside wood fibers. The reliable approach is removal of damaged material,
drying, appropriate treatment, and prevention.
Do I have to replace the whole board?
Not always. Localized trim rot can often be repaired with epoxy if you remove all soft wood and the remaining material is dry and sound.
But for structural membersor anything severely compromisedreplacement (or professional reinforcement) is usually the right move.
How do I know the rot won’t come back?
You never get a 100% guarantee from nature, but you can stack the odds heavily in your favor:
stop moisture, keep wood dry (ideally below the decay-friendly moisture range), seal and detail properly, and monitor.
Real-World Experiences and Lessons Learned (500+ Words)
Below are composite, real-world-style scenarios based on common patterns homeowners, inspectors, and repair pros run into.
Think of them as “rot truth stories” with the names changed to protect the innocent (and the guilty caulk jobs).
Experience #1: The “It’s Just a Little Soft” Window Sill
A homeowner notices paint bubbling on an exterior window sill. They poke it, and the screwdriver goes in like the wood is cheesecake.
The first instinct is to slap on filler, repaint, and declare victory. The problem? The leak is coming from above: missing drip cap,
tired caulk, and water tracking behind the trim every time it rains.
The successful fix wasn’t glamorous: remove the trim, cut out all decayed wood, dry the area, then rebuild the profile with epoxy
(after confirming the wood wasn’t still wet). The real hero was proper flashing and a drip edge detail that forced water
to shed outward instead of sneaking behind the paint.
Lesson: If you repair the wood but ignore how water got there, you’re basically feeding the rot and charging it rent.
Experience #2: The Crawl Space That Smelled Like a Gym Bag
Another common story: a musty smell inside the house that gets worse in summer. The crawl space is vented, but the soil is bare,
the ground is damp, and humidity spikes. Floor joists start reading high on a moisture meter, and localized decay shows up where
air circulation is worst. Someone tries “more vents,” but humid outdoor air just delivers more moisture.
What worked: a sealed ground vapor barrier, better drainage outside, and a crawl space dehumidifier set to keep humidity controlled.
After drying, damaged wood was replaced where needed, and adjacent areas were treated with an appropriate preservative where label-approved.
Over time, moisture readings stabilized and the smell faded.
Lesson: Rot prevention is often a moisture-management project, not a “spray-and-pray” weekend.
Experience #3: The Porch Post That Looked Fine… Until It Didn’t
Porch posts are notorious because they sit near splash zones. One homeowner had a post base where the paint looked “mostly okay,”
but the bottom few inches were punky and cracked. The rot started at end grain where water wicked upward, and the post was effectively
acting like a straw.
The durable solution wasn’t complicated: replace the rotted section with properly rated material, keep the post out of direct ground contact,
use a stand-off base, and detail the bottom so water can’t pool. Then prime and paint all facesespecially cuts and end grainbefore installation.
Lesson: End grain is a moisture magnet. If you don’t seal it and keep it out of wet contact, rot will eventually RSVP.
Experience #4: The Bathroom Wall That Hid a Slow Leak
A tiny drip behind a vanity can run for months unnoticed. By the time staining appears, the wood behind the drywall may already be compromised.
Here, the best “treatment” was early demolition: open the wall, find the leak, remove wet/rotted materials, dry thoroughly, and rebuild.
People sometimes try to patch without opening the wall because they fear what they’ll findunfortunately, fungi love secrecy.
Lesson: When a leak is hidden, inspection beats optimism. Fixing the plumbing is step one; drying and verifying moisture levels is step two.
Conclusion
Treating dry rot in wood is a three-part job: stop the moisture, remove the damaged wood, and repair or replace properly.
Treatments like borates or preservatives can help protect sound wood after you fix the root cause, and epoxy repairs can be excellent for localized trim damage
when the wood is dry and solid. If structural members are affectedor if moisture keeps returningbring in a qualified pro before rot turns into a safety issue.