Table of Contents >> Show >> Hide
- Why Starting Blocks Matter
- How to Use Starting Blocks: 14 Steps
- Step 1: Know what the blocks are supposed to do
- Step 2: Figure out which foot goes in front
- Step 3: Place the blocks securely behind the line
- Step 4: Start with a practical pedal distance
- Step 5: Set the pedal angles
- Step 6: Check your “on your marks” position
- Step 7: Place your hands correctly
- Step 8: Build pressure into the pedals
- Step 9: Move into the “set” position with purpose
- Step 10: React to the sound, not to your nerves
- Step 11: Push off both blocks hard
- Step 12: Stay low through the early acceleration phase
- Step 13: Let the transition happen gradually
- Step 14: Practice block starts in short, focused sets
- Common Starting Block Mistakes
- Quick Coaching Cues That Actually Help
- Final Thoughts
- Experiences Athletes Commonly Have When Learning Starting Blocks
If you have ever watched a sprint race and thought, “Wow, that looked fast and stressful,” welcome to the wonderful world of starting blocks. They are small, metal, oddly intimidating, and absolutely essential when you want a powerful sprint start. Used correctly, starting blocks help you create more force, launch at a better angle, and reach acceleration faster than you would from a lazy, upright shuffle that looks like you forgot your race had started.
But here is the good news: learning how to use starting blocks is not reserved for elite sprinters with superhero calves. Beginners can learn the skill too. The key is not copying a dramatic race-day pose from social media and hoping your hamstrings agree. The key is understanding the setup, the body position, the commands, and the first few steps after the gun. Once those pieces start working together, block starts feel less like chaos and more like controlled violence against the track surface.
This guide breaks the process into 14 practical steps so you can build a more confident, explosive sprint start. You will also find common mistakes to avoid, coaching cues that actually make sense, and a longer section on real-world experiences athletes often have while learning to use starting blocks. Let’s get your start looking less “confused flamingo” and more “sprinter with a plan.”
Why Starting Blocks Matter
Starting blocks are designed to give sprinters a stable surface to push against at the start of a race. That matters because the beginning of a sprint is all about force production and acceleration. You are not trying to pop straight up like toast. You are trying to drive out low, hard, and fast.
When your feet are braced against the pedals, you can push through both legs more effectively and leave the line in a better acceleration position. Good block technique also improves rhythm. Instead of stumbling into your first steps, you create a clean sequence: set position, reaction, push, drive, and transition. That makes your first 10 to 30 meters much more efficient.
One important note: rules can vary by meet, age group, and organization. In some competitions, starting blocks are required for shorter sprint races, while in others they are optional. Always check the meet instructions before race day so you do not discover the rules while standing on the line pretending everything is fine.
How to Use Starting Blocks: 14 Steps
Step 1: Know what the blocks are supposed to do
Before you adjust a single pedal, understand the purpose. Starting blocks are not there to make you look official. They help you create horizontal force at the beginning of a sprint. The whole point is to leave the line with intent and structure. If you think of blocks as a launching platform instead of a strange pre-race furniture item, your setup becomes easier to understand.
Step 2: Figure out which foot goes in front
Most sprinters place their stronger or more powerful leg in the front pedal and the quicker, more reactive leg in the rear pedal. A simple way to test this is to notice which leg you naturally jump off and which leg you would use to kick a ball. That said, this is a starting point, not a sacred law handed down by track gods. Try both arrangements in practice and see which one gives you a cleaner, more powerful first step.
Step 3: Place the blocks securely behind the line
Set the blocks so they are anchored firmly and do not touch the starting line. If the blocks slide, your confidence will disappear faster than your breath after a 200-meter repeat. Make sure the spikes or track grips are secure, especially on outdoor tracks or older surfaces. The blocks should feel stable enough that you can load pressure into them without worrying they will shift.
Step 4: Start with a practical pedal distance
A common beginner setup is to place the front pedal about two foot-lengths from the starting line and the rear pedal about three foot-lengths from the line. Another widely used coaching shortcut is “two to the front block, one more to the back block.” These are not magic measurements, but they are a strong starting point. From there, you can make small adjustments based on your height, flexibility, comfort, and how powerful your push feels.
Step 5: Set the pedal angles
Many coaches begin with the pedals around a 45-degree angle. That usually gives athletes a balanced position for pushing out effectively. If the pedals are too steep, the position may feel cramped. If they are too flat, you may lose leverage. Start with a moderate angle and adjust only after a few quality reps. This is not the time to become a mad scientist with a wrench.
Step 6: Check your “on your marks” position
When you step into the blocks for the “on your marks” command, place your feet firmly on the pedals and lower yourself into position with control. Your back knee should come down to the track, your hands should move just behind the starting line, and your body should feel organized rather than twisted. A useful checkpoint is that the front knee should land near the corresponding elbow. That usually tells you your spacing is in a workable range.
Step 7: Place your hands correctly
Your hands should be just behind the line, roughly shoulder-width apart or a little wider depending on comfort. Spread your fingers and create a stable base with the fingertips and thumbs. Keep your arms straight but not stiff like plastic pipes. The goal is support and balance. If your hands are too narrow, you may feel crowded. If they are too wide, the position can become unstable and awkward.
Step 8: Build pressure into the pedals
Once your hands and feet are set, load your legs into the pedals. Think of pressing back into the blocks rather than collapsing downward. You want tension, not panic. The feet should feel active, the shoulders relaxed, and the spine aligned. A good start often begins with the quiet feeling that everything is loaded and ready, not fidgety and frantic.
Step 9: Move into the “set” position with purpose
On the “set” command, raise your hips smoothly until they are slightly above shoulder height. Your front knee is often close to a 90-degree angle, and the rear knee often falls around 120 degrees or a little more. Keep the head neutral and the eyes focused slightly ahead on the track, not craned upward like you are checking the weather. Your weight should feel balanced between the hands and feet, with strong pressure into both pedals.
Step 10: React to the sound, not to your nerves
This is where many athletes get into trouble. Do not guess. Do not twitch. Do not try to outsmart the starting signal. React to the sound. Great starters are not just explosive; they are patient under tension. If something feels wrong before the start, raise your hand right away. That is far better than forcing a bad setup and turning your first step into a regrettable life decision.
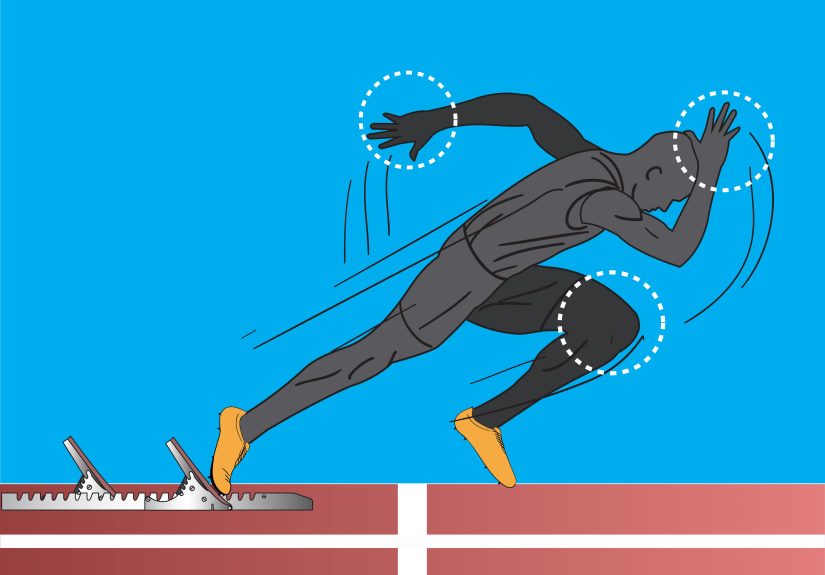
Step 11: Push off both blocks hard
At the gun or electronic signal, drive out by pushing forcefully through both legs. The rear leg usually moves first in a fast forward swing, while the front leg delivers a strong extension through the block. At the same time, the arms should fire in opposition: one punches forward, the other drives back. This is not a gentle unfolding. It is an aggressive, coordinated attack on the first few meters.
Step 12: Stay low through the early acceleration phase
Your first several steps should project forward, not upward. A lot of new sprinters pop up too soon because they are eager to look fast instead of actually being fast. Stay low, keep pushing, and let your body angle rise naturally as you accelerate. Think about driving the track behind you. If your first steps feel punchy, powerful, and low, you are on the right track. Literally.
Step 13: Let the transition happen gradually
After the first few strides, do not force yourself upright all at once. The body should gradually rise as stride length increases. Keep the arms active, the foot contact quick, and the mechanics organized. This is where a good block start pays off. A clean exit puts you in position to accelerate smoothly instead of spending the next 15 meters trying to recover from a messy launch.
Step 14: Practice block starts in short, focused sets
Starting blocks are a skill, not a one-time revelation. Practice them in short distances like 10, 20, and 30 meters. Focus on one or two cues at a time: block spacing, hips in set, arm action, or staying low. Video is extremely helpful because what you feel and what you actually do are often not the same thing. Many athletes swear they are “driving low,” then watch the replay and discover they stood up like they were exiting a folding chair.
Common Starting Block Mistakes
Popping up too early
This is one of the biggest mistakes. If you rise too soon, you lose the forward push that makes sprint starts effective. Think push first, rise later.
Overreaching in the set position
If your shoulders drift too far forward or your body feels like it is falling, your setup is too extreme. The set position should feel loaded and aggressive, not reckless.
Using block settings that are too cramped or too stretched
If you feel jammed, your knees and hips may not produce force efficiently. If you feel too long and disconnected, you may struggle to create a strong push. Small adjustments matter.
Waiting too long to use the arms
The arms are not decorative accessories. They help organize the entire start. Strong arm action improves rhythm, timing, and projection.
Practicing too many bad reps
Block starts should be rehearsed with intent. Ten ugly starts in a row do not make you tougher. They just make your bad habits more experienced.
Quick Coaching Cues That Actually Help
- Push, do not pop.
- Drive out, stay low.
- Big push through both pedals.
- Rear knee punches forward fast.
- Arms attack with the legs.
- React to the sound, not the fear.
- Let the rise happen gradually.
Final Thoughts
Learning how to use starting blocks well is part mechanics, part repetition, and part staying calm when your body wants to do something dramatic. The best starts usually look powerful because they are simple. The athlete is organized, the blocks are set correctly, the set position is balanced, and the first few strides are aggressive without being wild.
If you are new to block starts, do not chase perfection on day one. Chase consistency. A repeatable setup, a stable set position, and a strong push out of the blocks will take you much farther than obsessing over tiny details before you own the basics. Build the skill patiently, review video when possible, and practice with purpose. The goal is not just to use starting blocks. The goal is to make them work for you.
Experiences Athletes Commonly Have When Learning Starting Blocks
Most athletes do not fall in love with starting blocks the first time they use them. The usual first reaction is somewhere between “These feel weird” and “Why is everyone else making this look easy?” That is normal. Starting blocks demand coordination, body awareness, and patience. At first, many beginners feel cramped in the setup, unsure about which foot goes where, and almost comically aware of their own breathing. The set command can feel especially dramatic because everything gets quiet, your hips rise, and suddenly every muscle in your body is waiting for a sound that seems to take forever.
A common experience is realizing that the start feels much faster in your head than it looks on video. Athletes often swear they exploded out low and powerful, only to watch the replay and see themselves standing up early, hesitating with the rear leg, or barely using the arms. This can be humbling, but it is also incredibly useful. Video feedback often becomes the moment where block starts begin to improve because athletes stop guessing and start adjusting.
Another common experience is discovering that tiny setup changes matter a lot. Moving the front pedal a little closer can make the position feel stronger. Shifting the rear pedal back slightly can create a cleaner first step. Adjusting the pedal angle can make the push feel more natural. Many athletes spend several practices experimenting before they find a setup that feels balanced, explosive, and repeatable. That is not wasted time. That is part of learning.
There is also the emotional side. Some athletes get anxious in the blocks because the start feels so public. Everyone is still. Everyone is listening. A false start feels embarrassing even before it happens. That pressure is real, which is why routines matter so much. Athletes who learn to approach the line the same way each time, set the blocks the same way, breathe the same way, and rehearse the same cues usually become calmer and more consistent. The routine becomes an anchor.
Then there is the moment when it finally clicks. The blocks feel solid. The set position feels loaded instead of awkward. The gun goes off, and for once the athlete does not think through the movement. They simply push. The rear knee drives. The arms snap. The body stays low. The first three or four steps feel smooth and forceful. That moment is why coaches keep drilling starts and why sprinters keep coming back to refine them. A great block start feels sharp, aggressive, and strangely satisfying, like your whole body agreed on a plan for half a second.
Over time, athletes often notice that block work improves more than just the first step. It can sharpen acceleration mechanics, improve confidence, and make races feel more under control. Even if an athlete is not a pure 100-meter sprinter, better starts can help in relays, hurdles, and other short sprint events. The experience usually moves from awkward, to manageable, to repeatable, and finally to competitive. That progression is the real story behind learning starting blocks. No one is born knowing how to use them. They learn through reps, adjustments, mistakes, and that wonderful cycle of trying, reviewing, fixing, and trying again.