Table of Contents >> Show >> Hide
- Why a Mini Garden Pond Works So Well in Small Spaces
- What You Need Before You Start
- Step 1: Pick the Right Spot
- Step 2: Create Levels Inside the Container
- Step 3: Choose Plants That Fit the Scale
- Step 4: Add Water the Smart Way
- Step 5: Finish It Off and Keep It Easy to Maintain
- Best Design Ideas for a Compact Water Feature
- Common Mistakes to Avoid
- Final Thoughts
- Extended Experience: What Building a Mini Garden Pond Is Really Like
- SEO Metadata
A full-sized backyard pond is lovely. It is also, let’s be honest, a whole lifestyle. A mini garden pond, on the other hand, is the charming overachiever of the outdoor world: small footprint, big personality, and just enough sparkle to make your patio, balcony, porch, or tiny backyard feel far more expensive than it actually is.
If you have been craving the soundless calm of water lilies, glossy leaves, and a little reflected sky, but you do not have the square footage for an in-ground pond, a compact water feature is your sweet spot. A mini pond gives you the beauty of water gardening without requiring an excavator, a landscaping crew, or a dramatic speech to your spouse about “investing in serenity.”
Better yet, it is beginner-friendly. With the right container, a few aquatic plants, and a sensible setup, you can build a mini garden pond in one afternoon and enjoy it for months. The trick is not just tossing plants into a bucket and hoping for magic. The real win comes from using the right size container, placing plants at the proper height, managing light, and avoiding the classic rookie mistakes that turn a cute patio pond into a mosquito nightclub.
Here is exactly how to make this mini garden pond in five easy steps, plus the plant ideas, care tips, and real-world experience that make the difference between “pretty for a week” and “wow, this actually works.”
Why a Mini Garden Pond Works So Well in Small Spaces
A mini garden pond is basically the compact car of water features: efficient, attractive, and far easier to park. Instead of digging a pond, installing liners, and engineering circulation systems, you use a watertight container and create layers inside it with bricks, stones, or inverted pots. That structure lets you position different aquatic plants at the depth they prefer.
The result is a small patio pond or container water garden that adds movement, texture, and a cooling visual effect to your outdoor space. Even on a balcony or apartment patio, a mini pond can soften hard surfaces and make the area feel greener, calmer, and more alive. Birds may stop by. Butterflies may inspect the premises. You may suddenly become the kind of person who says things like, “I need to top off the water feature before lunch.”
Compared with a larger backyard pond, a compact water feature is cheaper, easier to clean, easier to winterize, and less intimidating for first-time water gardeners. That makes it ideal for renters, homeowners with tiny yards, and anyone who wants the pond look without signing up for pond-level maintenance.
What You Need Before You Start
Basic Materials
- A watertight container, tub, bowl, glazed pot, resin planter, or galvanized bucket
- Bricks, pavers, river rock, or upside-down nursery pots for plant risers
- Two to five aquatic or bog plants, depending on container size
- Floating plants or a miniature water lily if the container is large enough
- Water
- Optional river rock or pea gravel for a finished look
- Optional mosquito control dunk labeled for standing water
How Big Should the Container Be?
For a truly successful DIY water feature, go larger than you think. A shallow decorative bowl can look adorable for photos, but it heats up quickly and gives plants very little room to settle in. A container around 20 to 30 gallons is a comfortable starting point for most beginners, especially if you want a richer plant display. A smaller container can still work, but it needs more frequent topping off and more restraint with plant choices.
Choose a container that is at least 6 to 8 inches deep for a simple plant-only setup. If you want more flexibility with plant heights or hope to include miniature water lilies, a deeper vessel is even better. Also remember one not-so-fun but important fact: water is heavy. If you are placing a mini pond on a deck or balcony, be sure the structure can handle the weight before you fill it.
Step 1: Pick the Right Spot
This is the step people love to rush through, right before regretting everything.
Put your mini garden pond in a place that gets several hours of sun, ideally morning sun or gentle direct light rather than blazing late-afternoon punishment. Too little sun and flowering plants sulk. Too much harsh sun and the water can overheat, algae can multiply, and your peaceful pond begins to resemble a warm green soup.
A good target for a compact water feature is roughly four to six hours of direct sun. If your climate is very hot, a location with bright light and a bit of afternoon relief often works beautifully. Avoid placing the container directly under trees, where falling leaves, seeds, and twig confetti will clutter the water. Also avoid low spots that collect runoff, since runoff can carry fertilizer, soil, and other garden gunk into the pond.
Set the container in its permanent location before you fill it. Once water goes in, the thing is not “portable.” It is now architecture.
Step 2: Create Levels Inside the Container
A mini pond looks effortless when it is done right, but inside the container it needs some structure. Most aquatic and marginal plants do not all want to sit at the same depth. That is where bricks, pavers, stones, or upside-down pots come in.
Place them on the bottom of the container to form ledges and risers. The goal is to create different heights so some pots sit just below the water line while others sit deeper. Think of it as building stadium seating for plants that refuse to buy tickets.
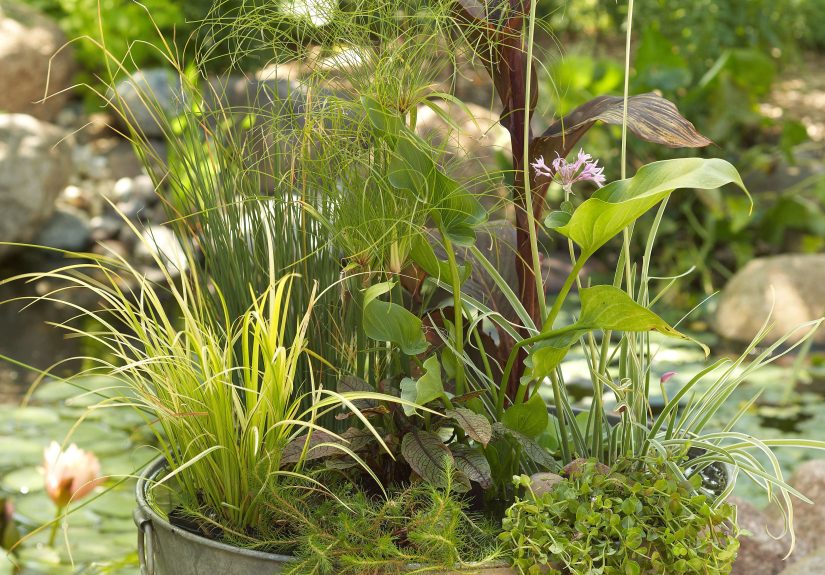
Taller accent plants, such as dwarf papyrus, rush, sweet flag, or fiber optic grass, usually look best toward the back or center. Lower plants or floaters can fill gaps and soften the surface. This layered structure gives your mini water garden dimension instead of making it look like a random bucket of wet leaves.
If your container is visible from all sides, create a balanced arrangement with one taller focal point and lower surrounding plants. If the pond will sit against a wall, keep the tallest plants in the back and let shorter ones spill visually toward the front.
Step 3: Choose Plants That Fit the Scale
This is where a lot of DIY mini pond projects either become charming or completely lose the plot. The rule is simple: choose plants that match the size of your container.
For a compact water feature, think in categories:
1. Vertical or Emergent Plants
These rise above the water and give the pond height. Good options include dwarf papyrus, corkscrew rush, sweet flag, fiber optic grass, or a small sedge. They create the “mini landscape” effect that makes the pond feel designed rather than accidental.
2. Floating or Surface-Covering Plants
These help shade the water, soften the look, and reduce algae pressure by blocking some sunlight. In warm-weather setups, floating plants can be useful, but check local rules before buying them because some popular aquatic plants are restricted or invasive in certain states. A miniature water lily in a larger container can do this job beautifully while also delivering flowers.
3. Submerged or Oxygenating Plants
These sit below the surface and help support cleaner-looking water. In a tiny plant-only setup, you do not need to get overly technical, but one submerged plant can help round out the system.
Use restraint. A mini pond is not the place to live out every plant fantasy you have ever had. In small containers, two to three main plants are often enough. In a larger tub, you may use three to five. Aim to cover a good portion of the water surface as the plants mature, but do not cram it so full that the whole pond disappears under foliage.
And for your first attempt, skip fish. Goldfish are cute, but a very small pond is less stable, warms up faster, and requires more careful management if animals are involved. Plants are simpler. Your stress level will thank you.
Step 4: Add Water the Smart Way
Once the plants are staged on their risers, fill the container slowly so you do not blast soil out of the pots. Pour against a rock or the side of the container if needed. For a plant-only pond, regular tap water is often acceptable, though rainwater can be an excellent option. One thing to avoid is softened water, since salt residue can be rough on aquatic plants.
Fill until the crowns and soil lines of the pots sit at the right level for each plant. Some marginal plants like their pots just under the surface. Others can sit slightly deeper. If you are using a water lily, follow the depth guidance for that specific variety rather than improvising like a pond cowboy.
After filling, let the water settle. At first it may look a little cloudy because the setup is new. That is normal. Resist the urge to fuss with it every ten minutes. Mini ponds, like people, sometimes need a moment.
Step 5: Finish It Off and Keep It Easy to Maintain
Now for the part that makes it look polished. Top the soil in each plant pot with river rock or pea gravel. This helps keep soil where it belongs, makes the arrangement look more natural, and gives the whole feature a cleaner finish. Decorative stones placed around the base or across visible pot rims can make even a simple container pond look intentionally styled.
From here, maintenance is mostly about attention, not drama.
Simple Maintenance Routine
- Top off water regularly, especially during hot weather
- Remove yellow leaves or spent blooms before they decay in the water
- Fertilize aquatic plants lightly and conservatively, if needed
- Use plant cover and shade to discourage algae
- Use a mosquito control product labeled for standing water if larvae appear
- Thin or trim vigorous plants before they take over the container
If algae shows up, do not panic. It usually means the pond is getting too much sun, too many nutrients, or not enough plant coverage. More shade from aquatic plants, less fertilizer, and basic cleanup usually solve the problem more gracefully than dumping in random “miracle” products.
Best Design Ideas for a Compact Water Feature
One of the best things about a patio pond is how flexible it is. You can keep it rustic, modern, cottage-style, or tropical depending on the container and plant palette.
Popular Looks
- Modern minimal: a black resin bowl with one rush and one miniature lily
- Cottage garden: a galvanized tub with sweet flag, creeping greenery, and river rock
- Tropical feel: a glazed ceramic pot with dramatic foliage and floating plants
- Wildlife-friendly: a low tub with stones, native marginals, and easy bird access
If you want a little movement, you can add a tiny recirculating fountain or bubbler designed for small containers. Just remember that some floating-leaf plants, especially water lilies, prefer calmer water. A mini pond should feel serene, not like a jacuzzi audition.
Common Mistakes to Avoid
Most failed mini ponds are not bad ideas. They are just good ideas launched with too much enthusiasm and not enough patience.
- Using a container that is too shallow: shallow water heats fast and is harder to balance
- Overplanting: too many plants make the feature look crowded and reduce visual impact
- Putting it under trees: debris falls in, water quality drops, cleanup gets annoying
- Adding fish too soon: tiny ponds are less forgiving
- Overfertilizing: extra nutrients often feed algae more than your plants
- Ignoring local plant restrictions: some aquatic plants are considered invasive in certain states
Keep the first version simple. You can always upgrade later once you know how the sun, water loss, and plant growth behave in your space.
Final Thoughts
If you have room for a chair and a planter, you probably have room for a mini garden pond. That is what makes this project so appealing. It delivers the atmosphere of a water garden in a footprint that works for real life. You do not need a sprawling yard. You do not need heavy construction. You do not need to become a full-time pond person by next Thursday.
You just need a watertight container, a little structure, a few well-chosen plants, and the willingness to let a small outdoor project do a surprisingly big job. A compact water feature can cool the eye, soften a hard patio, attract a little wildlife, and make your outdoor space feel more layered and alive.
And once it is finished, you may notice a funny side effect: people will assume you are much more serene and organized than you really are. That alone might be worth the price of the bucket.
Extended Experience: What Building a Mini Garden Pond Is Really Like
In real-life gardening experience, the most surprising thing about making a mini garden pond is how quickly it changes the mood of a space. A plain patio corner that felt hot, flat, and forgettable can suddenly feel intentional once water, glossy leaves, and a few stones enter the picture. It is not just about aesthetics. People often notice that they pause there more. Morning coffee lasts longer. Evening check-ins become a habit. Even a very small water feature has a way of slowing down the visual pace of a yard or balcony.
There is usually a learning curve during the first two weeks. New builders often expect the pond to look perfect on day one, but mini ponds tend to settle into themselves. Water may look slightly cloudy at first. A plant may lean in a dramatic direction as if auditioning for a soap opera. You may realize the taller plant needs one more brick under it or that the container would look better turned a few inches toward the seating area. That is normal. The project becomes easier once you accept that a mini pond is more like styling a small living scene than placing a static decoration.
Another common experience is discovering how much evaporation matters. In hot weather, a compact water feature can lose water faster than beginners expect, especially if the container is shallow or placed in strong afternoon sun. The fix is simple, but it does require attention. People who enjoy the project most usually build a quick check into their routine: glance at the water level while watering nearby pots, top it off if needed, and remove any tired leaves before they sink and decay. That tiny rhythm keeps the pond looking polished without turning maintenance into a chore.
Plant choice also shapes the whole experience. Gardeners often start out wanting every exciting aquatic plant they can find, then learn that fewer, better-scaled plants create a more elegant result. One upright accent plant, one surface plant, and one softer supporting plant often look better than a crowded mix of seven unrelated personalities fighting for space. Once the balance is right, the mini pond starts to look calm instead of busy. That is when it really begins to feel expensive in the best possible way.
Many gardeners also report that a mini pond makes them more observant. They notice light patterns, reflections, visiting birds, and how nearby foliage looks mirrored in the water. In a larger landscape, those details can get lost. In a compact pond, everything is condensed and easier to appreciate. That small scale is part of the charm. It creates a focal point that rewards attention without demanding a major renovation.
Perhaps the biggest lesson from experience is this: the best mini garden ponds are not the most complicated ones. They are the ones that fit the space, the climate, and the owner’s habits. A simple container with smart plant choices usually outperforms an overdesigned setup that is hard to maintain. When people enjoy their mini ponds for the longest time, it is usually because the project felt manageable from the beginning. Small, in water gardening, is not a compromise. Done well, it is the whole magic.