Table of Contents >> Show >> Hide
- Why This DIY Candle Project Still Has So Much Appeal
- What You Need to Make Homemade Candles with Crayons and Ice
- Before You Melt Anything: Set Yourself Up Like a Sensible Person
- How to Make Homemade Candles with Crayons and Ice
- The Truth About Using Crayons in Homemade Candles
- Common Mistakes to Avoid
- How to Burn Your DIY Candle More Safely
- Creative Ways to Use Ice and Crayon Candles at Home
- Real-World Experiences with Making Homemade Candles with Crayons and Ice
- Conclusion
There are craft projects that whisper, “Let’s have a peaceful afternoon,” and then there are craft projects that kick open the door wearing glitter boots and announce, “We’re making art out of wax, crayons, and frozen water.” This one is definitely the second type.
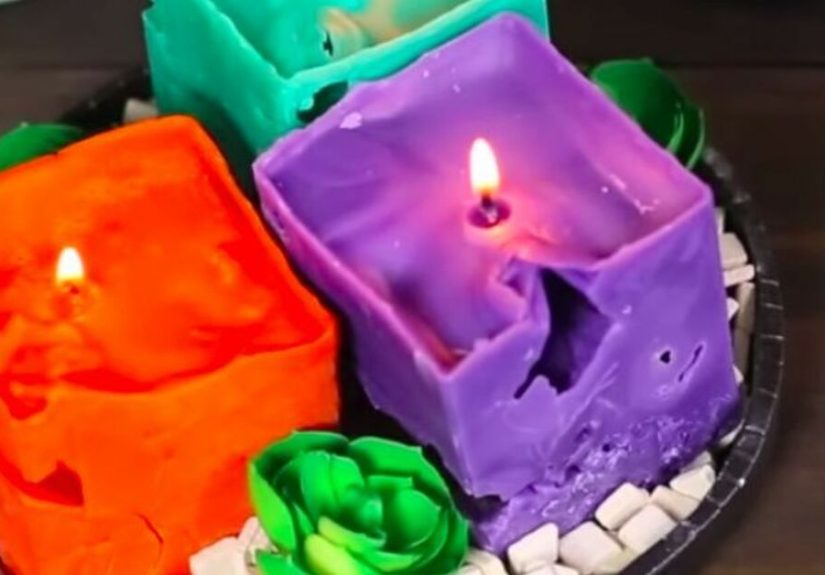
Making homemade candles with crayons and ice is part science experiment, part vintage craft, and part cozy home decor adventure. The magic is in the contrast: hot wax meets cold ice, the ice melts away, and what you get is a beautifully lacy candle full of texture, tunnels, and one-of-a-kind charm. Add a little crayon color, and suddenly your candle looks like it came from an artsy boutique instead of your kitchen counter.
The catch? This project is fun, but it works best when you understand what each ingredient actually does. Ice creates the signature cratered pattern. Wax creates the structure. Crayons add color, but they are not the gold standard for candle performance. That means the smartest approach is to treat this as a decorative DIY candle project first and a precision fragrance-lab masterpiece second.
Why This DIY Candle Project Still Has So Much Appeal
Ice candles have been around for decades, and it is easy to see why they never really disappear. They are inexpensive, dramatic, and wonderfully imperfect. No two come out exactly alike. One will have deep craters and a rugged, icy-lantern look. Another will be more delicate, with small tunnels and a softer surface. It is basically the candle version of snowflakes, except warmer and more likely to sit proudly on your dining table.
Crayons add another layer of appeal because they make this project feel accessible. You may already have a box tucked in a drawer, probably containing at least one sad broken blue crayon and a suspiciously tiny red one. Those leftovers can become part of the color story. Just remember that crayons are best used sparingly. Too much can interfere with how the wick burns, and nobody wants a candle that looks cute but behaves like a moody campfire.
What You Need to Make Homemade Candles with Crayons and Ice
Basic Supplies
You do not need a professional candle studio. You need a sensible setup, a little patience, and a willingness to clean wax off something you thought was “far enough away.” Gather a candle-safe wax, a wick, a mold, ice, and a heat source that allows controlled melting.
A simple supply list includes:
Wax for candles, preferably a wax designed for pillar or molded candles; a candle wick; a mold such as a milk carton or sturdy mold form; medium ice chunks; a double boiler or heat-safe pouring pitcher set inside a pot of hot water; a thermometer; a skewer or pencil to center the wick; old crayons for optional color; scissors; paper towels; and a tray or protected work surface.
Choosing the Wax
If you want structure, choose a wax that can stand on its own. Firm waxes made for pillars or molded candles are usually the easiest match for this type of project. If your wax is too soft, your finished candle may look less like a gorgeous ice sculpture and more like it needs emotional support.
Choosing the Color
If you already own proper candle dye, use that. It gives cleaner, more predictable results. If you specifically want to make homemade candles with crayons and ice because that is the whole crafty gimmick, keep your crayon shavings light. A little can tint the wax. A lot can create wick problems, weak burning, or extra soot. This is one of those moments where “more color” does not always mean “better candle.”
Before You Melt Anything: Set Yourself Up Like a Sensible Person
Homemade candle making is fun. Hot wax is not a joke. Set up on a stable, heat-safe surface away from curtains, paper, and random clutter. Keep kids and pets back from the pouring zone. Have potholders ready. Keep your wick, mold, and ice prepped before the wax is fully melted, because once the wax is ready, it is showtime.
Also, accept one universal truth: every candle project seems calm until you realize you have exactly eight seconds to center the wick, stop the leak, and avoid dripping wax on your favorite shirt.
How to Make Homemade Candles with Crayons and Ice
Step 1: Prep the Mold and Wick
If you are using a milk carton, cut it down to the height you want. Thread your wick through the center or anchor it securely at the bottom. Tie the top of the wick around a pencil, stick, or skewer laid across the mold so it stays upright and centered.
The wick matters more than beginners expect. If it is crooked, your candle may burn unevenly. If it drifts too far to one side, one wall may melt faster than the other. In short, a centered wick is the quiet hero of the entire project.
Step 2: Add the Ice
Fill the mold with medium chunks of ice around the wick. Do not pulverize the ice into tiny snow. Tiny pieces melt too fast and can make the candle look messy instead of dramatic. On the other hand, giant ice boulders can create oversized voids that weaken the structure. Think medium pieces, not glacier cosplay.
The ice is what forms the signature texture. As the hot wax surrounds it, the ice melts and leaves tunnels and pockets behind. That is the whole reason this technique is so satisfying.
Step 3: Melt the Wax
Melt your wax slowly using a double boiler. This gives you more control than direct heat and lowers the chance of scorching the wax. Watch the temperature rather than guessing. Different waxes have different ideal melting and pouring ranges, so follow the guidance for the wax you purchased whenever possible.
If you are using crayons for color, shave off a very small amount and stir it into the melted wax. Start tiny. Then go tinier. You can always deepen the shade a little, but you cannot un-clog a wick with positive thinking.
Step 4: Pour the Wax Over the Ice
Carefully pour the melted wax into the mold over the ice and around the wick. Pour slowly so the wick stays centered. Leave a little room at the top. If the mold leaks, do not panic. This is why people who make candles become emotionally attached to aluminum foil and old baking sheets.
You may hear crackling and popping as the hot wax hits the ice. That is normal. It sounds dramatic because it is dramatic. This is the part of the craft where you feel like a wizard and a kitchen scientist at the same time.
Step 5: Let It Cool and Drain
As the candle starts to harden, the ice inside will melt into water. Drain that water off carefully as needed. Let the candle cool completely before unmolding it. Rushing this step is the fastest way to turn a future showpiece into a sad wax collapse.
Step 6: Unmold and Trim
Peel away the mold once the candle is firm and cool. Let any remaining moisture dry out fully. Then trim the wick to about one-quarter inch before lighting. That little trim makes a big difference in flame control, soot reduction, and overall burn quality.
The Truth About Using Crayons in Homemade Candles
Let us address the colorful elephant in the room. Can crayons be used in candles? Yes, in the sense that they can add color and the craft will still happen. Should crayons be your first choice for a candle you want to burn beautifully for hours? Not really.
Crayons are designed for coloring paper, not for optimizing candle combustion. Candle makers often prefer dedicated candle dyes because they blend more predictably and are less likely to interfere with the wick. Crayon-heavy candles may look gorgeous on day one and then burn like they have unresolved issues on day two.
That does not mean you have to abandon the idea. It just means you should use crayons with realistic expectations. Keep the amount minimal. Choose lighter tints rather than trying to create deep, dramatic jewel tones. Test-burn the candle before gifting it. And if the goal is mostly decorative, you are already winning.
Common Mistakes to Avoid
Using Too Much Crayon
This is the classic mistake. The temptation is understandable. You want rich color. The candle wants airflow and a healthy wick. These goals are not always best friends.
Poor Wick Placement
If the wick is off-center, the candle may tunnel, lean, or burn unevenly. Secure it well before pouring and check it again right after the pour.
Rushing the Cooling Process
Cooling too fast can affect the final appearance and structure. Let the candle set naturally. Candle making rewards patience and punishes chaos.
Skipping the Burn Test
A homemade candle should be test-burned before regular use. Light it in a safe place, watch how the flame behaves, and see whether the wax pool develops evenly. If the flame is too large, the wick may need trimming or the candle may have too much additive.
How to Burn Your DIY Candle More Safely
Once your candle is done, the job is not over. Trim the wick before each burn. Place the candle on a heat-resistant surface. Keep it away from drafts, fabric, paper, and any spot where a sleeve, pet tail, or curious elbow might send it flying. Never leave it unattended, even if it smells amazing and looks like it deserves its own lifestyle magazine cover.
Burn sessions should be long enough to encourage an even melt, but not so long that the candle overheats. Watch the candle closely, especially because an ice candle has a more irregular interior than a standard container candle. Decorative candles with cavities can burn differently from smooth jar candles, so common sense matters here more than ever.
Creative Ways to Use Ice and Crayon Candles at Home
These candles shine in winter decor, handmade gift baskets, and rustic table settings. They also look great grouped with wood, greenery, or simple ceramic holders. Because the texture is already visually interesting, you do not need to over-style them. One textured candle on a tray can do plenty of heavy lifting.
You can also make seasonal versions. Pale blue and white feel frosty and elegant. Soft pink and peach look charming in spring. Deep cranberry or forest green can work for holiday decor. Just resist the urge to turn one candle into a rainbow tax audit.
Real-World Experiences with Making Homemade Candles with Crayons and Ice
One of the most interesting things about this project is how often people start it expecting a neat, polished craft and end up loving the messy, unpredictable parts most. That is the real charm of making homemade candles with crayons and ice. The experience is never completely identical twice, and that is exactly why it stays memorable.
A common first experience is surprise at how fast the project becomes immersive. At the beginning, it looks simple: melt wax, toss in ice, pour, done. Then you start noticing the little choices that shape the result. The size of the ice changes the holes. The amount of crayon changes the color depth. The wick placement changes the balance of the candle. Suddenly you are not just following steps; you are making design decisions like a tiny home-fragrance architect.
Many people also remember the sound. When hot wax hits the ice, the crackling and popping can be startling the first time. It feels like the candle is announcing its arrival with dramatic flair. That moment often becomes the point where the project shifts from “interesting” to “oh, this is actually fun.”
There is also a practical lesson that comes from experience: the prettiest candle on the outside is not always the best burner. Beginners often learn that color, texture, and performance are a balancing act. A candle with too much crayon may look bold but burn less cleanly. A candle with perfectly sized ice chunks may end up both beautiful and functional. After one or two attempts, most crafters begin adjusting their method naturally, using less crayon, centering the wick more carefully, and allowing more drying time before the first burn.
Another common experience is the joy of unmolding. Peeling away the carton or mold feels a bit like opening a present from your earlier self. You know roughly what you made, but not exactly. The final tunnels, pockets, and surface details are always a surprise. Some candles look rugged and dramatic, almost like coral or carved stone. Others come out soft and lace-like. That reveal is one of the best parts of the whole project.
People who make these candles for gifts often say recipients react strongly to the handmade texture. Even when the candle is not technically perfect, it feels personal and artistic. It does not look mass-produced. It looks thoughtful. That is a big reason this craft has lasted for generations. It feels homemade in the best possible way.
Perhaps the biggest experience this project offers is confidence. After making one ice candle, a beginner usually understands candle making much better than before. You start noticing wick behavior, wax cooling patterns, mold design, and burn habits. The project teaches you to observe, adjust, and improve. In other words, it is not just a candle craft. It is a very pretty lesson in patience, experimentation, and learning from small mistakes.
And honestly, that may be the best reason to try it. You do not just end up with a candle. You end up with a story: the crackling ice, the surprise texture, the color that turned out better than expected, and the moment you realize your kitchen now smells faintly of creativity and warm wax. That is a solid afternoon’s work.
Conclusion
Making homemade candles with crayons and ice is one of those rare DIY projects that manages to be affordable, creative, decorative, and just unpredictable enough to stay exciting. Ice gives the candle its signature sculpted look. Crayons can add playful color when used carefully. Wax ties it all together into something that feels handmade in the most satisfying way.
The smartest way to approach this project is with equal parts creativity and caution. Use candle-safe materials whenever possible, keep crayon use light, test your finished candle before regular use, and follow basic candle safety every time you light it. Do that, and you will have more than a fun craft. You will have a homemade candle with personality, texture, and a backstory that beats anything pulled off a store shelf.