Table of Contents >> Show >> Hide
- Before You Go Leak-Hunting: Make Sure It’s Not a “Fake Leak” Problem
- Simple Way #1: Use Your Eyes (and Ears) to Spot Common Leak Clues
- Simple Way #2: Do the Soapy Water “Bubble Test” on Accessible Joints
- Simple Way #3: Use a Handheld Leak Detector (Electronic “Sniffer” or UV Confirmation)
- When to Stop DIY and Call a Pro (A.K.A. The Smart Boundary)
- How to Reduce the Odds of Future AC Leaks
- Conclusion: Your Leak-Detection Game Plan
- Real-World Experiences: What Leak-Hunting Often Looks Like in Everyday Life
If your air conditioner suddenly feels more like a gentle fan that’s “emotionally supportive” but not actually cooling, you might be dealing with an
air conditioning leakspecifically a refrigerant leak. And here’s the key thing homeowners often miss:
refrigerant doesn’t get “used up.” Your AC is a sealed system. So if the refrigerant charge is low, it’s usually because it escaped
somewhere it absolutely didn’t have permission to go.
The good news: you can often narrow down where the leak is (or at least confirm that a leak is likely) without turning your weekend into an HVAC
apprenticeship. The better news: the “simple” methods are mostly about observing patterns and checking the most common leak points. The important news:
anything that involves opening the refrigerant circuit, adding refrigerant, or handling recovery equipment is a job for a licensed HVAC technician.
Below are three homeowner-friendly ways to do AC refrigerant leak detectionwith practical steps, realistic expectations, and a few
“learn-from-other-people’s-mistakes” notes so you don’t become the plot of a cautionary tale.
Before You Go Leak-Hunting: Make Sure It’s Not a “Fake Leak” Problem
Not every “my AC isn’t cooling” moment is a refrigerant leak. Some issues mimic leak symptoms so well they deserve an Oscar. Do these quick checks first:
- Check the air filter: A clogged filter can reduce airflow and cause the evaporator coil to ice upvery similar to low refrigerant symptoms.
- Confirm vents are open and unobstructed: Closed registers and blocked returns can choke airflow.
- Look for ice: If you see frost or ice on the indoor coil cabinet or copper line, turn the system off and let it thaw fully before running it again.
- Listen for new sounds: A hissing or bubbling noise near the indoor or outdoor unit can hint at a leak.
If the basics check out and cooling is still weak, run times are getting longer, or ice keeps returning, it’s time to investigate. Let’s do it in three simple steps.
Simple Way #1: Use Your Eyes (and Ears) to Spot Common Leak Clues
This is the “no special tools” methodand it’s surprisingly effective. Many refrigerant leaks leave behind physical evidence, especially around joints,
valves, and coils. Your mission is to look for patterns that scream “refrigerant escaped here.”
What you’re looking for
- Oily residue or grime that looks “wet”: Refrigerant travels with compressor oil. When refrigerant leaks, a light oily film often appears and collects dust.
- Corrosion or pitting on copper/aluminum: Coils can develop tiny pinhole leaks from corrosion over time.
- Ice or frost in the wrong places: Frost on the larger insulated suction line or at the indoor coil cabinet can be consistent with low refrigerant (but also airflow problems).
- Hissing or faint “psssst” sounds: Larger leaks can sometimes be audible near the leak site.
- Dirty spots at connection points: Dust sticks to oil, and oil sticks to leaking areas like it’s paying rent.
Where to check first (the “greatest hits” list)
Start with the places leaks love the mostbecause leaks are creatures of habit:
- Outdoor condenser service valves: Where gauges connect. Valve cores and caps can leak.
- Line set connections: Anywhere copper lines connect to components.
- Indoor evaporator coil cabinet: Look around the coil area for corrosion, staining, or oil.
- Where copper lines rub or vibrate: Copper can wear through if it’s touching metal edges or vibrating for years.
- Mini-splits (if you have one): Flare fittings are common leak points if they weren’t torqued correctly during installation.
How to do this safely
- Turn off power at the thermostat and, if you’re opening panels, at the outdoor disconnect/breaker.
- Use a flashlight and take your time. You’re not speedrunning HVAC.
- Don’t poke into coil fins with sharp tools. Those fins bend if you look at them wrong.
If you find obvious oil residue at a fitting or valve area, you may have already identified your prime suspect. But to confirm it, move on to the most
classic DIY test in history: bubbles.
Simple Way #2: Do the Soapy Water “Bubble Test” on Accessible Joints
The bubble test is popular for one reason: it works. If gas is escaping, soap solution can form visible bubbles at the leak point. It’s low-tech,
low-cost, and oddly satisfyinglike finding the squeaky floorboard on the first try.
What you need
- Dish soap and water (or a commercial bubble leak solution)
- Spray bottle or small brush
- Clean rag/paper towel
- Flashlight
Best places to bubble-test (homeowner-accessible)
- Service valve caps on the outdoor unit (the capped ports where technicians attach gauges)
- Valve core area (around the portnot inside it)
- Visible braze joints on the outdoor condenser (where copper meets components)
- Mini-split flare connections (if visible and accessible)
Step-by-step bubble test
- Shut the system off and keep hands clear of any moving parts.
- Mix your solution: a generous squirt of dish soap in water (thicker is often better for bubbles).
- Apply to one spot at a time: spray or brush a small area so you can clearly observe it.
- Watch for growth: tiny foam is normal; what you want is a bubble that keeps inflating or forms a steady stream of bubbles.
- Wipe, reapply, recheck: confirm it wasn’t just trapped air or leftover soap doing improv theater.
Bubble test tips that actually matter
- Wind is your enemy: outdoor breezes can pop bubbles or hide tiny leaks. Use your body as a windbreak if needed.
- Don’t spray solution into the service port: test around the core and cap area instead of blasting soap into places soap should not live.
- Small leaks may not show: if your system only leaks under certain pressures or temperatures, bubbles might miss it.
If bubbles clearly form at a cap or valve core area, that’s a strong clue. Still, repairing it often requires proper tools and procedures. Your job here
is diagnosis, not “I watched two videos so I’m basically licensed now.”
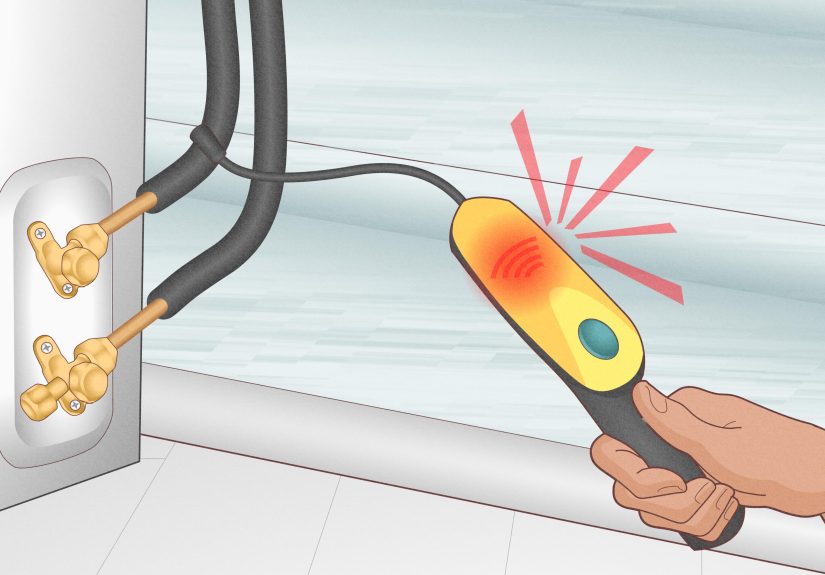
Simple Way #3: Use a Handheld Leak Detector (Electronic “Sniffer” or UV Confirmation)
If you want to level up from “detective with soap” to “detective with gadgets,” a handheld leak detector can help you pinpoint leaks that are too small
or too hidden for bubbles. Homeowners can use these tools for confirmation and narrowing down areasespecially around coils and crowded components.
Option A: Electronic refrigerant leak detector (“sniffer”)
A sniffer samples the air and alarms when it detects refrigerant. The key to success is slow, methodical movement and a systematic approach.
Rushing a sniffer over your unit is like waving a metal detector over a beach while joggingyou’ll miss the good stuff.
How to use a sniffer effectively
- Turn off fans if possible. Airflow can dilute refrigerant and make detection harder.
- Calibrate per the instructions (many units “zero out” to the background air).
- Move slowly: trace along joints, valves, coil edges, and line connections at a crawl.
- Pause at hotspots: service valves, coil U-bends, connection points, and areas with oily residue.
- Repeat passes: a real leak will tend to trigger consistently at the same area.
Once a sniffer alerts, use the bubble test (Way #2) on accessible fittings to confirm the exact spot. That two-step combosniffer to find the neighborhood,
bubbles to find the addressis a classic.
Common sniffer mistakes
- Moving too fast (most false “no leak” results are actually “no patience” results)
- Testing in heavy wind without shielding the probe area
- Expecting perfection: some detectors respond differently depending on refrigerant type and environmental conditions
Option B: UV dye and blacklight (best as a pro-assisted confirmation)
UV dye detection works by circulating a fluorescent dye with the system’s oil. If there’s a leak, dye escapes and leaves a visible trace that glows under
UV light. This method can be especially helpful for intermittent leaksones that only leak when the system is running hard on a hot day.
For most homeowners, the “simple” part is using a UV light to inspect for glowing residue if dye has already been added by a technician.
Adding dye yourself can involve equipment and procedures you shouldn’t attempt without proper training (and it may affect warranty or best practices depending
on the system).
Where UV dye tends to show up
- Coil areas where tiny leaks mist oil over time
- Connection points that seep slowly
- Service valve areas and caps
If you see bright staining that returns after cleaning, you’ve likely found the leak path. Take a photo and show it to your HVAC tech. You just saved them
timeand time is money, especially in July.
When to Stop DIY and Call a Pro (A.K.A. The Smart Boundary)
Finding a leak is helpful. Fixing it is a different category of responsibility. Call a licensed HVAC technician if:
- You see repeated icing, warm air, or performance drops even after airflow checks.
- The suspected leak is on the evaporator coil (often inside a sealed cabinet and not homeowner-serviceable).
- You suspect a leak but can’t access the area safely.
- You smell chemicals or feel unwellleave the area and get professional help.
- You have a newer system that may use mildly flammable refrigerantsdon’t experiment around ignition sources.
A technician can pressure test, perform verified leak testing, repair properly, and restore the correct refrigerant charge. “Topping off” without fixing the
leak is like refilling a leaky water bottle and calling it hydration.
How to Reduce the Odds of Future AC Leaks
- Keep coils clean: dirt and debris can increase corrosion risk and stress the system.
- Protect the line set: make sure refrigerant lines aren’t rubbing against sharp edges or vibrating against metal.
- Schedule maintenance: routine checks can catch slow leaks before they become expensive problems.
- Don’t ignore small symptoms: longer run times and slight cooling loss are early warnings, not personality quirks.
Conclusion: Your Leak-Detection Game Plan
To find an air conditioning leak without going full HVAC Jedi, start simple: look for oily residue and icing, confirm with bubbles on accessible
fittings, and use a handheld leak detector to narrow down hidden trouble spots. Even if you don’t repair it yourself, identifying the likely leak area can make
professional service faster, cheaper, and way less guessy.
Real-World Experiences: What Leak-Hunting Often Looks Like in Everyday Life
If you’ve never chased down an AC leak before, here’s what “real life” usually looks like (based on common homeowner situations and what technicians frequently
encounter). Spoiler: it’s rarely dramatic like in movies. It’s more like, “Why is my house 78°F when the thermostat says 72°F?”with a supporting cast of
mild confusion and one very dusty outdoor unit.
One of the most common experiences starts with a subtle change: the AC still runs, but it takes longer to cool. At first you blame the weather, then you blame
the house, then you blame your ceiling fan for “not believing in you.” Eventually you notice the air coming out of the vents isn’t as cold as usual. A quick
look at the indoor unit reveals frost where frost does not belong. In this scenario, homeowners often find that the filter is clogged (airflow issue), or they
discover recurring ice even with a clean filterpointing toward a potential refrigerant leak. The lesson: basic airflow checks first, then leak checks.
Another classic: the “service valve cap surprise.” Someone goes outside, removes the small caps on the outdoor unit’s service ports, and sees grime and a faint
oily ring around the area. They do the bubble test andboombubbles form right around the cap or core area. It feels like victory, and honestly, it kind of is.
Even small leaks at valve cores can cause noticeable performance drops over time. What makes this experience memorable is how unglamorous the culprit is:
not a dramatic coil failure, just a tiny component that isn’t sealing perfectly.
Mini-split owners often live a different version of this story. Their “experience” frequently involves a system that was installed recently, cooled fine for a
while, then slowly lost performance. A quick inspection might show no ice and no obvious oil at first glance. But when the flare connections are checked (or when
a sniffer is used carefully around them), the leak reveals itself. Many people are surprised that a connection that looks “tight” can still leak if it wasn’t
properly flared, torqued, or seated. The takeaway: the leak isn’t always where it’s easy to seeit’s where metal-to-metal sealing has to be perfect.
Coil leaks create the most frustrating experiences because they’re often invisible until you know exactly what you’re looking for. A homeowner may bubble-test
everything outside and find nothing. The sniffer might chirp near the indoor coil cabinet, but there’s no single “smoking gun” fitting to point at. In these
cases, technicians may use advanced verification methods or add UV dye (following proper procedures) to make the leak show itself over time. The homeowner’s
best move here is not to keep poking around, but to document symptoms (icing, warm air, run time changes), take clear photos of any residue or corrosion, and
share those details during service. Good information shortens diagnostic time.
And then there’s the “false alarm” experiencewhere the bubble test shows nothing, the sniffer is quiet, and yet the house still isn’t cooling. This is where
people discover issues like a dirty outdoor condenser coil, a failing capacitor, a blower problem, or duct leakage. It’s a humbling reminder that leak detection
is one part of a bigger troubleshooting puzzle. The win isn’t always “I found the leak.” Sometimes the win is “I ruled out a leak and found the real problem.”
That’s still a winbecause comfort doesn’t care whether your victory was dramatic.
Bottom line: leak-hunting is rarely a single moment of genius. It’s a process of narrowing down the most likely causes, checking the most common leak points,
and knowing when to hand off the final steps to a pro. If you approach it methodicallyeyes first, bubbles second, tools thirdyou’ll avoid guesswork, reduce
wasted service time, and get your home back to “cool and comfortable” faster. And you’ll earn the right to dramatically announce, “I have located the problem,”
even if the problem is a valve cap the size of a grape.


