Table of Contents >> Show >> Hide
- When Your Drapes Are Too Short, Don’t PanicThey Can Still Grow Up
- Why Floor-Length Drapes Look Better
- The Best No-Sew Method for Making Short Drapes Floor Length
- Step 1: Hang the Drapes Before Measuring
- Step 2: Decide Whether Rings Can Solve the Problem First
- Step 3: Choose the Right Extension Fabric
- Step 4: Cut and Press the Fabric Band
- Step 5: Attach the Extension with Fusible Hem Tape
- Step 6: Use Fabric Glue If You Prefer No Heat
- Step 7: Hide the Join with Trim
- Step 8: Rehang and Check the Length
- Common Mistakes to Avoid
- No-Sew Design Variations
- How Much Does This Project Cost?
- Best Rooms for This No-Sew Curtain Fix
- Experience Section: Real-Life Lessons from Making Short Drapes Floor Length Without Sewing
- Conclusion: Short Drapes Can Have a Second Act
Note: The title is kept as requested, but the article uses the standard spelling “length” throughout the body for polished American English.
When Your Drapes Are Too Short, Don’t PanicThey Can Still Grow Up
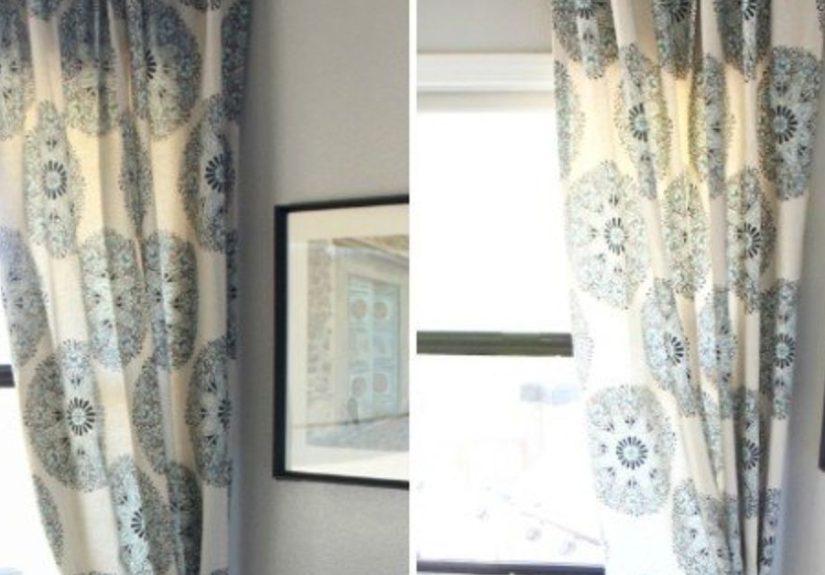
Short drapes have a special talent for making a room look slightly unfinished. They hover awkwardly above the floor like they are afraid of commitment. Maybe you bought beautiful panels on sale, inherited curtains from another room, or moved into a home with taller windows. Whatever happened, the result is the same: your drapes stop too soon, and now your living room looks like it borrowed pants from a younger sibling.
The good news is that you do not need a sewing machine, a professional workroom, or a heroic amount of patience to fix them. A no-sew curtain lengthening method can turn short drapes into floor-length drapes using simple materials such as fabric, trim, fusible hem tape, fabric glue, curtain rings, or clip rings. With careful measuring and a little heat from an iron, you can create a custom look without threading a needle.
This guide walks you through an easy, practical, and beginner-friendly way to make short drapes floor length. You will learn how to measure correctly, choose an extension fabric, attach it without sewing, hide the join, and avoid the most common mistakes. Think of it as a curtain makeover with less drama than a home renovation show and fewer tools than a sandwich.
Why Floor-Length Drapes Look Better
Floor-length drapes make a room feel taller, more intentional, and more polished. Interior designers often recommend curtains that lightly touch, skim, or almost touch the floor because they create a clean vertical line. When curtains stop several inches above the floor, the eye notices the gap immediately. It is the window-treatment version of wearing socks with sandals: technically possible, but not always the dream.
Longer drapes also help balance large windows, soften hard edges, and add a sense of warmth. In bedrooms, dining rooms, living rooms, and offices, floor-length curtains can make budget panels look more expensive. Even simple cotton or polyester panels gain a tailored feel when they fall properly from rod to floor.
Common Curtain Length Styles
Before you lengthen your drapes, decide what “floor length” means for your space. There are three popular looks:
- Floating: The drapes stop about half an inch above the floor. This is practical for high-traffic rooms, kids’ rooms, and homes with pets.
- Kissing the floor: The drapes barely touch the floor. This is the most tailored and classic option.
- Puddling: The fabric extends a few inches onto the floor. This creates a romantic, formal look but collects dust more easily.
For most homes, the best target is a curtain that just kisses the floor or floats slightly above it. It looks neat, feels intentional, and will not become a dust mop with decorative ambitions.
The Best No-Sew Method for Making Short Drapes Floor Length
The easiest no-sew way to make short drapes floor length is to add a fabric band or decorative trim to the bottom of each panel using fusible bonding tape or washable fabric glue. This method works especially well when your drapes are more than two or three inches too short. If you only need a small amount of extra length, clip rings may solve the problem without adding fabric at all.
For a clean, custom look, choose extension fabric that looks intentional. It can match the drapes, contrast with them, or complement another color in the room. A linen-look band on cotton panels, velvet trim on plain drapes, or a patterned border on solid curtains can all look stylish when done carefully.
Supplies You Will Need
- Short drape panels
- Measuring tape, preferably a metal tape measure
- Iron and ironing board
- Fusible hem tape, bonding web, or fabric glue
- Extension fabric, wide trim, or another curtain panel to cut from
- Fabric scissors
- Straight pins, clips, or painter’s tape for temporary placement
- Pressing cloth or clean cotton towel
- Seam ripper, optional
- Curtain rings or clip rings, optional
If your curtains are washable, prewash the extension fabric before attaching it. Fabric can shrink, especially cotton and linen. Nothing ruins a curtain makeover faster than a beautiful new border that shrinks after the first wash and turns your floor-length drapes back into ankle pants.
Step 1: Hang the Drapes Before Measuring
Never measure your drapes only while they are lying on the floor. Fabric hangs differently once gravity gets involved, and gravity is very serious about its job. Hang the curtains on the actual rod with the actual rings, hooks, or pocket you plan to use. Then measure from the bottom edge of the existing drape to the floor.
Measure at the left side, center, and right side of each panel. Floors are not always perfectly level, and curtain rods may be slightly uneven. If the measurements vary, use the longest gap as your guide, then fine-tune later with the hem or ring placement.
Example Measurement
Let’s say your drape hangs 7 inches above the floor. You want it to kiss the floor, so you need to add about 7 inches of visible length. However, you also need extra fabric for folded edges and bonding. Add at least 1 to 2 inches for hems and overlap. In this example, you would cut your extension fabric about 9 inches tall.
The formula is simple:
Gap from curtain to floor + top fold allowance + bottom fold allowance = extension fabric height
If your gap is 7 inches and you want half-inch folded edges on the top and bottom, cut the band at least 8 inches tall. If you prefer a deeper, more luxurious bottom hem, add more.
Step 2: Decide Whether Rings Can Solve the Problem First
Before adding fabric, check whether curtain rings can give you enough extra length. If your drapes currently hang from a rod pocket or back tabs, switching to clip rings may lower the panel by 1 to 3 inches. This small change can be enough if the curtains are only slightly short.
Clip rings are also useful because they add a designer-like pleated effect at the top. They help panels move smoothly across the rod and can make inexpensive curtains look more finished. If you need 2 inches or less, try this first. If you need 4, 6, 8, or even 10 inches, a no-sew fabric extension is the better solution.
Step 3: Choose the Right Extension Fabric
The extension fabric is where your project becomes either “custom decorator moment” or “I glued a random napkin to my curtains.” Choose carefully. The fabric should have a similar weight or a visually pleasing contrast. For example, medium-weight cotton drapes pair well with cotton canvas, linen blends, or decorator fabric. Sheer curtains need lightweight fabric or lace. Heavy velvet drapes need a substantial trim, velvet band, or thick decorative border.
Good Fabric Pairings
- White cotton curtains: Add natural linen, ticking stripe, or soft beige fabric.
- Gray drapes: Add charcoal, ivory, navy, or patterned fabric with gray in the print.
- Blackout curtains: Use a heavier decorator fabric or another blackout panel for the extension.
- Sheer curtains: Add lace, voile, or lightweight cotton trim.
- Solid curtains: Add a patterned border for a custom look.
If you want the lengthening to disappear, match the color and texture as closely as possible. If an exact match is impossible, choose contrast on purpose. Design crimes often happen in the awkward middle, where something almost matches but not quite. Intentional contrast is your friend.
Step 4: Cut and Press the Fabric Band
Lay the extension fabric on a clean, flat surface. Measure the width of your curtain panel and cut the fabric band to the same width, adding a little extra on each side for folding. If your curtain is 50 inches wide, cut the band about 52 inches wide so you can fold the side edges under neatly.
Next, press the fabric. Ironing is the secret ingredient in many no-sew projects. It sharpens folds, removes wrinkles, and helps the bonding tape grip evenly. Fold the top edge of the extension band under by half an inch and press. Fold the bottom edge under by half an inch or more and press. Then fold the side edges under and press them as well.
Use a pressing cloth if your fabric is delicate, synthetic, or dark-colored. Some fabrics can shine, melt, or scorch under direct heat. When in doubt, test on a scrap first. The scrap test is boring for 30 seconds and heroic for the rest of the project.
Step 5: Attach the Extension with Fusible Hem Tape
Fusible hem tape, also called bonding web or iron-on adhesive tape, is a heat-activated strip that bonds two layers of fabric together. It is popular for no-sew curtain hems because it creates a clean hold without visible stitches.
Lay the curtain panel face down. Place the extension band along the bottom edge, overlapping the folded top edge of the band with the lower back side of the drape. Slide fusible hem tape between the layers. Make sure the tape is fully covered by fabric so it does not melt onto your iron.
Cover the area with a damp or dry pressing cloth according to the adhesive instructions. Press the iron down firmly for the recommended time. Do not slide the iron back and forth like you are ironing a shirt in a hurry. Pick it up, move to the next section, and press again. Sliding can shift the fabric and create a wavy bond.
Important Ironing Tips
- Read the instructions on your specific hem tape.
- Use the heat setting recommended for your curtain fabric.
- Press, lift, and move instead of sliding the iron.
- Let the bond cool before moving the panel.
- Check the bond and press again if any areas lift.
For washable curtains, choose a washable adhesive product. For heavier drapes, choose heavy-duty bonding tape. Lightweight tape may not hold thick decorator fabric securely, especially after repeated opening, closing, and cleaning.
Step 6: Use Fabric Glue If You Prefer No Heat
If your curtain fabric cannot tolerate heat, fabric glue can be a good alternative. Washable fabric glue works well for many trims, bands, and decorative borders. Apply a thin, even line of glue between the curtain and extension fabric. Press the layers together firmly, smooth out ripples, and let the glue cure according to the product directions.
Do not overdo the glue. More glue does not mean a stronger result. It often means stiff fabric, visible seepage, and a panel that feels like it has been emotionally hardened by life. Use enough to bond the layers, then allow proper drying time before hanging.
When Fabric Glue Works Best
- For delicate fabrics that should not be ironed
- For attaching decorative trim or ribbon
- For small repairs after using hem tape
- For lightweight fabric bands
Fabric glue is convenient, but fusible tape usually creates a flatter, cleaner line for long curtain seams. If possible, use hem tape for the main bond and fabric glue only for small touch-ups, side edges, or decorative details.
Step 7: Hide the Join with Trim
If the spot where the curtain meets the extension fabric looks too obvious, cover it with trim. Grosgrain ribbon, braided trim, lace, twill tape, velvet ribbon, or decorative border tape can make the extension look planned. Attach the trim with fusible bonding web or fabric glue.
This is one of the best tricks for making short drapes floor length without sewing because it turns a practical fix into a design feature. Instead of trying to hide the addition, you celebrate it. The result looks less like a rescue mission and more like a boutique curtain upgrade.
Trim Ideas That Look High-End
- Black ribbon on white panels for a modern contrast
- Natural linen tape on cream drapes for a relaxed look
- Greek key trim for a classic designer feel
- Velvet ribbon for bedrooms or formal spaces
- Lace trim for cottage, vintage, or romantic rooms
Place the trim exactly over the seam where the two fabrics meet. Measure carefully and use clips or pins to hold it in position before bonding. A crooked trim line is very noticeable, especially across wide panels.
Step 8: Rehang and Check the Length
Once the adhesive has cooled or cured, hang the panel again. Step back and check the length from several angles. The bottom should skim, kiss, or slightly float above the floor depending on your chosen style.
If one side is a little long, you may be able to adjust the clip ring placement at the top. If the new band is slightly uneven, press the bottom hem again or use a tiny amount of fabric glue to secure loose edges. Do not judge the final result until the curtains have hung for a few hours. Fabric relaxes, folds settle, and sometimes the whole thing looks better after it stops being freshly handled.
Common Mistakes to Avoid
Choosing Fabric That Is Too Light or Too Heavy
A thin extension on heavy curtains can curl or look flimsy. A bulky extension on lightweight panels can pull the drapes downward awkwardly. Try to match fabric weight or choose trim designed for curtains.
Skipping the Pressing Step
Pressing creates crisp edges and helps adhesives work properly. If you skip it, the finished band may look lumpy, wavy, or homemade in the wrong way.
Using the Wrong Adhesive
Not all bonding tapes are the same. Some are designed for lightweight fabric, while others are made for heavier materials. Read the package and choose one that fits your curtain type.
Forgetting About Washability
If you plan to wash the curtains, use washable materials and adhesives. Also consider washing the extension fabric before attaching it so the new band does not shrink later.
Making the Panels Too Narrow
Length is important, but width matters too. Curtains usually look best when the total panel width is about 1.5 to 2.5 times the width of the window or curtain rod. If panels are too narrow, even perfect floor length may not save them from looking skimpy.
No-Sew Design Variations
Add a Bottom Border
The most common method is a horizontal band at the bottom. This works well when you need several inches of extra length. It also gives the curtains a custom color-blocked look.
Add a Middle Band
If you want a more decorative approach, cut the curtain and insert a contrasting band in the middle or lower third. This is more advanced because the line must be perfectly straight, but it can look very high-end.
Add Lace or Fringe
Lace, fringe, or tassel trim can add length while creating texture. This is especially attractive for bohemian, farmhouse, vintage, or romantic spaces. Choose trim that is wide enough to cover the gap and strong enough to hang straight.
Layer with Longer Sheers
If your main drapes are only slightly short, hang longer sheer panels behind them. The sheers create the floor-length line while the shorter drapes frame the window. This trick works best when the shorter panels look intentionally layered rather than accidentally undersized.
How Much Does This Project Cost?
A no-sew drape lengthening project can be very affordable. Fusible hem tape usually costs only a few dollars per roll. Fabric glue, trim, and clip rings are also budget-friendly compared with custom curtains. If you use fabric from an old curtain panel, tablecloth, sheet, or remnant bin, the cost can be surprisingly low.
For two panels, a simple project might cost between $10 and $40 depending on your materials. Decorative trims or designer fabric can raise the price, but even then, you are often spending far less than you would on custom floor-length drapes.
Best Rooms for This No-Sew Curtain Fix
This method works in almost any room, but it is especially useful in living rooms, bedrooms, dining rooms, home offices, and rental apartments. It is also a smart solution for odd window heights. Many ready-made curtains come in standard lengths, and your windows may not care about those standards at all.
In rentals, no-sew drape lengthening is helpful because you can upgrade the look of a room without permanent changes. Add clip rings, attach a fabric band, hang the panels high, and suddenly the space feels taller and more finished. Your security deposit remains calm, which is always a beautiful thing.
Experience Section: Real-Life Lessons from Making Short Drapes Floor Length Without Sewing
The first lesson from no-sew curtain projects is simple: measure after the curtains are hanging, not before. On a table, panels behave like polite rectangles. On a rod, they become fabric with opinions. The header style, ring height, rod placement, and even the weight of the fabric can change the final drop. Many people measure a panel flat, add a perfect-looking extension, then discover the curtain still floats two inches above the floor. That is the moment when the iron gets blamed, but the tape measure was the real villain.
Another useful experience is to test the adhesive before committing to the full panel. A small test on a hidden area or scrap fabric can save the entire project. Some synthetic curtains dislike high heat. Some textured fabrics do not bond evenly. Some adhesives work beautifully on cotton but struggle with thick blackout lining. Testing may feel like an annoying extra step, but it is much less annoying than peeling a melted adhesive web off your ironing board while questioning your life choices.
Color matching is also trickier than it looks. A “white” curtain may be bright white, warm white, ivory, cream, off-white, or “mysterious hotel towel after three washes.” If you cannot match the color exactly, choose contrast deliberately. A tan linen band on white curtains can look elegant. A navy band on gray drapes can look sharp. But a nearly matching fabric that is just slightly wrong may look like a mistake. When in doubt, bring the curtain panel to the fabric store or order several swatches before choosing.
The most successful no-sew lengthening projects often use trim to hide the transition. Even when the fabric band is attached neatly, the seam can draw attention. A ribbon or decorative tape placed over the join makes the addition look like a design decision. This works especially well in bedrooms and living rooms, where a small decorative detail can tie the curtains to pillows, rugs, or wall colors.
Patience matters during the bonding step. Hem tape needs firm pressure, correct heat, and cooling time. If you lift the fabric too soon, the bond may separate. If you drag the iron, the layers may shift. The best rhythm is press, hold, lift, move, repeat. It is not glamorous, but neither is paying for new drapes when the old ones only needed a little extra height.
Another practical lesson is to keep both panels side by side while working. Curtains are usually viewed as a pair, so small differences become obvious once they are hanging. Mark the same measurements on each panel, align the bands carefully, and compare them before bonding the second curtain. If one panel ends up half an inch longer, it may not sound like much, but your eyes will find it every time you enter the room. Eyes are dramatic like that.
Finally, no-sew lengthening is not just a budget fix; it can be a style upgrade. Many store-bought drapes are plain by design, which makes them easy to customize. Adding a bottom band, contrast border, or decorative trim can make basic panels feel custom-made. The finished result often looks more personal than buying new curtains. Instead of replacing what you have, you improve it. That is good for your wallet, good for your room, and honestly, good for the ego when guests ask where you bought your “custom” drapes.
Conclusion: Short Drapes Can Have a Second Act
Making short drapes floor length without sewing is one of the easiest ways to upgrade a room on a budget. With accurate measuring, the right extension fabric, fusible hem tape or fabric glue, and a little patience, you can transform awkward curtain panels into polished floor-length drapes. The key is to make the addition look intentional. Choose fabric thoughtfully, press every fold, cover the join with trim if needed, and rehang the panels before making final adjustments.
You do not need advanced sewing skills to get a designer-inspired result. You need a plan, a tape measure, an iron, and the courage to tell your short curtains, “Today, we grow.”


