Table of Contents >> Show >> Hide
- Why Making Sushi Without a Mat Actually Works
- Before You Start: What You’ll Need
- How to Roll Sushi Without a Mat: 13 Steps
- Step 1: Choose the easiest no-mat method
- Step 2: Make proper sushi rice
- Step 3: Season the rice while it’s warm
- Step 4: Let the rice cool to the right temperature
- Step 5: Prep your filling station like a sane person
- Step 6: Build your makeshift mat
- Step 7: Place the nori correctly
- Step 8: Wet your fingers and spread the rice thinly
- Step 9: Add fillings sparingly
- Step 10: Tuck and start the roll
- Step 11: Continue rolling and seal the edge
- Step 12: Let it rest, then slice with a wet knife
- Step 13: Serve immediately and know your backup plan
- Best No-Mat Sushi Styles for Beginners
- Common Mistakes to Avoid
- Food Safety Tips for Homemade Sushi
- Why This Method Is Great for Home Cooks
- Extra Experience: What It’s Really Like to Make Sushi Without a Mat
- Conclusion
If you’ve ever stood in your kitchen holding a sheet of nori and thinking, “I can cook dinner, but apparently I cannot own one tiny bamboo rectangle,” good news: you can absolutely make sushi without a mat. In fact, rolling sushi without a bamboo mat is less of a culinary tragedy and more of a creative plot twist. A clean kitchen towel, a piece of parchment paper, or even a hand-roll approach can get you surprisingly close to homemade sushi glory.
The real secret is not the mat anyway. It’s the rice. It’s the balance. It’s not stuffing your roll like a gym bag five minutes before a flight. Once you understand how sushi rice should feel, how much filling to use, and how to create gentle pressure while rolling, the lack of a mat becomes a minor inconvenience instead of a full-blown kitchen crisis.
This guide walks you through 13 easy steps to roll sushi without a mat, plus practical tips on fillings, slicing, and common mistakes. Whether you want a classic nori-out roll, an inside-out roll with rice on the outside, or the easiest no-equipment option of all, the humble hand roll, you’re in the right place.
Why Making Sushi Without a Mat Actually Works
A bamboo mat is helpful because it gives structure and even pressure, but it’s not magic. A flexible towel wrapped in plastic wrap does nearly the same job. Parchment paper can also help guide the roll while keeping things tidy. And if you want to skip rolling entirely, hand rolls are famously beginner-friendly because they’re folded into a cone or taco shape and eaten right away.
That means homemade sushi is still very doable even if your kitchen drawer contains twelve mystery takeout sauce packets but no sushi tools. Better yet, no-mat sushi can feel more relaxed, more customizable, and frankly more fun. It’s less “restaurant perfection” and more “look at me, I made dinner that feels fancy.”
Before You Start: What You’ll Need
Basic tools
- Cooked short-grain sushi rice
- Nori sheets
- A clean kitchen towel, parchment paper, or plastic wrap
- A cutting board or flat work surface
- A small bowl of water
- A sharp knife
Easy filling ideas
- Cucumber, avocado, and carrot
- Imitation crab with mayo
- Cooked shrimp
- Flaked cooked salmon
- Canned spicy tuna
- Egg omelet strips
- Pickled vegetables
If you’re new to homemade sushi, start with cooked seafood or vegetables. It’s simpler, cheaper, and less stressful. Your first goal is learning the texture and rolling technique, not auditioning for a sushi counter in Tokyo after one Tuesday night practice round.
How to Roll Sushi Without a Mat: 13 Steps
Step 1: Choose the easiest no-mat method
You have three solid options. First, use a clean dish towel wrapped in plastic wrap. This is the closest substitute for a bamboo mat and gives you the best control. Second, use parchment paper if you want a simpler, less clingy setup. Third, skip the log shape and make hand rolls, which are the easiest option for beginners and require almost no rolling skill.
If your goal is neat, sliceable rolls, go with the towel trick. If your goal is “I want sushi in my mouth soon and perfection is overrated,” hand rolls are your best friend.
Step 2: Make proper sushi rice
Use short-grain sushi rice, not jasmine rice, not basmati, and definitely not whatever lonely long-grain rice is rattling around in the pantry. Sushi rice is naturally stickier, which is exactly what helps the roll hold together.
Rinse the rice until the water runs mostly clear, cook it according to package directions or your preferred rice-cooker method, then let it steam briefly after cooking. This step matters because rice that’s too wet becomes mushy, and rice that’s too dry turns your sushi into edible confetti.
Step 3: Season the rice while it’s warm
Sushi isn’t defined by raw fish. It’s defined by seasoned rice. Stir a mixture of rice vinegar, sugar, and salt into the warm rice. Fold gently instead of smashing it like you’re angry at it. At first, the rice may seem too wet, but it will settle as it cools.
This seasoned rice gives sushi its signature lightly sweet, tangy, savory flavor. Without it, you’re basically making a seaweed burrito with identity issues.
Step 4: Let the rice cool to the right temperature
Cool the rice until it’s warm or room temperature, not piping hot and not refrigerator-cold. Hot rice can make the nori soggy too quickly, while cold rice is harder to spread and less pleasant to eat. The sweet spot is rice that’s comfortable to handle with damp fingers.
While the rice cools, prep your fillings into thin strips. Uniform fillings roll better than chunky ones. Think tidy little matchsticks, not random vegetable boulders.
Step 5: Prep your filling station like a sane person
Before you assemble anything, line up your ingredients. Put rice in one bowl, fillings on a plate, nori nearby, and a small bowl of water at your station. Wet fingers help keep rice from sticking to your hands, and organization keeps your sushi session from turning into a sticky, seaweed-covered scavenger hunt.
If you’re using seafood, keep food safety in mind. Separate raw seafood from ready-to-eat ingredients, wash hands and utensils thoroughly, and refrigerate perishable ingredients promptly. If you’re not serving the rolls right away, keep fillings chilled until the last moment.
Step 6: Build your makeshift mat
Lay a clean folded kitchen towel on the counter and cover it with plastic wrap. That gives you flexibility, grip, and a nonstick barrier. If you don’t want to use a towel, lay out a piece of parchment paper instead. Either option lets you lift, tuck, and guide the roll just like a bamboo mat would.
This is the part where you realize your kitchen has been secretly capable all along. Inspirational, really.
Step 7: Place the nori correctly
Set a sheet of nori shiny side down on your makeshift mat or parchment. Position it with one edge closest to you. That way, when you roll, you can lift the near edge up and over the filling in one smooth motion.
For traditional rolls, keep the nori on the outside. For inside-out sushi, spread the rice first, then carefully flip the sheet so the rice faces down and the nori faces up before adding the filling.
Step 8: Wet your fingers and spread the rice thinly
Dip your fingers lightly into the bowl of water. Then spread a thin, even layer of rice over the nori. Don’t mash it down hard. Gentle pressure is enough. Leave a small border at the far edge so the roll can seal properly when you finish.
One of the most common beginner mistakes is using too much rice. You want coverage, not a snowdrift. Too much rice makes rolling harder and slicing messier.
Step 9: Add fillings sparingly
Place your fillings in a narrow horizontal line across the lower third of the rice. Keep the amount modest. This is sushi, not a deli wrap. Overfilling causes bursting, squishing, and that sad moment when one cucumber stick launches itself across the counter.
A good beginner combo is cucumber, avocado, and imitation crab or cooked shrimp. Vegetarian rolls with avocado, carrot, and cucumber are also forgiving, affordable, and easy to balance.
Step 10: Tuck and start the roll
Lift the edge of the towel or parchment nearest you and guide the nori over the filling. Use your fingers to tuck the filling inward as the roll begins to form. This first tuck is the key moment. It creates structure and keeps the center compact instead of loose and floppy.
Don’t yank. Don’t squeeze like you’re wringing out a sponge. Think firm but gentle pressure.
Step 11: Continue rolling and seal the edge
Once the first turn is secure, keep rolling forward until the log is complete. Use the towel or parchment to help shape the roll into a round, even cylinder. If the edge doesn’t want to close, dampen the bare border with a little water and press lightly to seal it.
At this point, you can also give the roll a gentle squeeze along the length to help it hold together. Not a wrestling move. Just a little encouragement.
Step 12: Let it rest, then slice with a wet knife
Give the roll a short rest before cutting. Even a minute or two helps everything settle. Then use a sharp knife dipped in water or wiped with a damp towel between cuts. Slice with a clean downward motion rather than crushing through the roll like you’re splitting firewood.
Most rolls are cut into six to eight pieces. If the knife gets gummy with rice, clean it and keep going. This tiny habit makes a huge difference.
Step 13: Serve immediately and know your backup plan
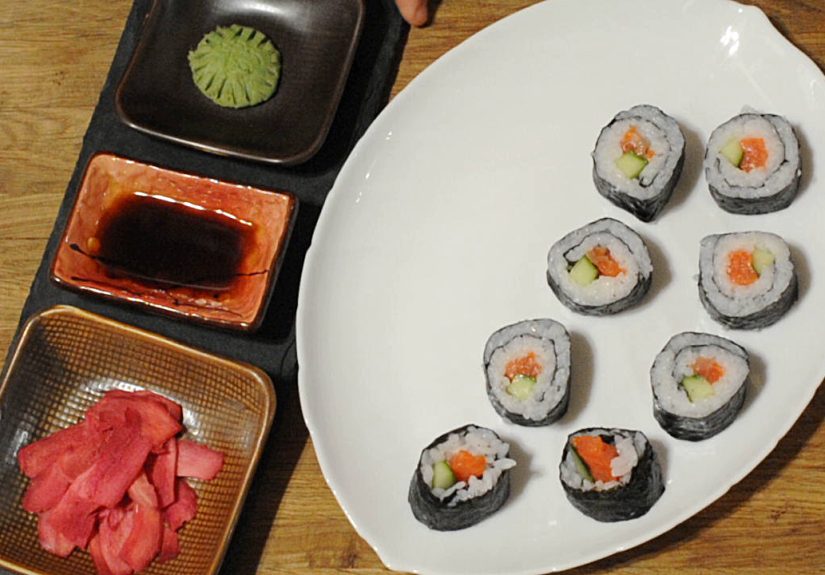
Serve your sushi right away with soy sauce, pickled ginger, and wasabi if you like. Nori is crispest shortly after assembling, especially for hand rolls. If your log roll looks a little wonky, don’t panic. Call it rustic. Or pivot to hand rolls for the rest of the batch and suddenly you look intentional.
That’s one of the best things about making sushi without a mat: you don’t have to be precious. You just have to be practical.
Best No-Mat Sushi Styles for Beginners
Classic roll
This is the traditional log shape with nori on the outside. It’s the easiest sliced roll to practice because it’s structurally straightforward and doesn’t require flipping.
Inside-out roll
This style has rice on the outside and nori on the inside. It feels a little fancier and can be topped with sesame seeds or thin avocado slices. It’s slightly messier, but very doable with plastic wrap or a towel setup.
Hand roll (temaki)
This is the easiest equipment-free sushi style. Place rice and fillings on one side of a nori sheet, then fold it into a cone or taco shape and eat it immediately. Hand rolls are perfect for dinner parties, family-style meals, or nights when you want the sushi experience without slicing anything.
Common Mistakes to Avoid
- Using the wrong rice: Short-grain sushi rice is worth it.
- Overstuffing: More filling does not mean better sushi.
- Skipping the water bowl: Wet fingers make spreading rice much easier.
- Using hot rice: It can make the nori limp too fast.
- Cutting with a dull knife: That’s how beautiful rolls become abstract art.
- Leaving rolls out too long: Perishable fillings and cooked rice should not sit around for hours.
Food Safety Tips for Homemade Sushi
If you use cooked seafood, eggs, vegetables, or imitation crab, homemade sushi is much easier to manage safely. If you choose raw fish, buy from a highly reputable seller and handle it with care. Keep raw seafood separate from ready-to-eat ingredients, wash hands and surfaces after contact, and keep chilled ingredients cold until serving time.
Cooked rice and other perishable ingredients should be refrigerated within two hours, or within one hour if the room is very hot. In other words, sushi night is not the moment to let food lounge dramatically on the counter like it’s on vacation.
Why This Method Is Great for Home Cooks
Rolling sushi without a mat makes homemade sushi more accessible. You don’t need specialty gear, a giant pantry haul, or professional-level knife skills. You just need a few reliable ingredients, a little patience, and a willingness to laugh at your first roll if it comes out looking like it had a long day.
The payoff is big. You get customizable rolls, fresher ingredients, fun presentation, and a dinner project that feels way more impressive than it really is. Honestly, that’s the dream.
Extra Experience: What It’s Really Like to Make Sushi Without a Mat
The first time you try to roll sushi without a mat, it can feel suspiciously like you’ve volunteered for an arts-and-crafts project that also expects dinner at the end. There’s rice on your fingers, a cucumber strip somehow on your sleeve, and the nori is staring at you like it knows you’re bluffing. But here’s the funny thing: by the second roll, your hands start to figure it out. By the third, you stop overthinking. By the fourth, you start acting like this was your plan all along.
One of the biggest surprises is how forgiving the process becomes once you stop chasing perfect restaurant-style symmetry. Home sushi has personality. One roll might be a little plumper on one end. Another might lean slightly oval instead of perfectly round. A hand roll might look more taco than cone. None of that matters once you take a bite and get that combination of seasoned rice, crisp nori, creamy avocado, and crunchy vegetables. Suddenly your “imperfect” sushi tastes suspiciously excellent.
There’s also something oddly satisfying about the towel trick. It feels like kitchen improvisation at its finest. You use an everyday object, wrap it in plastic, and somehow turn it into a sushi tool. It’s the culinary equivalent of fixing a problem with duct tape, except much more elegant and significantly tastier. And when it works, it really works. That first neatly sliced roll gives you a tiny rush of victory that feels wildly disproportionate to the task, but you should absolutely enjoy it anyway.
Another great part of no-mat sushi is how social it can be. It’s perfect for a low-pressure dinner with friends or family because everyone can build their own rolls or hand rolls. One person goes all-in on cucumber and avocado. Someone else makes a spicy tuna situation. Another person accidentally invents a roll that would make a sushi chef faint, but it tastes great, so democracy wins. It becomes less about rules and more about rhythm, flavor, and having fun with the format.
For beginners, hand rolls are often the confidence booster that keeps the whole sushi experiment alive. If your sliced rolls aren’t looking their best, a temaki-style cone swoops in like the superhero of weeknight sushi. No neat cylinder required. No perfect cuts. Just rice, fillings, fold, and eat. The nori stays crisp, the assembly is fast, and the whole thing feels casual in the best possible way.
Over time, you start learning little instincts that no recipe can fully teach. You notice when rice is too warm. You understand how much filling is enough before the roll fights back. You realize a damp knife is not a suggestion but a lifestyle. You also discover your favorite combinations. Maybe it’s cooked salmon with cucumber and scallions. Maybe it’s imitation crab, avocado, and sesame seeds. Maybe it’s a fully vegetarian roll that tastes clean, crunchy, and ridiculously fresh.
That’s the real joy of making sushi without a mat: it lowers the barrier to entry. It tells you that sushi night does not require a shopping quest, a certification, or a tiny bamboo accessory you forgot to order. It just requires a willingness to try, adjust, and keep rolling. Literally. And once you do, you may find yourself making homemade sushi more often, not because it’s flawless, but because it’s fun, flexible, and surprisingly achievable in a regular American kitchen.
Conclusion
If you want to roll sushi without a mat, the trick is simple: use the right rice, keep the fillings light, use a towel or parchment for support, and work with a gentle hand. From classic rolls to inside-out rolls to easy hand rolls, there are several smart ways to make homemade sushi without special equipment.
So no, a missing bamboo mat does not mean sushi night is canceled. It just means you’re about to become the kind of resourceful cook who can turn a dish towel into dinner theater. And honestly, that’s a pretty great skill to have.


