Table of Contents >> Show >> Hide
- Before You Boost: What Bass Actually Does
- Method 1: Use the Built-In Bass Boost Enhancement
- Method 2: Adjust Bass with Your Audio Driver or Equalizer App
- Method 3: Use a Third-Party Bass Booster or System-Wide Equalizer
- How to Choose the Best Bass Boost Method
- Why Bass Boost May Not Work on Your PC
- Practical Bass Settings for Different Uses
- Common Mistakes to Avoid
- Personal Experience: What Actually Works When Boosting Bass on Windows
- Conclusion
- SEO Tags
Sometimes your PC sound is technically “working,” but emotionally? It is giving paper cup with a string. The music plays, the game runs, the movie explodes, and yet the bass feels like it left early to beat traffic. The good news: you do not need to buy new speakers immediately, summon an audio engineer, or tape a subwoofer to your laptop like a cyberpunk lunchbox. Windows 10 and Windows 11 both offer practical ways to increase low-end sound, depending on your audio driver, headset, speakers, and installed sound software.
This guide explains how to boost the bass on Windows 10 or 11 using three easy methods: the built-in Bass Boost enhancement, your audio driver’s equalizer, and trusted third-party equalizer apps. You will also learn what to do if the Bass Boost option is missing, how to avoid muddy audio, and which settings usually work best for music, movies, gaming, and everyday listening.
Before You Boost: What Bass Actually Does
Bass refers to the lower-frequency part of sound. In simple terms, it is the thump in a kick drum, the rumble in an action scene, the weight behind an explosion, and the satisfying “oomph” that makes a song feel alive. Most bass energy sits roughly in the 60 Hz to 250 Hz range, while deeper sub-bass can dip below that. Boosting these frequencies can make audio warmer, fuller, and more exciting.
But bass is like hot sauce: a little can wake everything up; too much turns dinner into a dare. If you boost low frequencies aggressively, your sound can become boomy, distorted, or muffled. Small laptop speakers may also struggle to reproduce deep bass because physics is rude and tiny speakers cannot magically act like a nightclub subwoofer.
For best results, increase bass gradually, test with different songs or videos, and lower the volume if you hear crackling. If your speakers start sounding like a cardboard box in a thunderstorm, reduce the boost.
Method 1: Use the Built-In Bass Boost Enhancement
The easiest way to boost bass on many Windows 10 and Windows 11 computers is through the classic Sound control panel. This method works best when your audio device and driver support Windows audio enhancements. Some PCs show a dedicated Bass Boost option, while others may only show general audio enhancement settings.
How to Turn On Bass Boost in Windows 10
- Right-click the speaker icon on the taskbar.
- Select Sounds. If you do not see it, open Control Panel, then choose Hardware and Sound > Sound.
- Click the Playback tab.
- Select your active speakers or headphones.
- Click Properties.
- Open the Enhancements tab.
- Check Bass Boost.
- Click Settings if available, then choose a frequency and boost level.
- Click Apply, then OK.
How to Turn On Bass Boost in Windows 11
- Press Windows + R.
- Type mmsys.cpl and press Enter.
- Go to the Playback tab.
- Choose your output device, such as speakers, headphones, or a monitor audio device.
- Click Properties.
- Open the Enhancements tab if it appears.
- Select Bass Boost.
- Click Apply, then OK.
On some Windows 11 systems, you may also find audio effects by going to Settings > System > Sound, choosing your output device, and looking for Audio enhancements or Enhance audio. The exact wording depends on your version of Windows and the driver installed by your PC maker.
Best Bass Boost Settings to Try
If Windows lets you adjust the Bass Boost settings, start modestly. A common beginner-friendly setting is around 80 Hz to 100 Hz with a boost of 3 dB to 6 dB. This can add fullness without turning every podcast into a monster truck rally.
For music, try 80 Hz if you want deeper low-end impact. For movies and games, 100 Hz can make explosions and sound effects feel bigger. For small laptop speakers, avoid extreme boosting because the speakers may not be physically capable of producing deep bass cleanly.
What If the Enhancements Tab Is Missing?
If you do not see the Enhancements tab, do not panic. It is common. Many modern Windows 11 laptops and desktops rely on manufacturer-specific audio software instead of the classic Windows enhancements panel. The tab may also disappear after a driver update, Windows update, or when using certain USB, Bluetooth, HDMI, or DisplayPort audio devices.
Try these fixes:
- Make sure you selected the correct playback device.
- Update your audio driver from your PC manufacturer, such as Dell, HP, Lenovo, ASUS, Acer, or MSI.
- Check whether your computer uses an app like Realtek Audio Console, Dolby Access, DTS Sound Unbound, Bang & Olufsen Audio Control, Waves MaxxAudio, or Nahimic.
- Try a wired headset or speaker if Bluetooth audio sounds thin.
- Restart Windows after installing or updating audio drivers.
If Bass Boost is not available, use Method 2 or Method 3. In many cases, those methods offer better control anyway.
Method 2: Adjust Bass with Your Audio Driver or Equalizer App
Many Windows computers include audio software from the device manufacturer or sound-chip provider. This software may offer a graphic equalizer, bass preset, loudness setting, surround effect, or headphone profile. If your PC has Realtek audio, for example, you may have access to Realtek Audio Console or a branded version of it.
How to Find Your Audio Control App
- Open the Start menu.
- Search for terms like Realtek, Audio Console, Dolby, DTS, Nahimic, Waves, or your laptop brand name.
- Open the audio app that appears.
- Look for Equalizer, Sound Effects, Playback Devices, Music, or Presets.
- Choose a bass preset or manually raise the lower-frequency bands.
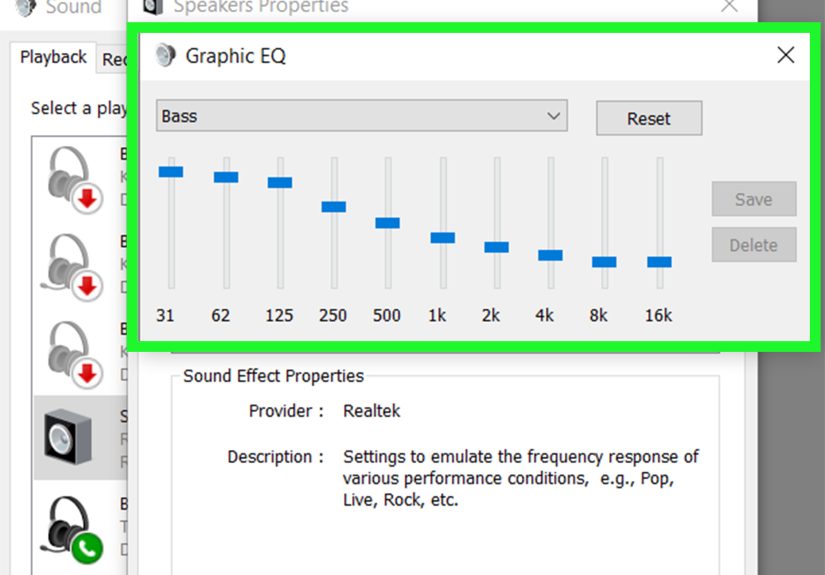
A graphic equalizer usually displays sliders labeled with frequencies such as 31 Hz, 62 Hz, 125 Hz, 250 Hz, 500 Hz, 1 kHz, and higher. To boost bass, raise the low-frequency sliders slightly. The most useful bands are often 62 Hz, 125 Hz, and sometimes 250 Hz. Be careful with 250 Hz, because too much can make audio sound thick and cloudy.
Simple Equalizer Settings for More Bass
Here is a safe starter setting for many headphones and desktop speakers:
- 31 Hz: +1 dB or leave flat
- 62 Hz: +3 dB
- 125 Hz: +4 dB
- 250 Hz: +1 dB or +2 dB
- 500 Hz and above: leave flat at first
This gives you more punch without burying vocals. If speech starts sounding muffled, reduce 250 Hz first. If kick drums still feel weak, raise 62 Hz or 125 Hz a little more. If the sound distorts, lower the preamp, master volume, or boost amount.
Best Driver Settings for Gaming
For gaming, bigger bass can make explosions, engines, and cinematic moments more exciting. However, too much bass can cover up footsteps, reload sounds, and directional cues. If you play competitive shooters, do not simply max out the bass and call it “tactical.” That is how your enemy becomes a ghost wearing sneakers.
Try a moderate boost at 80 Hz to 125 Hz, but avoid heavy boosting around 250 Hz. Keep virtual surround features off unless they genuinely help you locate sounds. Some headsets already process surround effects, so stacking Windows effects, headset software, and game audio processing can create echo or delay.
Best Driver Settings for Movies and Music
For movies, bass enhancement is usually more forgiving. Raising 80 Hz to 125 Hz can add cinematic weight to action scenes and soundtracks. For music, the best setting depends on genre. Hip-hop, EDM, pop, rock, and metal may benefit from a stronger low-end curve, while acoustic, jazz, classical, and podcasts often sound better with a lighter touch.
Use a familiar song as your test track. Choose something you know well, preferably with clean bass and vocals. If the bass gets louder but the singer sounds like they are trapped under a blanket, the low mids are too high.
Method 3: Use a Third-Party Bass Booster or System-Wide Equalizer
If Windows does not show Bass Boost and your manufacturer’s audio app is missing, limited, or about as helpful as a screen door on a submarine, third-party equalizer software can help. A system-wide equalizer changes audio across most apps, including browsers, music players, games, and video platforms.
Option A: FxSound
FxSound is a popular Windows audio enhancer that includes an equalizer, effects, presets, and bass controls. It is especially friendly for beginners because you can start with presets such as music, gaming, or bass boost, then fine-tune from there. It is a good choice if you want better sound quickly without reading an audio engineering textbook with a flashlight.
General steps:
- Install FxSound from its official site or the Microsoft Store.
- Open the app.
- Select your playback device.
- Choose a preset like Music or Bass Boost.
- Adjust the bass or low-frequency sliders gradually.
- Lower the volume if you hear distortion.
FxSound is useful for casual listening, laptop speakers, budget headphones, and users who want a cleaner interface than traditional equalizer tools.
Option B: Equalizer APO with Peace Equalizer
Equalizer APO is a powerful system-wide equalizer for Windows. It is lightweight and flexible, but its default interface can feel a little technical. That is why many users pair it with Peace Equalizer, which provides a friendlier visual interface with sliders, presets, and effects.
General steps:
- Install Equalizer APO.
- During setup, select the playback device you want to modify.
- Restart your computer.
- Install Peace Equalizer as a user interface for Equalizer APO.
- Open Peace and choose a simple equalizer layout.
- Raise the low-frequency bands slightly, such as 60 Hz, 90 Hz, or 120 Hz.
- Save your preset with a clear name like Warm Bass or Movie Bass.
Equalizer APO and Peace are best for users who want more control. You can create separate presets for headphones, speakers, games, movies, and music. Just remember that powerful tools can create powerful mistakes. Boosting every bass band to the ceiling is not “high fidelity”; it is a polite invitation for distortion to move in.
Safety Tip: Lower the Preamp When Boosting Bass
When you increase bass frequencies, the total audio signal becomes louder. If the signal gets too hot, it can clip, crackle, or sound harsh. Many equalizer apps include a Preamp slider. If you boost bass by 5 dB, try lowering the preamp by 3 dB to 5 dB. This creates headroom and keeps the sound cleaner.
How to Choose the Best Bass Boost Method
The right method depends on your device and comfort level. If your Windows PC shows the built-in Bass Boost option, start there because it is fast and requires no extra installation. If you have Realtek, Dolby, DTS, Nahimic, or Waves software, use that next because it is designed for your hardware. If both options are missing or too limited, use a third-party equalizer.
Quick Comparison
| Method | Best For | Skill Level | Main Advantage |
|---|---|---|---|
| Windows Bass Boost | Fast basic bass boost | Beginner | No extra software needed |
| Audio Driver Equalizer | Realtek, Dolby, DTS, laptop audio apps | Beginner to intermediate | Designed for your device |
| Third-Party Equalizer | Advanced control and missing bass options | Intermediate | More precise customization |
Why Bass Boost May Not Work on Your PC
There are several reasons bass boost may not appear or may not change the sound much. First, your playback device may not support Windows enhancements. This is common with Bluetooth headphones, USB DACs, HDMI audio, monitor speakers, and some modern audio drivers. Second, your PC maker may control enhancements through a separate app. Third, the speakers themselves may not produce much bass, especially if they are tiny laptop speakers.
Bluetooth can also complicate things. Some Bluetooth headsets switch audio modes when the microphone is active, which may reduce sound quality. If music sounds rich until you join a voice call, your headset may be switching profiles. Using a wired connection, a dedicated microphone, or a headset that supports newer Bluetooth audio features can improve the experience.
Practical Bass Settings for Different Uses
For Spotify, YouTube, and Music Apps
Boost 62 Hz and 125 Hz slightly. Keep vocals clear by avoiding too much 250 Hz. For bass-heavy music, use a small boost first because the track may already have strong low-end mixing.
For Netflix, Movies, and Streaming Video
Try a wider boost from 80 Hz to 160 Hz. This can add warmth to dialogue and more impact to action scenes. If voices become too thick, reduce 250 Hz.
For Gaming
Use moderate bass. Too much low-end can hide important sound cues. A small boost around 100 Hz can make the game feel fuller without ruining clarity.
For Podcasts and Video Calls
Do not overdo bass. Voices can quickly become boomy. If your goal is clearer speech, focus less on bass and more on balanced mids.
Common Mistakes to Avoid
- Maxing out every low-frequency slider: This usually creates distortion, not better bass.
- Boosting bass on weak laptop speakers: Small speakers can only do so much.
- Stacking too many effects: Windows enhancements, headset software, and game audio effects can conflict.
- Ignoring volume: Bass boost may sound clean at 50% volume but distorted at 95%.
- Using one preset for everything: Music, movies, games, and calls often need different settings.
Personal Experience: What Actually Works When Boosting Bass on Windows
After working with different Windows 10 and Windows 11 audio setups, the biggest lesson is simple: the “best” bass setting is rarely the loudest one. The most satisfying sound usually comes from a controlled boost, not a dramatic one. When users complain that their computer audio sounds weak, they often assume the solution is to push bass to the maximum. That can be fun for about twelve seconds. Then the kick drum starts swallowing the vocals, movie dialogue turns into soup, and every notification sound feels like a tiny earthquake in a plastic bucket.
The built-in Windows Bass Boost option is great when it appears. It is quick, simple, and safe for beginners. On many older Windows 10 machines, it is easy to find through the classic Sound panel. On newer Windows 11 devices, however, it is less predictable. Some laptops hide enhancements behind driver-specific software, and some external devices do not expose the feature at all. This is why people can follow the same instructions and get different screens. One person sees Bass Boost immediately; another sees nothing but a lonely Advanced tab and a deep sense of betrayal.
In everyday use, driver equalizers usually provide the best balance between convenience and control. Realtek Audio Console, Dolby tools, DTS apps, Nahimic, and similar software often include presets that are tuned for the laptop or motherboard. These apps can be especially helpful on gaming laptops, where speakers are small but tuned with extra processing. A good music preset or custom EQ can make built-in speakers sound fuller, even though it will not turn them into a dedicated subwoofer. That distinction matters. Software can shape sound; it cannot rewrite physics.
For headphones, the difference can be more dramatic. Many budget headphones have uneven tuning. A careful boost around 80 Hz to 125 Hz can make them feel warmer and more enjoyable. Still, the cleanest results often come from cutting problem frequencies instead of only boosting bass. For example, if headphones sound thin, a small bass lift helps. But if they sound muddy, reducing 250 Hz may improve clarity more than increasing 60 Hz. Equalizer work is a little like seasoning soup: sometimes you do not need more salt; you need less of whatever made it weird.
Third-party equalizers shine when Windows options are missing. FxSound is easy for casual users because the interface is approachable and the presets are quick to test. Equalizer APO with Peace Equalizer is better for people who want precise system-wide control. It takes more setup, but the flexibility is excellent. The most useful habit with these tools is creating multiple presets. A “Movie Bass” preset can be warmer and heavier, while a “Gaming Clarity” preset should keep bass moderate so footsteps and voices remain clear. A “Night Listening” preset can reduce bass so you do not accidentally share your action movie with the neighbors, the dog, and possibly the next zip code.
The final practical tip is to test with real content. Do not tune bass using only one song, one YouTube video, or one game. Try a bass-heavy track, a vocal-heavy track, a movie trailer, and a normal speaking video. If all of them sound better, you have a good setting. If only one sounds amazing and the rest sound like they were mixed inside a laundry basket, keep adjusting. Good bass should add weight, not chaos.
Conclusion
Learning how to boost the bass on Windows 10 or 11 is easier when you know where Windows hides its audio controls. Start with the built-in Bass Boost enhancement if your device supports it. If that option is missing, check your audio driver software, such as Realtek Audio Console, Dolby, DTS, Nahimic, or Waves. For the most control, use a third-party equalizer like FxSound or Equalizer APO with Peace.
The best bass boost is clean, balanced, and matched to your speakers or headphones. Raise low frequencies gradually, protect clarity, and avoid distortion. Your PC may not become a concert hall, but with the right settings, it can stop sounding like it is apologizing for existing.
Note: Menu names and available audio enhancements can vary by Windows version, sound driver, PC manufacturer, and playback device. If a setting is missing, update your audio driver or use a system-wide equalizer as an alternative.


