Table of Contents >> Show >> Hide
- First: Define “Dreamy” (Because It’s a Building Spec Now)
- Design & Sizing: The Part Where Tape Measures Earn Their Keep
- Materials & Hardware: Build for Weather, Not Wishful Thinking
- Tools & Shopping List: What You’ll Actually Use
- Step-by-Step: How to Build a Pergola That Doesn’t Wobble
- Step 1: Lay Out the Footprint
- Step 2: Plan Footings Like You Want to Sleep at Night
- Step 3: Dig Holes, Pour Footings, Set Anchors
- Step 4: Install Posts and Get Them Plumb
- Step 5: Add Beams (The Big Structural Moment)
- Step 6: Install Rafters (Where It Starts Looking Like a Pergola)
- Step 7: Add Purlins or Top Slats for Extra Shade
- Step 8: Brace for Racking (Translation: Side-to-Side Wobble)
- Step 9: Sand, Seal, Stain, or Paint
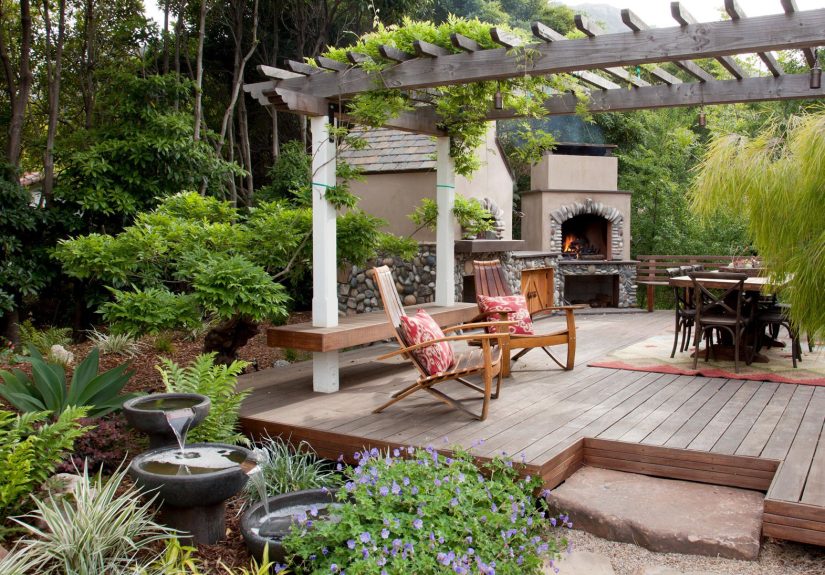
- Step 10: Add the Dreamy Stuff (Without Turning It Into a Circus)
- Common Mistakes (So You Don’t Join the Backyard Hall of Shame)
- Maintenance: Keep It Dreamy, Not Dingy
- Conclusion: Your Backyard Getaway, Built to Last
- Real-World Experiences: of “Stuff People Learn the Hard Way”
A pergola is basically a “roof” that politely refuses to be a roof. It frames a space, filters sunlight, gives you a place to hang lights, and makes your backyard feel like it has a personality beyond “lawn, but make it beige.” Build it right, and you’ve got an outdoor getaway that feels intentionallike a tiny vacation you can access without TSA removing your water bottle.
This guide walks you through planning, building, and finishing a sturdy DIY pergola with the kind of details that keep it standing straight, looking sharp, and not drifting into your neighbor’s yard during the first windy weekend.
First: Define “Dreamy” (Because It’s a Building Spec Now)
Freestanding vs. Attached: Choose Your Adventure
Freestanding pergola = four (or more) posts, fully independent, can live anywhere you have space. It’s the easiest path for most DIYers because you’re not tying into the house, and you can avoid the “Wait, did I just invite water behind my siding?” worry.
Attached pergola = one side connects to your home via a ledger board. It can look seamless and provides that “indoor-outdoor flow” people talk about in renovation shows. But it’s higher-stakes: you’ll need proper flashing, solid structural attachment (not just into siding), and often more permitting.
How Much Shade Do You Actually Want?
Pergolas range from “sun-dappled romance” to “why is my iced tea still boiling?” depending on the top design. Decide now:
- Open rafters: prettiest light patterns, least shade.
- Closer rafter spacing + purlins: more shade, still airy.
- Shade sail / canopy / retractable fabric: adjustable comfort.
- Vines: gorgeous, living shadealso a long-term commitment (like bangs).
Permits, HOAs, and the Ground’s Secret Plans
Before you buy lumber, check local rules. Some areas are relaxed for small, freestanding structures; others want a permit if you so much as whisper “post hole.” If you’re attaching to a house, it’s even more likely you’ll need approval.
Also: call 811 (in the U.S.) before digging. Hitting a utility line is a terrible way to add “special effects” to your outdoor oasis.
Design & Sizing: The Part Where Tape Measures Earn Their Keep
Pick a Size That Fits Real Life
Build around your furniture, not your fantasies. A pergola should comfortably “hold” the activity you want:
- Cozy lounge: 8′ x 10′ works well for two chairs + side table.
- Dining zone: 10′ x 12′ or 12′ x 12′ fits most tables with breathing room.
- Big hangouts: 12′ x 16′ (or larger) feels like an outdoor room.
Pro tip: lay out the footprint with stakes and string, then place chairs (or cardboard stand-ins) inside it. If you bump into imaginary furniture, you’ll definitely bump into real furniture.
Post Layout: Make It Square (Unless You Love Diagonal Problems)
Square and plumb are the two words that decide whether your pergola looks custom or “DIY, but in a confusing way.” Use:
- String lines for straight edges
- Diagonal measurements to confirm squareness (both diagonals should match)
- The 3-4-5 method to create a right angle if needed
Think Through Overhang and Headroom
The rafters often extend beyond the beams for style (and to cast a slightly wider shade footprint). Plan that overhang early so your final size isn’t a surprise. For headroom, most people prefer a comfortable “walk under it without ducking” heightand if you’re hanging string lights, give yourself space so the vibe doesn’t become “festival wiring meets forehead.”
Materials & Hardware: Build for Weather, Not Wishful Thinking
Wood Choices (and Why They Matter)
- Cedar: naturally rot-resistant, lighter weight, smells amazing while you work.
- Redwood: durable and beautiful, often pricier depending on region.
- Pressure-treated lumber: budget-friendly and strong; needs the right fasteners because the treatment can be corrosive to standard hardware.
- Paint-grade lumber: can look great finished, but choose carefully for outdoor durability.
If you’re mixing species (say, pressure-treated posts with cedar top framing), make sure your fasteners and connectors are compatible with pressure-treated lumber.
Fasteners & Connectors: Tiny Parts, Huge Consequences
Outdoor structures live in a world of moisture, temperature swings, and wind. Use exterior-rated screws and nails, and choose corrosion-resistant hardware (hot-dipped galvanized or stainless) where appropriate. This is not the place to “use what’s in the drawer” unless that drawer is labeled “approved for weather and structural work.”
Post Bases vs. Buried Posts
Many DIY pergolas use concrete footings with metal post bases to keep wood slightly elevated off concrete. That small gap helps reduce rot at the basebecause water loves to hang out where wood touches masonry.
Some builds set posts directly in the ground. That can work, but it demands careful material choice and long-term moisture management. If you want a pergola that ages gracefully, a post base on a solid footing is often the friendlier option.
Tools & Shopping List: What You’ll Actually Use
Your list will vary by design, but here’s a practical baseline for a typical wood pergola build:
- Measuring tape, chalk line, string line, stakes
- Post hole digger or auger (or a very strong relationship with a rental shop)
- Level (4′ is great), speed square, framing square
- Circular saw and/or miter saw
- Drill/driver, impact driver, bits
- Clamps, ladders, safety glasses, hearing protection
- Concrete mix (if pouring footings), forms/tubes (optional), shovel
- Exterior-rated fasteners + structural screws/bolts as needed
- Post bases/anchors and connectors (as required by your plan)
Step-by-Step: How to Build a Pergola That Doesn’t Wobble
Step 1: Lay Out the Footprint
Mark your corners with stakes. Run string lines between them to outline the pergola. Double-check:
- All sides match your plan measurements
- Diagonals match (square!)
- The pergola sits where you actually want it (check sun, privacy, and traffic paths)
Step 2: Plan Footings Like You Want to Sleep at Night
Your footings need to handle weight and resist movement from frost and soil shifts. In many climates, that means going below the frost line. Local building departments (or local code guides) will tell you the depth that applies where you live.
If you’re building on an existing slab or patio, you may be able to use surface-mounted anchorsassuming the concrete is thick enough and in good condition. Don’t guess: confirm the slab can handle structural anchoring.
Step 3: Dig Holes, Pour Footings, Set Anchors
Dig your holes at the marked post locations. Keep spacing consistent. If you’re pouring footings:
- Confirm hole depth and diameter per local requirements or your plan
- Use forms/tubes if needed for clean, consistent piers
- Pour concrete, then set post base hardware per manufacturer instructions
Let concrete cure properly. Rushing this step is how you end up with posts that slowly “learn” how to lean.
Step 4: Install Posts and Get Them Plumb
Attach posts to the bases and brace them temporarily. Take your time here. If your posts are out of plumb, every beam and rafter will either fight you or mock you. Sometimes both.
Step 5: Add Beams (The Big Structural Moment)
Beams typically run along the long sides of the pergola and carry the rafters. Common approaches:
- Notched posts so beams sit in a “seat” (strong and tidy)
- Sandwich beams (two boards on either side of the post, bolted through)
- Hardware-supported beams using structural connectors
Use bolts or structural screws where required, and keep connections consistent. Measure, mark, and set beam height so the top framing stays level.
Step 6: Install Rafters (Where It Starts Looking Like a Pergola)
Rafters typically run perpendicular to the beams. This is where style meets function:
- Tighter spacing = more shade
- Decorative tails = more “custom” vibe
- Consistent layout marks = fewer headaches
Mark rafter placement on both beams so they line up. Pre-cut decorative ends using a template so they match. (Nothing says “first draft” like rafters that look like siblings from different families.)
Step 7: Add Purlins or Top Slats for Extra Shade
Purlins (smaller boards running across the rafters) add shade and visual texture. They also give you more places to attach lighting or shade fabric later. Space them evenly and fasten them securely.
Step 8: Brace for Racking (Translation: Side-to-Side Wobble)
Pergolas are open structures, so wind can push them sideways. To stiffen the frame:
- Add knee braces (angled braces between posts and beams)
- Use approved connectors where appropriate
- Confirm all fasteners are tightened and installed correctly
Step 9: Sand, Seal, Stain, or Paint
Finishing is where “construction project” becomes “dreamy getaway.” For wood, a quality exterior stain or sealant helps protect against UV and moisture. If you paint, use exterior-rated primer and paint designed for the conditions in your region.
If you used pressure-treated lumber, check recommendations for drying time before applying certain finishesyour future self will appreciate not watching paint peel like a sunburn.
Step 10: Add the Dreamy Stuff (Without Turning It Into a Circus)
Now the fun part. A pergola becomes an outdoor getaway with a few strategic upgrades:
- Lighting: warm string lights, pendant lanterns, or solar options
- Shade: retractable canopy, outdoor curtains, shade sail panels
- Greenery: planters, trellised vines, hanging baskets
- Comfort: outdoor rug, pillows, a small side table for snacks (non-negotiable)
Common Mistakes (So You Don’t Join the Backyard Hall of Shame)
- Skipping layout checks: Out-of-square posts make everything harder.
- Weak anchoring: Wind doesn’t care about your aesthetic.
- Wrong fasteners: Interior screws outdoors = rusty sadness.
- Attaching to siding: If you go attached, do it structurally and flash it properly.
- Forgetting drainage: Water will find the path you didn’t plan for.
Maintenance: Keep It Dreamy, Not Dingy
A pergola is low-maintenance, not no-maintenance. Once or twice a year:
- Check fasteners and connectors for loosening or corrosion
- Inspect wood for cracking, rot, or insect damage
- Clean off debris that traps moisture
- Refresh stain/sealant as needed based on exposure
Conclusion: Your Backyard Getaway, Built to Last
Building a pergola is a mix of planning, precision, and a little patience. Start with a smart layout, anchor it like you respect weather, frame it square and level, and then finish it with shade and details that make you want to linger. Do it right, and your pergola becomes the place where mornings start slower, dinners last longer, and weekends feel like you “went somewhere”even if that somewhere is 14 feet from your back door.
Real-World Experiences: of “Stuff People Learn the Hard Way”
If you ask a handful of DIYers about pergolas, you’ll hear the same theme: the build is straightforwarduntil the yard reminds you it’s not a flat, cooperative workshop table. The most common “wish I knew” moment shows up early: sun and shade are weird. A pergola that looks perfect at 10 a.m. can feel like a skillet at 4 p.m. The people happiest with their finished space usually did a simple test firststanding in the exact spot at a few different times of day, imagining where seating would go, and noticing whether the sun blasts in from the side. That tiny “sun audit” often changes the orientation, rafter spacing, or the decision to add a canopy.
Next lesson: layout is everything, and it’s sneaky. Plenty of builders start with “It looks square enough,” then discover their rafters don’t line up cleanly because one corner is off by an inch. That inch becomes a cascade: beam marks don’t match, purlins drift, and suddenly you’re inventing creative trim to hide it. The folks who avoid the spiral do two things: they measure diagonals until they match, and they keep string lines tight like they’re tuning a guitar. It’s not glamorous, but it’s the difference between “nice pergola” and “why does it look like it’s walking away?”
Another common experience: posts don’t want to be plumb. Even if you set the base perfectly, a tall post will try to lean the moment you look awayespecially if the ground has a slope or the concrete isn’t fully cured. Builders who stay sane brace posts in two directions and re-check them after adding each major piece. It feels obsessive, but it prevents the final structure from having that subtle “crooked picture frame” vibe that you can’t unsee once you notice it.
People also underestimate the “small stuff”: hardware and finishing. A pergola can be made of gorgeous wood, but if the fasteners aren’t exterior-rated, you can end up with rust streaks that look like your pergola has been crying. And finishing isn’t just about colorit’s about longevity. DIYers who love their pergola years later usually picked a finish that matches their climate (UV exposure, rain, humidity), then committed to basic upkeep. Not a full-time jobjust a periodic refresh that keeps the wood from going gray and cranky.
Finally, the most joyful “experience” people share is what happens after the last screw goes in: the pergola becomes a magnet. The first night you hang lights and sit under it, the space feels different. It’s not just shadeit’s a room without walls. And once you have that, you’ll start collecting little rituals: coffee outside, late-night chats, a book you only read out there, a plant that climbs like it owns the place. That’s the real dreamy getawaybuilt from lumber, hardware, and the very satisfying knowledge that you made it happen.


