Table of Contents >> Show >> Hide
- Why Turn a Filing Cabinet Into a Planter?
- Tools and Materials You Will Need
- Step 1: Choose the Right Filing Cabinet
- Step 2: Clean and Prep the Cabinet
- Step 3: Drill Drainage Holes
- Step 4: Add Feet or Casters
- Step 5: Prime and Paint for Outdoor Beauty
- Step 6: Line the Interior
- Step 7: Fill With the Right Potting Mix
- Step 8: Choose Plants That Match the Planter
- Step 9: Plant With Good Spacing
- Step 10: Style the Planter So It Looks Intentional
- Care Tips for a Healthy Filing Cabinet Planter
- Common Mistakes to Avoid
- Budget-Friendly Design Ideas
- Experience Notes: What This Project Teaches You in Real Life
- Conclusion
Somewhere in America, there is an old metal filing cabinet sitting in a garage, holding exactly three rusted paper clips, one mystery key, and the emotional weight of tax seasons past. Good news: that dusty office relic is one weekend away from becoming the most charming planter on your porch. Learning how to build a pretty filing cabinet planter is not just a clever upcycling project; it is a practical way to create a deep, durable, raised container garden with personality.
A filing cabinet planter works beautifully because the cabinet already has the bones of a container: sturdy sides, a rectangular shape, and plenty of depth for flowers, herbs, compact vegetables, or trailing plants. With a little cleaning, drilling, sanding, paint, and smart planting, you can turn a boring gray box into a colorful outdoor feature that looks like it came from a boutique garden shop instead of the back corner of your basement.
This guide walks you through the full project, from choosing the right cabinet to adding drainage, protecting the metal, filling it with the right growing medium, and styling it so your neighbors say, “Wait, is that a filing cabinet?” in the best possible way.
Why Turn a Filing Cabinet Into a Planter?
A filing cabinet planter is a win for gardeners, DIY fans, and anyone who enjoys giving old things a second career. Instead of buying a large metal planter, you can repurpose a cabinet that might otherwise end up in the waste stream. The result is a sturdy, budget-friendly container that can handle patios, porches, side yards, and small-space gardens.
Its height is also a major advantage. A two-drawer or three-drawer cabinet can reduce bending compared with low pots, making planting and maintenance more comfortable. The rectangular shape fits neatly against a wall, fence, balcony rail, or walkway. And because metal cabinets can be painted almost any color, they are easy to match with your outdoor decor.
Best Uses for a Filing Cabinet Planter
A filing cabinet planter is especially useful for:
- Herb gardens near the kitchen door
- Annual flowers for porch color
- Pollinator-friendly plants like salvia, zinnias, and lantana
- Lettuce, kale, chard, and compact greens
- Trailing plants such as sweet potato vine, nasturtium, or creeping Jenny
- Decorative succulent displays in dry, sunny locations
The key is to match your plant choices to the cabinet’s location. A metal planter in full afternoon sun can heat up quickly, so choose heat-tolerant plants or place the planter where it gets morning sun and afternoon shade.
Tools and Materials You Will Need
Before you begin, gather your supplies. This project is not complicated, but metal is less forgiving than wood or plastic, so the right tools make everything smoother.
Basic Supplies
- Old metal filing cabinet
- Drill with metal drill bits
- Work gloves and eye protection
- Sandpaper or sanding block
- Rust remover or wire brush, if needed
- Exterior metal primer
- Exterior spray paint or outdoor enamel paint
- Clear outdoor sealant, optional
- Landscape fabric or fine mesh screen
- High-quality potting mix
- Compost, optional
- Slow-release fertilizer
- Plants suited to your light conditions
- Casters or furniture feet, optional
Do not use regular garden soil as the main filling material. In containers, garden soil can become heavy, compacted, and slow to drain. A lightweight potting mix is designed to hold moisture while still allowing air and excess water to move through the root zone.
Step 1: Choose the Right Filing Cabinet
Start with a metal filing cabinet that is structurally sound. Surface rust is usually manageable, but deep corrosion, sharp broken edges, or a wobbly frame may not be worth the trouble. Two-drawer cabinets are easier to move and fill, while taller cabinets can create a dramatic raised planter if you have the space.
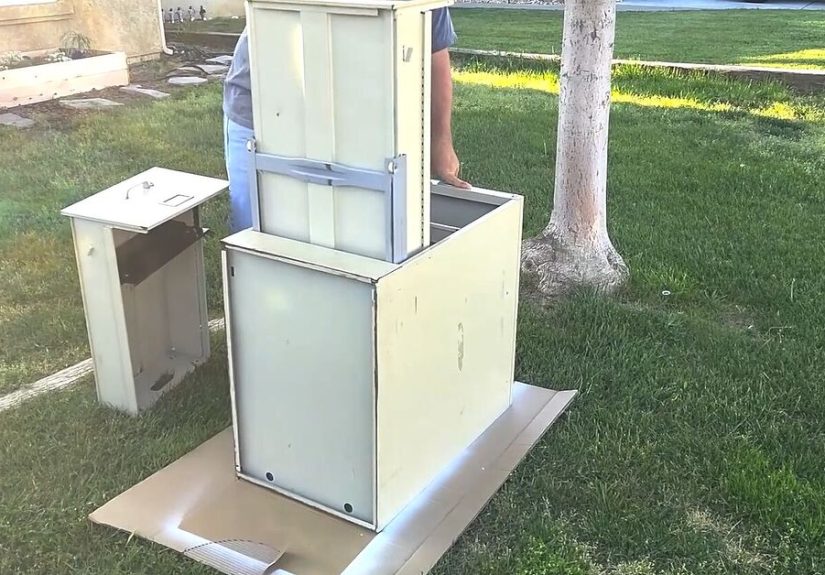
Remove all drawers unless your design intentionally uses them as tiered planting trays. Most filing cabinet planters are made by turning the empty cabinet shell into one large container. If the cabinet has a top, you can remove it or cut a large opening, depending on the style. Many cabinets are easiest to use when laid on their back so the drawer openings face upward, creating a long, deep trough.
Check for Safety First
Before you start cutting, drilling, or painting, inspect the cabinet for sharp edges. Wear gloves when handling metal. If the cabinet has loose rails, broken drawer slides, or jagged corners, remove or flatten them. A pretty planter should not bite you every time you water the basil.
Step 2: Clean and Prep the Cabinet
Wash the cabinet with warm water and mild dish soap to remove dirt, grease, spider webs, and whatever office ghosts are still clinging to it. Rinse well and let it dry completely. Paint will not adhere properly to a dirty or damp surface.
Next, sand the exterior lightly. You are not trying to remove every bit of old paint; you are roughing up the surface so primer can grip. If you find rust, scrub it with a wire brush or sandpaper until the flaky material is gone. For heavier rust, use a rust converter or rust remover according to the product directions.
Should You Remove Old Paint?
If the existing finish is smooth and firmly attached, sanding and priming are usually enough. If paint is peeling, bubbling, or flaking, remove the loose areas first. For very old cabinets, be cautious with unknown coatings. Work outside, wear a mask appropriate for sanding dust, and avoid creating unnecessary dust clouds.
Step 3: Drill Drainage Holes
Drainage is the difference between a thriving filing cabinet planter and a soggy metal bathtub full of sad roots. Drill multiple drainage holes in the lowest part of the planter. If you are laying the cabinet on its back, the back panel becomes the bottom, so that is where your holes go.
Use a metal drill bit and space the holes evenly across the base. For a large cabinet, aim for plenty of drainage rather than one lonely hole doing all the work. After drilling, check for sharp burrs and file or sand them down.
Do You Need Gravel at the Bottom?
Skip the gravel layer. It sounds helpful, but in many containers it can actually create a perched water zone and reduce the usable root space. Instead, cover the drainage holes with landscape fabric, fine mesh, or a piece of screen. This keeps potting mix from washing out while still allowing water to escape.
Step 4: Add Feet or Casters
Raising the planter slightly improves airflow and helps water drain away from the bottom. You can attach short furniture feet, metal legs, or outdoor-rated casters. Casters are especially useful if you want to move the planter around a patio, but remember that a soil-filled filing cabinet can become very heavy.
If you add wheels, choose strong casters rated for the expected weight. Locking casters are helpful on patios and decks. If your planter will sit directly on soil or mulch, stable feet may work better than wheels.
Step 5: Prime and Paint for Outdoor Beauty
This is where the project changes from “found behind the office printer” to “designer garden moment.” Use an exterior metal primer first, especially on bare or sanded areas. Primer helps paint adhere and gives the cabinet better protection against moisture.
Once the primer dries, apply outdoor spray paint or exterior enamel paint in thin, even coats. Light colors are often better for hot, sunny spots because dark metal absorbs more heat. Soft sage, warm white, clay pink, butter yellow, muted blue, or classic black can all look beautiful depending on your garden style.
Paint Safety Tips
Paint outdoors or in a very well-ventilated area. Wear appropriate protection, follow the paint label, and avoid spraying near open windows, pets, or children. Let the cabinet cure fully before filling it with potting mix. Dry-to-touch and fully cured are not always the same thing, and your future parsley deserves a properly finished home.
Step 6: Line the Interior
Lining the inside of a filing cabinet planter can help slow corrosion and keep soil from sitting directly against every metal surface. You do not need to create a sealed bathtub; in fact, you should not. Drainage still matters.
Use landscape fabric, burlap, or a breathable planter liner along the inside walls and bottom. Cut openings where the drainage holes are located. The liner should hold the potting mix in place while allowing excess water to move out.
Optional Rust Protection
If the inside is bare metal, consider using a rust-inhibiting primer or outdoor-safe coating before adding the liner. Let all coatings cure completely. Avoid using questionable chemical coatings inside planters intended for edible herbs or vegetables unless the product is clearly appropriate for that use.
Step 7: Fill With the Right Potting Mix
Use a high-quality potting mix, not dense yard dirt. For flowers and herbs, a general outdoor container mix works well. For vegetables, choose a potting mix labeled for container vegetables or raised planters. You can blend in compost for added organic matter, but do not make the mix so heavy that it stops draining.
A practical blend for a large filing cabinet planter is about two-thirds quality potting mix and one-third compost. Add slow-release fertilizer according to the label. Container plants depend on you for nutrients because their roots cannot roam into surrounding soil.
How Much Soil Will You Need?
Measure the length, width, and depth of the planting area to estimate volume. Large filing cabinets can require more potting mix than expected, so price it before you begin. To reduce cost and weight in very deep planters, you can use an insert or false bottom, but keep at least 10 to 12 inches of quality growing medium for most annuals, herbs, and greens.
Step 8: Choose Plants That Match the Planter
The prettiest filing cabinet planter is not just painted well; it is planted well. Think in layers: upright plants for height, rounded plants for fullness, and trailing plants to soften the metal edges.
Sunny Filing Cabinet Planter Ideas
- Thrillers: ornamental grass, compact canna, salvia, lavender
- Fillers: zinnias, marigolds, petunias, basil, parsley
- Spillers: sweet potato vine, trailing verbena, nasturtium, calibrachoa
Part-Shade Planter Ideas
- Thrillers: coleus, upright fuchsia, small fern
- Fillers: impatiens, begonias, parsley, chives
- Spillers: creeping Jenny, ivy, trailing lobelia
If you want an edible filing cabinet planter, try a kitchen garden with basil, thyme, parsley, chives, lettuce, and nasturtiums. For a cottage look, mix cosmos, dwarf zinnias, alyssum, and trailing greenery. For a modern look, choose one color family and repeat it.
Step 9: Plant With Good Spacing
It is tempting to pack the planter until it looks instantly full, but plants need room to grow. Follow spacing recommendations on plant tags or seed packets. Place taller plants toward the back or center, depending on where the planter will be viewed. Add trailing plants near the edges so they can tumble over the sides.
After planting, water thoroughly until moisture runs from the drainage holes. This settles the mix around the roots and helps you confirm that drainage is working. If water pools on top for a long time, the mix may be too dense or the holes may be blocked.
Step 10: Style the Planter So It Looks Intentional
A filing cabinet planter becomes “pretty” when the finish, plants, and placement feel deliberate. Add a stencil, house number, hand-painted stripe, or simple label plaques. For a farmhouse look, use soft white paint and herbs. For a playful patio, go with coral, turquoise, or sunny yellow. For a sleek urban balcony, choose matte black or charcoal with sculptural grasses.
You can also attach a small trellis to the back for climbing nasturtiums, peas, or compact flowering vines. A cedar trim around the top edge can warm up the metal and hide rough edges. Even simple touches, like matching the planter color to your front door, can make the whole project look polished.
Care Tips for a Healthy Filing Cabinet Planter
Container gardens dry out faster than in-ground beds, and metal containers can dry out even faster in hot weather. Check moisture regularly by sticking your finger about an inch into the potting mix. If it feels dry at that depth, water deeply.
Watering
Water until excess drains out the bottom. Shallow sprinkling encourages shallow roots and leaves dry pockets in the planter. In summer, you may need to water daily, especially if the planter is in full sun.
Fertilizing
Even if your potting mix contains fertilizer, nutrients wash out over time. Use a slow-release fertilizer at planting and supplement with a balanced liquid fertilizer as needed. Flowering annuals and vegetables are usually hungrier than succulents or Mediterranean herbs.
Seasonal Maintenance
At the end of the season, remove dead plants and inspect the planter. Touch up chipped paint before rust spreads. If you live in a cold climate, move the planter to a sheltered area or cover it to reduce winter wear.
Common Mistakes to Avoid
Using Too Few Drainage Holes
A filing cabinet is deep and wide, so one hole is not enough. Multiple holes prevent standing water and help roots breathe.
Filling It With Garden Soil
Garden soil may seem free, but it can become compacted and heavy in containers. Use potting mix for better drainage, aeration, and root health.
Painting Without Prep
Skipping sanding and primer can lead to peeling paint. A little prep work saves you from watching your pretty finish flake off by Labor Day.
Choosing Heat-Sensitive Plants
Metal heats up in the sun. In hot climates, choose tough plants, use lighter paint colors, and consider afternoon shade.
Budget-Friendly Design Ideas
You do not need a large budget to build a beautiful filing cabinet planter. Look for used cabinets at thrift stores, office cleanouts, salvage shops, online marketplaces, or local reuse centers. Paint is often the biggest style upgrade for the least money.
For a charming cottage planter, use pale green paint, white flowers, and trailing alyssum. For a modern herb station, paint the cabinet matte black and add simple white plant labels. For a cheerful family garden, let each drawer front or side panel have a different color, then plant marigolds, basil, and cherry tomatoes.
Experience Notes: What This Project Teaches You in Real Life
Building a filing cabinet planter sounds simple on paper, and it is, but the real experience has a few surprises. The first surprise is weight. An empty filing cabinet feels manageable. A filing cabinet full of moist potting mix feels like it has been secretly training for a strongman competition. Place it where you want it before filling, or install heavy-duty casters first. Your back will send you a thank-you card.
The second lesson is that prep work matters more than the dramatic paint reveal. Sanding, cleaning, priming, and waiting between coats are not glamorous, but they are the reason the final planter looks finished instead of rushed. Thin coats of paint beat one thick coat every time. One heavy spray-paint pass can drip faster than gossip at a neighborhood barbecue. Several light coats create a smoother, more durable finish.
Drainage is another real-world teacher. It is easy to think, “This is a big container; it can handle extra water.” Unfortunately, plant roots do not appreciate optimism when they are sitting in a swamp. Drill more holes than you think you need, test them with water before filling, and keep the holes clear. If the planter sits on a flat patio, raise it slightly so water can escape freely.
Plant selection also becomes clearer after the first season. Some plants love the warmth of a metal container, while others sulk when afternoon sun turns the sides hot. In many areas, herbs like rosemary, thyme, oregano, and basil do well with good drainage and sun. Leafy greens may prefer spring or fall, when the planter is cooler. Trailing flowers can make the metal edges disappear, which is especially helpful if your cabinet still looks a little too “accounts payable.”
One of the most satisfying experiences is watching people notice the transformation. A filing cabinet planter has built-in conversation power. Guests recognize the shape but need a second to understand why it is full of flowers. That small moment of surprise is the magic of upcycled garden design. You are not just decorating; you are giving an ordinary object a new story.
Another practical takeaway: leave yourself access for maintenance. If you place the planter tight against a wall, make sure you can still reach the back plants. If you plant aggressive growers, give them regular trims. If you grow edibles, keep plant labels handy because tiny seedlings have a way of looking suspiciously similar until dinner depends on knowing basil from zinnia.
Finally, expect the planter to evolve. The first version may be cute. The second season will be better. You may repaint it, change the plant palette, add a trellis, switch from flowers to herbs, or tuck in solar lights. That is part of the fun. A filing cabinet planter is not a one-and-done project; it is a flexible garden feature that can change with your style, your plants, and your confidence.
Conclusion
Learning how to build a pretty filing cabinet planter is a practical, creative way to combine upcycling, container gardening, and outdoor decorating. With a sturdy cabinet, proper drainage, a durable paint finish, lightweight potting mix, and the right plants, you can create a planter that looks custom-made and costs far less than many large garden containers.
The secret is to treat the cabinet like both a DIY project and a living garden. Prep the metal carefully, protect it from rust, give roots room to breathe, and choose plants that suit the light and heat conditions. Do that, and your old filing cabinet will stop storing paperwork and start growing something much better: flowers, herbs, vegetables, and compliments.