Table of Contents >> Show >> Hide
- Why This Is the Easiest Motor Method
- What You Need
- Before You Start: A Few Smart Safety Rules
- How to Build the Motor Step by Step
- How the Motor Actually Works
- Common Problems and Easy Fixes
- How to Improve Performance Without Overcomplicating It
- Where This Tiny Motor Connects to Real Life
- What First-Time Builders Usually Experience
- Conclusion
- SEO Tags
Note: This guide uses a low-voltage, classroom-friendly design with one battery, copper wire, magnets, and paper clips. Never use household wall power for this project. If the wire or battery feels hot, stop, let everything cool down, and try again later.
If you have ever looked at a fan, toy car, blender, or electric toothbrush and thought, “Okay, but what tiny wizard is making that spin?” the answer is not wizardry. It is electromagnetism, which is a fancy word for one of the coolest tag teams in science: electricity and magnets. The good news is that you do not need a machine shop, a garage full of tools, or a dramatic movie soundtrack to build a simple electric motor yourself. You can make one on a table with a few low-cost parts and a little patience.
This guide walks you through the easiest practical method for beginners: a basic coil motor powered by a single battery. It is simple enough for a first project, educational enough to impress your inner science nerd, and satisfying enough to make you say, “Wait, I built that?” Better yet, this method teaches the same core idea used in larger motors: electrical energy becomes motion when a wire carrying current sits in a magnetic field.
By the end, you will know what materials to use, how to assemble the motor, why it spins, what usually goes wrong, and how to fix it without turning your DIY moment into a melodrama. You will also get real-world tips and experience-based advice so you can move from “mysterious spin failure” to “tiny homemade masterpiece.”
Why This Is the Easiest Motor Method
There are several ways to make a basic electric motor, but not all of them are equally beginner-friendly. Some ultra-short demonstrations spin quickly but use very strong magnets and can heat up fast. Others need more specialized parts. The coil motor is the sweet spot. It is easier to understand, safer for a basic home project, and much better for learning how a real direct current motor works.
In this version, the wire coil becomes a temporary magnet when electricity flows through it. Permanent magnets nearby push and pull on that coil. The trick that makes the motor keep turning is simple but clever: the current switches on and off at the right moment as the coil rotates. That gives the coil repeated little nudges in the same direction. Think of it like pushing someone on a swing at the right time instead of randomly flailing your arms and hoping for the best.
What You Need
- 1 fresh AA battery
- About 2 feet of solid copper wire, preferably 20–24 gauge, insulated or enameled
- 2 large paper clips
- 2 small ceramic or similar magnets
- Masking tape
- Fine sandpaper
- A small piece of cardboard or a stable base
You do not need expensive components. In fact, the charm of this project is that it looks like a school science experiment and behaves like a miniature engineering lesson. If your materials are neat, balanced, and connected well, the motor can work surprisingly well for something that looks like it was assembled between a snack break and a YouTube rabbit hole.
Before You Start: A Few Smart Safety Rules
- Use battery power only. Never connect this project to a wall outlet.
- Do not leave the motor running unattended.
- Stop if the battery, wire, or paper clips become hot.
- Handle magnets carefully and keep them away from electronics and small children.
- Use sandpaper to remove insulation instead of scraping with a knife.
This is a low-voltage project, not a high-risk one, but “low risk” still deserves common sense. Good DIY habits are part of the build, not a boring side quest.
How to Build the Motor Step by Step
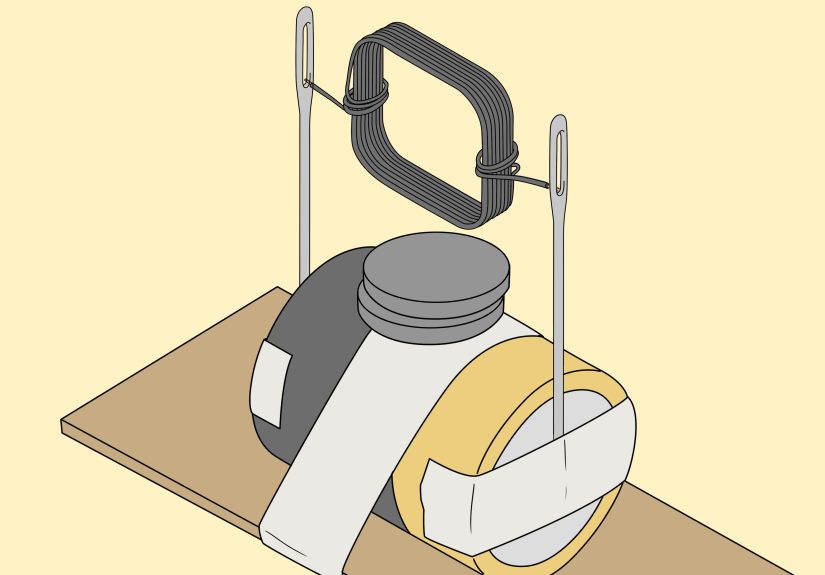
Step 1: Make the Wire Coil
Wrap the copper wire around a marker, battery, or thick pen about 4 to 6 times to form a round coil. Slide it off carefully so it keeps its shape. Leave about 2 inches of straight wire sticking out on each side. These straight ends will act like the axle of your motor.
Now wrap each loose end once or twice around the coil to hold the circle together. The coil should look tidy and balanced. If one side is lopsided, the motor may wobble or stop. Tiny motors are surprisingly picky. They have the attitude of a cat that only drinks water from one specific glass.
Step 2: Prepare the Coil Ends Correctly
This is the part that decides whether your motor spins or just sits there like modern art. Take sandpaper and fully remove the insulation or enamel from one straight end of the coil. On the other straight end, remove the insulation from only the top half of the wire while leaving the bottom half coated.
Why does this matter? Because that partial stripping acts like a very simple commutator. As the coil rotates, electricity flows for part of the turn and pauses for the other part. That timing helps the coil keep moving in the same direction instead of getting stuck.
Step 3: Make the Supports
Unbend the two paper clips into support arms. Each one should have a loop or curved section at the top where the coil axle can rest and spin. Tape the paper clips to the battery terminals or to a stable base so they line up across from each other. The coil should sit horizontally between them.
If you tape the paper clips directly to the battery ends, keep the contact points firm. Loose electrical contact is one of the most common reasons the motor does not work. A shaky connection means weak or inconsistent current, and weak current means no spin, just disappointment.
Step 4: Place the Magnets
Put the magnets under the coil, centered as closely as possible. The magnetic field needs to interact with the coil while it spins. You do not need perfect lab geometry, but you do want the magnets close enough to matter and stable enough not to slide away during testing.
If you are using two small magnets, place them side by side under the middle of the coil. The stronger and better positioned the magnetic field, the easier it is for the motor to start.
Step 5: Balance the Coil
Set the coil axle into the paper clip loops. Make sure it can turn freely. The coil should not rub hard against the clips, battery, or magnets. Give it a tiny manual spin with your finger. If it rotates smoothly, you are in good shape. If it scrapes or droops, adjust the supports until it spins with minimal friction.
Step 6: Start the Motor
With the coil balanced and the circuit complete, give the coil a gentle flick. In many builds, the motor will not launch from a dead stop, but it will keep spinning once it gets that first little push. If everything is aligned correctly, the coil should continue rotating on its own.
Congratulations. You just made a simple electric motor from household materials. That humming sound you may be imagining is the sound of your confidence leveling up.
How the Motor Actually Works
At the center of this project is a basic rule of electromagnetism: when electric current flows through a wire, it creates a magnetic field. If that current-carrying wire sits near a permanent magnet, the magnetic fields interact and create a force. In a coiled wire, that force can create torque, which means rotation.
Your coil becomes an electromagnet when current flows through it. The permanent magnets beneath it either attract or repel the magnetic field of the coil, depending on orientation. Because one axle end is only half stripped, the current turns off during part of the rotation. That brief pause keeps the coil from reversing direction and helps it continue spinning forward.
In larger brushed DC motors, engineers use parts designed specifically for this switching process. In your homemade version, the half-stripped wire does the job in a surprisingly elegant way. It is simple, inexpensive, and a great example of how engineering often means making smart use of humble materials.
Common Problems and Easy Fixes
The Coil Does Not Spin
Check the stripped wire ends first. If the enamel is still partly covering the contact areas, current may not flow well. Sand a little more, but keep the half-stripped side only half bare. Then check whether the paper clips are making solid electrical contact with the battery and the coil.
The Coil Twitches but Stops
This usually means the motor is close to working. Adjust the magnet position, reduce friction, and rebalance the coil. Often the fix is tiny: a straighter axle, a more centered magnet, or a better first flick.
The Coil Spins Poorly
Your coil may be uneven or too heavy. Rewind it more neatly with fewer loops. You can also try a fresh battery, since low voltage means a weaker magnetic effect.
Nothing Happens at All
Look for an open circuit. Both paper clips must connect properly, and the coil must touch both supports while still rotating freely. No complete circuit means no current, and no current means your motor becomes a very small sculpture.
How to Improve Performance Without Overcomplicating It
- Use a fresh battery for stronger, steadier current.
- Keep the coil light and symmetrical.
- Position the magnets as close as possible without touching the coil.
- Reduce friction by smoothing the axle ends.
- Experiment with 4, 5, or 6 loops in the coil.
Do not chase perfection right away. Small motors are sensitive, and trial and error is part of the learning. Each tiny adjustment teaches you something about current, balance, magnet strength, and mechanical resistance.
Where This Tiny Motor Connects to Real Life
Your homemade motor is simple, but the principle behind it powers a huge part of modern life. Electric motors show up in fans, washing machines, power tools, printers, computer cooling systems, electric vehicles, and factory equipment. The scale changes, the engineering gets much fancier, and efficiency matters a lot more, but the core idea stays familiar: magnetic forces turn electrical energy into motion.
That is why this project is more than a weekend curiosity. It gives you a hands-on introduction to one of the most important technologies in everyday life. Build one tiny spinning coil today, and suddenly the world looks different tomorrow. Your blender becomes less mysterious. Your fan becomes a physics lesson. Your electric scooter becomes a rolling reminder that magnets are secretly overachievers.
What First-Time Builders Usually Experience
The first experience most people have with this project is not instant success. It is usually confusion. You build the coil, tape the supports, place the magnets, give the axle a hopeful flick, and… nothing. Or maybe the coil twitches once like it is considering your request and then refuses to cooperate. That moment is completely normal. In fact, it is almost part of the tradition. A simple electric motor looks easy on paper, but in real life it teaches patience very quickly.
One common experience is realizing that “close enough” is not always close enough in small engineering projects. The coil can be only slightly uneven and still fail. The paper clips can look connected and still not conduct well. The magnet can sit almost in the right place and still produce a weak effect. Beginners often learn that successful building is not about brute force. It is about careful adjustment. That is a useful lesson far beyond this project.
Another typical experience is the surprise of how satisfying the first successful spin feels. When the coil suddenly keeps turning on its own, even for a few seconds, it feels like a tiny scientific miracle. Of course, it is not magic. It is current, magnetic force, torque, and timing. But emotionally, it still feels like you persuaded metal and wire to come alive. That moment tends to hook people. Many beginners start with this motor and then move on to switches, LEDs, generators, or more advanced electronics because they want to see what else they can make move, light up, or respond.
Builders also often discover that failure becomes easier to handle once the project gives them feedback. If the coil gets stuck at the same point every time, that suggests a balance issue. If it spins only after a strong flick, the magnetic push may be too weak or the friction too high. If it works once and then stops, the battery may be draining, the contacts may be dirty, or the wire ends may need adjustment. In other words, the project trains you to observe patterns instead of guessing wildly. That shift from frustration to diagnosis is one of the best experiences this motor offers.
There is also a confidence-building side to the project. Many first-time builders start out thinking motors are factory-made black boxes full of advanced parts and impossible complexity. After building this simple version, they realize that the basic idea is understandable. That realization matters. Once you understand the principle with your hands, the topic no longer feels locked behind a wall of jargon. You stop seeing machines as mysterious objects and start seeing them as systems made from understandable parts.
Finally, people usually walk away with a new respect for precision. A simple motor is not just a science demo. It is a small reminder that real technology depends on details: clean contacts, balanced moving parts, controlled current, and good material choices. That is why the experience stays with people. You are not just building a toy. You are getting a bite-sized introduction to engineering thinking, and that is a skill that keeps paying off long after the coil stops spinning.
Conclusion
If you want the easiest method to build a simple electric motor yourself, the low-voltage coil motor is the best place to start. It uses accessible materials, clearly demonstrates electromagnetism, and teaches real engineering lessons without overwhelming beginners. Build the coil neatly, strip the wire correctly, reduce friction, place the magnets carefully, and give the motor a small starting flick. Once it spins, you will understand electric motors in a way that reading alone cannot teach.
Best of all, this project turns abstract physics into something visible and memorable. You are not just learning that electricity and magnetism can create motion. You are watching it happen on your desk. And that is exactly the kind of learning that sticks.