Table of Contents >> Show >> Hide
- What You Need Before You Start
- The Universal 3-Step Method (Works Everywhere)
- How to Connect on Windows
- How to Connect on macOS
- How to Connect on iPhone & iPad (iOS/iPadOS)
- How to Connect on Android
- How to Connect on ChromeOS (Chromebooks)
- How to Connect on Linux
- Connecting “Any Device” by Using a Router (One Tunnel, Many Gadgets)
- Security Settings Worth Turning On
- Troubleshooting: When Your OpenVPN Connection Refuses to Behave
- Best Practices for Teams (and Power Users)
- Conclusion
- Real-World Experiences: What Using OpenVPN “Everywhere” Actually Feels Like (and What You Learn)
OpenVPN is one of those quietly heroic technologies: it doesn’t ask for applause, it just keeps your traffic
encrypted, your remote-work life functional, and your “Why is the office printer on a different planet?” problems
solvable.
The best part: connecting to an OpenVPN server is basically the same on every device. The frustrating part: each
device hides the buttons in a slightly different place, like a scavenger hunt designed by a mischievous UX goblin.
This guide walks you through the universal workflow and then shows device-by-device steps (Windows, macOS, Linux,
iOS/iPadOS, Android, ChromeOS, and even the “let my router do it” approach).
We’ll keep it practical, a little funny, and very “I just want the VPN to connect right now, please.”
What You Need Before You Start
Connecting to an OpenVPN server isn’t hard, but it does require the right ingredients. If you’re missing any of
these, you’ll spend your afternoon staring at a “Connecting…” spinner that feels oddly judgmental.
1) A connection profile (usually a .ovpn file)
The .ovpn file is your golden ticket. It tells your device where the server is, which protocol
and port to use, and what security settings are expected. Some profiles are “inline” (everything embedded in one
file). Others reference separate certificate/key files that must travel with the .ovpn like a little security
posse.
2) Authentication details
- Username and password (common in business setups and many hosted VPN services)
- Certificates/keys (often used for stronger identity verification)
- Multi-factor authentication (MFA) (you may be prompted for a one-time code)
3) A trusted installer
Use an official client when possible. “RandomVPNClient_DefinitelyNotSketchy.exe” is not a vibe.
On most platforms, OpenVPN Connect is the official go-to client, and it covers an impressive
range of devices.
4) Permission to create a VPN connection
Your operating system will usually ask to add a VPN configuration. Say yes. It’s not asking to adopt a dragon;
it’s just creating a secure tunnel interface.
The Universal 3-Step Method (Works Everywhere)
- Install an OpenVPN client (OpenVPN Connect or a reputable alternative).
- Import your VPN profile (from a file or sometimes a URL).
- Connect and authenticate (toggle/connect button, then enter credentials if prompted).
If you remember only one thing: install → import → connect. That’s it. Everything else is just where the
buttons are hiding.
How to Connect on Windows
Option A: OpenVPN Connect (easy mode)
- Install OpenVPN Connect for Windows.
- Open the app and choose Import Profile (often “File” or “Upload File”).
- Select your .ovpn file (and keep any referenced cert/key files in the same folder if needed).
- Name the profile something recognizable (e.g., “Work VPN” instead of “final_final_vpn2”).
- Click Connect, then enter your username/password or MFA code if prompted.
Option B: OpenVPN GUI (classic Windows approach)
If your organization uses the traditional OpenVPN GUI approach, you’ll typically place configuration files in the
client’s config directory and connect from the system tray. The steps vary by client build, but the principle is
the same: the profile controls everything, and the app reads it to connect.
Windows tips that save sanity
- Run as admin if the client can’t create the network adapter/tunnel.
- Try a different network (coffee shop Wi-Fi may block VPN ports).
- Check your clock: incorrect system time can break certificate-based connections.
How to Connect on macOS
Option A: OpenVPN Connect on macOS
- Install OpenVPN Connect for macOS.
- Import your .ovpn profile (file import is the most common).
- Approve any macOS prompts about adding VPN configurations or network extensions.
- Click/toggle Connect, authenticate if asked.
Option B: Alternative macOS clients
Some teams use third-party clients (often for advanced routing controls, UI preferences, or legacy profiles). If
you do, the import process is still the same concept: add the profile, supply certificates if required, then connect.
macOS “it connected but nothing works” checklist
- Confirm DNS settings (a VPN can connect while DNS resolution fails).
- Check whether split tunneling is enabled (your internal apps may need to go through the tunnel).
- Try disconnect/reconnect after switching networks (Wi-Fi to hotspot is a classic VPN mood swing trigger).
How to Connect on iPhone & iPad (iOS/iPadOS)
On iOS, the biggest challenge is usually not the connectionit’s getting the profile file onto the device in a way
the app can import cleanly.
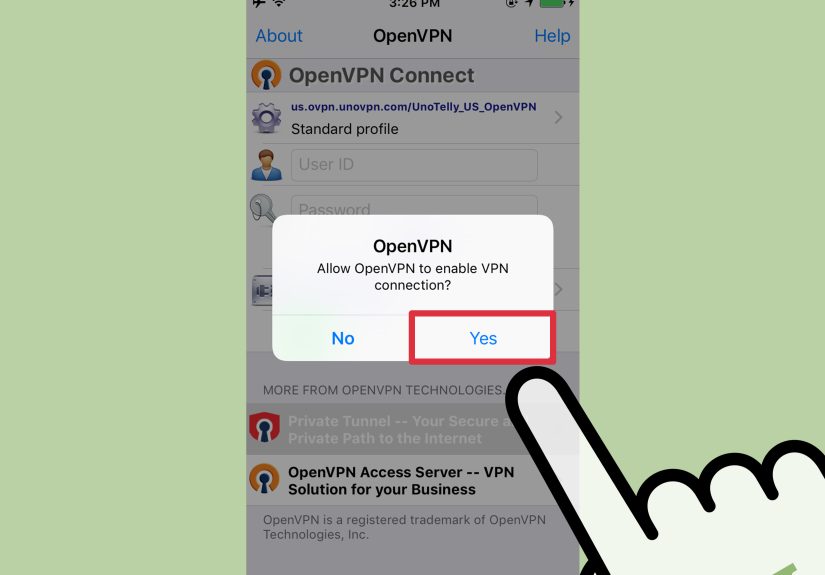
Step-by-step with OpenVPN Connect
- Install OpenVPN Connect from the App Store.
- Transfer your .ovpn file to your iPhone/iPad using one of these methods:
- Files app (iCloud Drive, On My iPhone/iPad)
- AirDrop from a Mac
- Email attachment (okay for convenience; be mindful of sensitive keys)
- In OpenVPN Connect, choose Add / Import and select the .ovpn file.
- Enter credentials if prompted, then tap Connect.
- Approve the iOS permission prompt to add a VPN configuration.
iOS profile gotchas
-
If your .ovpn references separate cert/key files, importing may fail unless those are bundled or provided in a
compatible way. Many setups solve this by using an “inline/monolithic” profile where certs are embedded. -
If you import successfully but can’t connect on cellular data, your carrier or network may be interfering.
Try switching between Wi-Fi and cellular to isolate the issue.
How to Connect on Android
Option A: OpenVPN Connect (official)
- Install OpenVPN Connect from Google Play.
- Transfer or download your .ovpn file to the device.
- Open OpenVPN Connect and import the profile from file.
- Tap Connect and approve the Android VPN permission prompt.
Option B: “OpenVPN for Android” (popular alternative)
Some users prefer alternative clients for more granular controls or better compatibility with certain profile styles.
If you use one, the workflow remains the same: import profile → connect → authenticate.
Android import troubleshooting
- Make sure referenced files (CA cert, client cert, key) are accessible to the app.
- If your organization recommends Android Keychain usage, follow those directions to avoid handling raw key files.
- If “connect” fails immediately, double-check username/password or MFA timing.
How to Connect on ChromeOS (Chromebooks)
Chromebooks can connect in two common ways: using an Android VPN app (like OpenVPN Connect) or using built-in VPN
settings, depending on your device and policy restrictions.
Method 1: OpenVPN Connect via Google Play
- Install OpenVPN Connect (Android app) from the Play Store on your Chromebook.
- Import your .ovpn profile.
- Connect and authenticate as prompted.
Method 2: Built-in VPN settings (when supported)
If your Chromebook offers built-in OpenVPN support in network settings, you’ll add a VPN connection, supply the
required server and authentication info, and then connect from the network menu. If your organization uses complex
certificates or advanced config directives, the app method is usually smoother.
How to Connect on Linux
Linux gives you flexibility: you can connect via a desktop Network Manager (GUI) or via command line (fast, scriptable,
and sometimes the only option on headless servers).
Option A: GUI (Network Manager)
- Install OpenVPN support for your desktop network manager.
- Import the .ovpn profile into your network settings.
- Connect like any other network connection and enter credentials if required.
Option B: Command line (classic)
Many distributions support connecting with the OpenVPN package directly. A typical connection looks like this:
If your profile requires user credentials, you may be prompted in the terminal or your profile may reference an auth
file (your organization will specify the approved method). For security, avoid saving passwords in plaintext unless
you fully understand the risks and your policy permits it.
Connecting “Any Device” by Using a Router (One Tunnel, Many Gadgets)
Got smart TVs, game consoles, or an e-reader that can’t run an OpenVPN client? A router-based connection can make
your entire home network appear “inside” the VPNwithout installing anything on each device.
How router-based OpenVPN client setups usually work
- You import the VPN profile (or manually enter settings) into your router’s VPN client section.
- The router establishes the tunnel.
- All (or selected) devices route through that tunnel.
Router caveats (read before you turn your weekend into a firmware festival)
- Performance: encryption takes CPU. Some routers can’t maintain high speeds.
- Split tunneling complexity: deciding which devices go through the VPN can require extra routing rules.
- Updates matter: old firmware + VPN keys is not the cybersecurity love story anyone wants.
Security Settings Worth Turning On
Kill switch / “block traffic if VPN drops”
A kill switch helps prevent accidental leaks if the VPN disconnects mid-zoom-call or mid-“upload the thing to the server,
oh no why did it fail.” If your client offers it, enable itespecially on laptops that roam between networks.
Auto-connect on untrusted Wi-Fi
If you frequently use public networks, auto-connect can save you from the “I forgot the VPN and now I’m on airport Wi-Fi”
moment. Your future self will thank you.
DNS behavior and leak prevention
A VPN can encrypt traffic but still leak DNS requests if the system resolves domain names outside the tunnel.
If your client offers DNS settings, use your organization’s recommended configuration. If you’re troubleshooting,
DNS misrouting is a top suspect when “VPN connects but websites don’t load.”
Split tunneling (useful, but make it intentional)
Split tunneling sends some traffic through the VPN and some directly to the internet. It can improve speed and reduce
load, but it can also cause confusion (“why can I access internal tools but not that one internal tool?”). Use it on
purposepreferably with clear rules.
Reality check: a VPN isn’t invisibility
A VPN can help protect traffic on untrusted networks and reduce what your ISP can see. It doesn’t automatically make you
anonymous, and it doesn’t erase browser or account-based tracking. Treat it as a powerful tooljust not a wizard cloak.
Troubleshooting: When Your OpenVPN Connection Refuses to Behave
VPN issues usually fall into a few buckets: import problems, authentication failures, network blocks, or TLS/certificate
issues. Here’s how to triage without losing your last nerve.
Problem: “I can’t import the .ovpn file.”
- Check for missing files: If the profile references separate CA/cert/key files, they must be accessible and correctly named.
- Prefer inline profiles: Many admins export “unified” profiles that include embedded certs to reduce mobile import issues.
- Move the file differently: On mobile, import often works best via Files/iCloud/AirDrop instead of obscure download folders.
Problem: AUTH_FAILED (or repeated password prompts)
- Confirm username/password (sounds obvious, but so does “don’t text your ex,” and yet).
- If MFA is used, check that your device clock is correct and you’re entering the current code.
- Some setups require a specific username format (e.g., email-style usernames).
Problem: TLS handshake failed
This often indicates the client and server can’t complete the secure negotiation. Common causes include:
- Wrong server/port/protocol: the profile may point to a blocked port or outdated endpoint.
- Firewall/NAT blocks: some networks block UDP or specific ports; switching to another network can confirm.
- Time/certificate mismatch: incorrect system time can cause certificate validation to fail.
- Certificate/key issues: expired certs, wrong CA, or mismatched TLS settings.
Problem: Connected… but nothing can reach the office network
- Routing: the server may not be pushing the right routes, or your client may be set to split-tunnel incorrectly.
- DNS: internal hostnames may not resolve if DNS isn’t routed through the VPN.
- Overlapping subnets: if your home network uses the same IP range as the office network, routing becomes a mess.
Problem: VPN disconnects when switching networks
- Enable “reconnect” features if available.
- On mobile, keep an eye on battery optimization settings that may throttle the VPN app.
- If you move between Wi-Fi and cellular often, expect occasional reconnectsdesign your workflow around short interruptions.
Best Practices for Teams (and Power Users)
Ask for the right kind of profile
If you manage or support users, “inline/unified” profiles reduce import issues and support tickets. If you’re a user,
asking your admin for a mobile-friendly export can be the fastest path to victory.
Keep profiles and certificates current
Certificate rotation and configuration changes happen. If something that worked last month suddenly fails today, it may
not be personalyour credentials or certs might have been updated. Grab the newest profile from your admin portal or IT
team and try again.
Use logs (they’re annoying, but they’re honest)
When troubleshooting gets weird, client logs usually reveal whether you’re failing at DNS, auth, TLS negotiation, or
routing. Copy the relevant error line(s) and share them with your admin rather than sending “VPN broken pls fix” energy.
Conclusion
Connecting to an OpenVPN server doesn’t have to be complicated. If you remember the universal flowinstall a reputable
client, import the .ovpn profile, then connect and authenticateyou can get online securely from almost any device.
The details change by platform, but the fundamentals don’t.
And if it still won’t connect? It’s almost always one of the usual suspects: missing profile files, wrong credentials,
blocked network ports, or TLS/certificate mismatches. Tackle those methodically and you’ll be back in businesssecurely.
Real-World Experiences: What Using OpenVPN “Everywhere” Actually Feels Like (and What You Learn)
After you’ve connected to an OpenVPN server from a handful of devices, you start to notice patternsnot just technical
ones, but “human behavior meets network reality” patterns. Like the fact that the VPN will always disconnect precisely
when you say, “Let me share my screen real quick.” It’s basically a law of physics.
One of the most common experiences is the public Wi-Fi reality check. You sit down at a café, connect to
Wi-Fi, and launch your VPN out of habitonly to discover the network uses a captive portal. Translation: the Wi-Fi wants
you to accept terms and conditions you will never read (because you value your remaining lifespan). Until you do that,
the VPN can’t reach the server. The best routine becomes: join Wi-Fi → open a browser → trigger the portal → then connect
the VPN. Not glamorous, but effective.
Then there’s the network-switching drama. Laptops and phones love hopping between Wi-Fi, cellular,
hotspots, and that one mysterious “Printer_Network_5G” you absolutely did not mean to join. Each hop can force the VPN to
renegotiate the tunnel. On a phone, the experience is usually a quick reconnect. On a laptop mid-file-transfer, it can
feel like watching a sandwich fall in slow motion. The practical lesson: if you’re uploading something important, stay put
for five minutes and let the tunnel finish its job.
Over time, you also learn that profiles are living documents. People think of an .ovpn file as a one-time
setupimport it, forget it, move on. But organizations rotate certificates, update encryption settings, change endpoints,
or add MFA requirements. The real-life symptom is classic: “It worked last month.” The fix is often unglamorous:
download the latest profile, re-import, and reconnect. It’s the VPN equivalent of “Have you tried turning it off and on
again?”annoying, but suspiciously powerful.
Another very real experience: DNS weirdness that makes you doubt reality. The VPN says connected.
Your internal site says “can’t be reached.” Your coworker says it’s working. You begin to suspect a conspiracy. In many
cases, it’s simply DNS not flowing through the tunnel the way it should. Once you’ve lived through this a couple times,
you start troubleshooting faster: can you reach internal IPs but not internal hostnames? That’s a DNS clue. Do public
sites load but internal ones don’t? That’s a routing or policy clue. You become a part-time network detective, except
your trench coat is a hoodie and your magnifying glass is a ping command.
Finally, there’s the “any device” mindset shift. Once you can connect on your phone, laptop, and maybe a
Chromebook, you start thinking strategically. Do you want every device individually connected (more control, more setup),
or do you want a router-based tunnel (less setup per device, but centralized performance constraints)? Real life pushes you
toward hybrid solutions: individual VPN on laptops for reliability and per-user logging, router VPN for devices that can’t
run clients, and split tunneling when you need speed without breaking access to internal systems.
The bigger takeaway: OpenVPN is less “set it and forget it” and more “set it, understand it, and keep it tidy.”
When you do, it becomes one of the most dependable tools in your security toolkitquiet, boring, and exactly how you want
your encrypted tunnel to behave.