Table of Contents >> Show >> Hide
- What Is a Digital Signup Sheet?
- Before You Start: Decide What Your Signup Sheet Needs
- Way 1: Create a Signup Sheet Directly in Google Docs
- Way 2: Create a Google Form and Link It in Google Docs
- Way 3: Use Google Sheets and Link or Embed It in Google Docs
- Google Docs vs. Google Forms vs. Google Sheets: Which Should You Choose?
- Tips for Making a Better Digital Signup Sheet
- Common Mistakes to Avoid
- Experience-Based Advice: What Actually Works in Real Signup Situations
- Conclusion
Creating a digital signup sheet in Google Docs sounds simpleuntil twelve people type their names into the same row, someone deletes the header, and your beautifully planned volunteer list starts looking like a raccoon edited it at 2 a.m. The good news? Google Docs can absolutely help you build a clean, shareable signup sheet, especially when you pair it with Google Forms or Google Sheets for more organized data collection.
Whether you are planning a classroom event, volunteer shift, potluck dinner, parent-teacher conference, club meeting, church activity, team snack schedule, neighborhood cleanup, or office training session, a digital signup sheet saves time and prevents paper-list chaos. No more passing around a clipboard that mysteriously disappears near the snack table. No more decoding handwriting that looks like ancient cave art. No more “Wait, did I sign up for setup or cleanup?” drama.
In this guide, you will learn how to create a digital signup sheet in Google Docs in three practical ways: by building a table directly in Google Docs, by creating a Google Form and linking it inside your document, and by using Google Sheets for a more advanced signup tracker. Each method has a slightly different purpose, so you can choose the one that fits your event, audience, and tolerance for spreadsheet wizardry.
What Is a Digital Signup Sheet?
A digital signup sheet is an online document, form, or spreadsheet that lets people add their names, contact details, preferred time slots, tasks, items, or availability. Instead of printing a blank sheet and hoping people remember to sign it, you can share a link through email, text, Google Classroom, Slack, Facebook groups, newsletters, or your organization’s website.
The best digital signup sheets are easy to read, simple to update, mobile-friendly, and clear about what information people should enter. At minimum, most signup sheets include columns or fields for name, email address, phone number, time slot, role, item, notes, and confirmation status. For small groups, Google Docs may be enough. For larger groups, Google Forms or Google Sheets usually works better because they reduce accidental edits and organize responses automatically.
Before You Start: Decide What Your Signup Sheet Needs
Before opening a blank Google Doc and bravely staring into the white void, take one minute to plan your signup sheet. Ask yourself what people need to sign up for, how many people will use it, and whether participants should see everyone else’s responses.
For example, a classroom snack signup sheet may need columns for student name, parent name, snack item, date, and allergy notes. A volunteer event signup sheet may need shift times, roles, contact information, and a checkbox for training completed. A potluck signup sheet may need dish categories so you do not end up with nine bags of chips and zero main dishesunless that is your community’s official cuisine.
Also consider privacy. If you are collecting phone numbers, addresses, student names, or other personal details, do not make the document publicly editable. Use a Google Form instead, or restrict access to specific people. The easier your signup sheet is to edit, the easier it is for someone to accidentally break it.
Way 1: Create a Signup Sheet Directly in Google Docs
The fastest way to create a digital signup sheet in Google Docs is to use a table. This method works best for small groups where everyone is comfortable editing the same document. It is ideal for classroom lists, meeting sign-ins, team assignments, simple volunteer rosters, and informal event planning.
Step 1: Open a New Google Doc
Go to Google Docs and create a blank document. At the top, add a clear title such as “Spring Picnic Signup Sheet,” “Volunteer Shift Signup,” or “Parent Conference Schedule.” A specific title helps people immediately understand what they are editing. Under the title, add a short instruction line, such as:
Please add your name to one available row only. Do not delete other people’s information. Contact the organizer if you need to make a change.
This tiny instruction can save your sheet from digital mayhem. Think of it as a friendly fence around your neatly organized garden.
Step 2: Insert a Table
Click where you want the signup sheet to appear. Then choose Insert > Table and select the number of columns and rows you need. For a simple event, start with five columns and ten rows. You can always add more rows later.
A basic signup table might include these headers:
- Name
- Phone
- Time Slot or Task
- Notes
If you are creating a potluck signup sheet, use columns such as Name, Dish, Category, Serving Size, and Allergy Notes. For volunteers, use Name, Role, Shift Time, Contact Info, and Confirmed.
Step 3: Format the Header Row
Make the first row bold so users can quickly understand what belongs in each column. You can also shade the header row using table formatting options. Keep formatting simple. A signup sheet does not need to look like a luxury wedding invitation unless your PTA has a design committee with strong opinions.
To improve readability, adjust column widths so the most important columns have enough space. For example, the Notes column usually needs more room than a “Yes/No” confirmation column. If your signup sheet is long, consider pinning or repeating the header in your layout so people do not lose track of what each column means.
Step 4: Add Sample Rows or Placeholders
People are more likely to fill out a signup sheet correctly when you show them an example. Add one sample row, such as:
Example: Jordan Lee | [email protected] | 555-123-4567 | 10:00 a.m. setup | Can bring tape
Then remove the sample before publishing, or label it clearly as an example. This is especially helpful for school groups, volunteers, or community members who may not use shared Google Docs often.
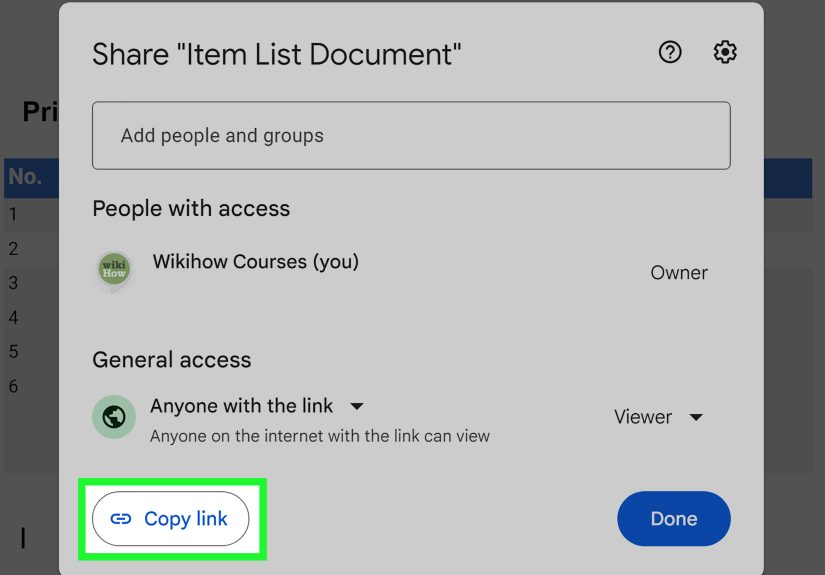
Step 5: Share the Google Doc Correctly
Click the Share button in the upper-right corner. You can share the document with specific people by email or choose “Anyone with the link.” If you want people to type directly into the sheet, they need Editor access. If you only want them to view instructions, choose Viewer. If you want feedback but not direct edits, choose Commenter.
For small trusted groups, editor access is fine. For public events, avoid giving everyone editing permission. One mistaken backspace can erase three hours of organizing, and nobody wants to investigate “The Case of the Missing Volunteer Slots.”
Best Uses for the Google Docs Table Method
This method is best when the group is small, the signup is simple, and transparency is useful. Everyone can see available rows, add their information, and update their own entry. It is less ideal when you need privacy, advanced sorting, automated response tracking, or protection from accidental edits.
Way 2: Create a Google Form and Link It in Google Docs
If you want a cleaner and safer signup process, Google Forms is often the better choice. You can still use Google Docs as the main instruction page, but the actual signup happens through a form. This method is excellent for collecting responses without letting participants edit the master document.
Step 1: Create a New Google Form
Open Google Forms and start a blank form. Give it a clear title that matches your Google Doc, such as “Community Cleanup Volunteer Signup.” Add a short description explaining the event date, location, deadline, and what happens after people submit the form.
For example:
Please complete this form to sign up for a volunteer shift. You will receive a confirmation email from the organizer within two business days.
Step 2: Add the Right Questions
Add questions based on what you need to collect. For most signup forms, use short-answer questions for name, email, and phone number. Use multiple-choice questions or dropdowns for time slots, tasks, or roles. Use checkboxes if people can select more than one option.
A strong Google Forms signup sheet might include:
- Full name
- Email address
- Phone number
- Preferred shift
- Second-choice shift
- Volunteer role
- Special notes or accessibility needs
Turn on the Required setting for essential fields. This prevents people from submitting a form with only “Bob” and a mysterious blank space where the email address should be.
Step 3: Connect Responses to Google Sheets
In the Responses tab of your Google Form, choose the option to send responses to Google Sheets. This creates a spreadsheet where each form submission appears as a new row. You can sort by time slot, filter by role, mark confirmations, and track attendance later.
This is one of the biggest advantages of using Google Forms. Participants get a simple form, while you get organized data. It is the digital equivalent of having a clipboard that alphabetizes itself and never runs out of ink.
Step 4: Add the Form Link to Your Google Doc
Now return to your Google Doc. Add a section near the top that says something like:
Ready to sign up? Please complete the volunteer signup form here.
Highlight the words “volunteer signup form,” click the link icon, and paste your Google Form link. You can also paste the full link below the button-style text if your audience may print the document.
Step 5: Share the Google Doc as a Viewer
For this method, most people do not need to edit the Google Doc. Set the document permission to Viewer and let the Google Form collect responses. This keeps your instructions clean and prevents participants from changing event details by mistake.
Best Uses for the Google Forms Method
Use Google Forms when you are collecting personal information, managing a larger group, or need structured responses. It is especially useful for school events, nonprofit volunteer recruitment, appointment requests, workshop registration, training signups, and community surveys.
The only downside is that participants may not automatically see how many spots are left unless you manage that separately. For simple events, that is fine. For limited time slots, you may need to manually update availability or use a dedicated scheduling tool.
Way 3: Use Google Sheets and Link or Embed It in Google Docs
Google Sheets is the best option when your signup sheet needs sorting, filtering, formulas, status tracking, or lots of rows. While Google Docs is great for instructions and presentation, Google Sheets is better for managing live signup data.
Step 1: Create a Signup Tracker in Google Sheets
Open Google Sheets and create a blank spreadsheet. Add columns based on your event needs. For a volunteer signup tracker, you might use:
- Timestamp
- Name
- Phone
- Role
- Shift
- Status
- Notes
You can freeze the header row so it stays visible as you scroll. You can also use filters to sort by shift, role, or confirmation status. If you are managing many participants, this will feel much better than scrolling through a long Google Doc table.
Step 2: Format the Sheet for Easy Use
Make your headers bold, resize columns, and use alternating row colors if desired. Add dropdown menus for columns such as Status or Role. For example, your Status dropdown might include “Pending,” “Confirmed,” “Waitlist,” and “Canceled.”
This turns your signup sheet from a basic list into a lightweight event management system. No, it will not make coffee or politely remind late volunteers to check in, but it will keep your information much cleaner.
Step 3: Decide Whether People Can Edit the Sheet
If you want people to enter their own names directly into the spreadsheet, share the Google Sheet with Editor access. For a trusted internal team, this can work well. For public signups, it is riskier because users can accidentally overwrite rows, sort only one column, or create formatting chaos.
A safer approach is to use Google Forms for the public-facing signup and Google Sheets as the private response tracker. Then link the private spreadsheet only for organizers.
Step 4: Link the Sheet in Your Google Doc
Use your Google Doc as the main information hub. Include the event description, instructions, deadlines, contact person, and a link to the Google Sheet if appropriate. For example:
Organizers can view the live signup tracker here.
If the sheet is for public viewing only, set it to Viewer. If team members need to update assignments, share it only with those specific people as Editors.
Best Uses for the Google Sheets Method
Use Google Sheets when your signup process needs more organization than a simple table can provide. It is especially helpful for recurring events, multi-day conferences, volunteer programs, appointment slots, donation tracking, class projects, sports teams, and staff scheduling.
Google Docs vs. Google Forms vs. Google Sheets: Which Should You Choose?
Choose Google Docs if you need a simple, visible signup list for a small group. Choose Google Forms if you need a private, structured way to collect responses. Choose Google Sheets if you need to organize, sort, filter, or manage lots of signup data.
Here is the easiest way to decide:
- Small group, simple list: Use a Google Docs table.
- Public or private response collection: Use Google Forms linked in Google Docs.
- Large or complex signup tracking: Use Google Sheets with your Google Doc as the instruction page.
For many real-world situations, the best setup is a combination: write the event details in Google Docs, collect signups through Google Forms, and manage responses in Google Sheets. That gives you a clean front-end experience and an organized back-end tracker.
Tips for Making a Better Digital Signup Sheet
Keep Instructions Short and Clear
People do not want to read a novel before signing up for a bake sale. Put the most important details at the top: event name, date, time, location, deadline, and contact person. Use short sentences and plain language.
Ask Only for Information You Actually Need
Every extra field creates friction. If you do not need someone’s mailing address, do not ask for it. If a phone number is optional, label it optional. A shorter signup process usually gets more responses.
Use Required Fields Carefully
Required fields are useful, but too many can annoy users. Make name, email, and key signup choices required. Leave comments, notes, and secondary preferences optional unless they are essential.
Protect the Original Document
If you are sharing a Google Docs signup sheet widely, consider keeping a backup copy. You can also limit editing access and use a Google Form instead. This protects your layout from accidental changes.
Test the Signup Link Before Sharing
Always open your signup link in an incognito window or ask a friend to test it. Make sure the permissions work, the form accepts responses, and the instructions are clear. Nothing ruins momentum like sending a signup link that says “You need access.”
Common Mistakes to Avoid
One common mistake is giving public editor access to a Google Doc when a Google Form would be safer. Another is forgetting to include a deadline, which leads to last-minute confusion. Some organizers also forget to confirm submissions, leaving people unsure whether they are officially signed up.
Another issue is asking for too much information. A signup sheet should be focused. If you are organizing a three-hour volunteer event, you probably do not need someone’s life story, favorite sandwich, and childhood nickname. Keep it practical.
Finally, avoid vague labels such as “Option 1” or “Task A.” Use clear labels like “Setup: 8:00–9:00 a.m.” or “Bring dessert for 10 people.” Specific labels reduce questions and make your signup sheet easier to manage.
Experience-Based Advice: What Actually Works in Real Signup Situations
After working with many types of digital signup sheets, one lesson becomes obvious: the best signup sheet is not always the fanciest one. It is the one people can understand in ten seconds. A beautifully formatted document is useless if participants do not know where to click, what to type, or whether they are officially registered.
For small, familiar groups, a Google Docs table feels friendly and transparent. Everyone can see the open slots, and people often like the simplicity of typing directly into a shared document. This works well for book clubs, small classrooms, casual volunteer teams, and internal office lists. However, the moment your group gets bigger or less tech-confident, direct editing becomes risky. Someone may type in the wrong cell, paste text that breaks the table, or accidentally delete another person’s entry. Most people do not mean to cause trouble; they are simply trying to sign up while holding coffee, answering a text, and using a phone screen the size of a granola bar.
For public events, Google Forms usually creates the smoothest experience. The organizer controls the questions, participants cannot damage the master list, and responses arrive in a structured format. Forms are especially helpful when collecting email addresses, phone numbers, shirt sizes, meal choices, or volunteer preferences. The form also feels more official, which can increase trust when the signup is connected to a school, nonprofit, business, or community organization.
Google Sheets becomes valuable when the signup does not end after people submit their names. If you need to assign roles, confirm attendance, create a waitlist, track payments, count supplies, or sort by shift, Sheets is much easier than Docs. A good spreadsheet can show who signed up, what they chose, what still needs attention, and where gaps remain. For organizers, this is where the magic happens. For participants, however, Sheets can feel intimidating if they are expected to edit it directly. That is why the Forms-to-Sheets workflow is often the best balance.
One practical trick is to use Google Docs as the “landing page” for the signup. The Doc can explain the event in a friendly, readable format. It can include headings, bullet points, expectations, parking instructions, what to bring, and contact information. Then the signup button or link sends people to a Google Form. Behind the scenes, responses flow into Google Sheets. This setup feels professional without requiring paid software.
Another experience-based tip: always include a confirmation message. In Google Forms, customize the response confirmation so people know what happens next. For example, say, “Thank you for signing up. The organizer will email final details by Friday.” This small detail reduces follow-up messages and reassures participants that their response was received.
It also helps to create a closing plan. If the event has limited spots, decide what you will do when slots are full. Will you manually close the form? Add a waitlist option? Update the Google Doc with “Registration closed”? Many signup problems happen not during setup, but after the list starts filling up. A little planning prevents awkward emails later.
Finally, design for mobile users. Many people will open your signup sheet on a phone. Long tables in Google Docs can be annoying on small screens, while Google Forms usually works better for mobile signups. If your audience includes busy parents, volunteers, students, or community members, assume at least half of them will use a phone. Make the signup process short, clear, and thumb-friendly.
Conclusion
Learning how to create a digital signup sheet in Google Docs gives you a flexible way to organize people, tasks, time slots, and event details without chasing paper lists. For a quick and simple signup, create a table directly in Google Docs. For cleaner response collection, build a Google Form and link it in your document. For advanced tracking, use Google Sheets as your signup database and connect it with your Doc or Form.
The best method depends on your audience and your event. If five coworkers are choosing lunch duties, a Docs table is enough. If fifty volunteers are choosing shifts, use Forms and Sheets. If you want the most organized system, combine all three: Google Docs for instructions, Google Forms for signups, and Google Sheets for tracking. That setup keeps everyone informed, keeps your data tidy, and keeps you from becoming the human version of a copy-paste error.
Note: This article is written as publish-ready HTML body content. The SEO metadata below is included in JSON format for easy copying into your CMS or SEO plugin.