Table of Contents >> Show >> Hide
- What a Pinch Harmonic Actually Is (and Why It Squeals)
- Quick Setup Checklist (Because Technique Loves a Little Help)
- The 10 Steps to a Consistent Pinch Harmonic
- Step 1: Start With One Friendly Note
- Step 2: Choke Up on the Pick (Yes, Really)
- Step 3: Angle the Pick Slightly
- Step 4: Set Your Thumb as the “Secret Second Picker”
- Step 5: Find the “Sweet Spot” by Moving Your Picking Hand
- Step 6: Pick With Commitment (But Not Aggression)
- Step 7: Mute Everything You Aren’t Playing
- Step 8: Add Vibrato Right Away
- Step 9: Try It on a Bend (Classic “Scream” Move)
- Step 10: Build a Mini Practice Loop for Consistency
- Troubleshooting: Why Your Pinch Harmonic Isn’t Working (Yet)
- When to Use Pinch Harmonics (So It Sounds Musical, Not Random)
- A Fast 5-Minute Practice Plan
- of Real-World “Pinch Harmonic” Experiences
- Conclusion
A pinch harmonic is the guitar equivalent of making a tire squeal in a parking lot: unnecessary, dramatic,
and somehow the reason we all showed up. Done right, it turns an ordinary note into a high-pitched “squeal”
(also called a false harmonic, artificial harmonic, or pick harmonic) that jumps out of the amp like it’s late
for band practice.
Done wrong, it sounds like a sad little plink… or like your string briefly remembered it has feelings.
This guide will get you from “why is nothing happening?” to “oh no, it’s happening too much,”
with 10 clear steps, drills, and real-world fixes.
What a Pinch Harmonic Actually Is (and Why It Squeals)
Every time you pluck a string, you get the main note (the fundamental) plus a stack of higher overtones.
A pinch harmonic works by partially stopping the string right after the pick attack so the
fundamental gets reduced and a higher overtone dominates. That overtone is the squeal.
Think of it like this: you’re “picking” and “touching” the string almost at the same time, creating a node point
(a spot where the string doesn’t move much) so the harmonic pops out. The trick is doing it fast, clean, and on
purposelike a magician who definitely did not just drop the coin.
Quick Setup Checklist (Because Technique Loves a Little Help)
Yes, pinch harmonics are a technique thing. But a few setup choices make the learning curve feel less like a cliff:
- Pickup: Start on the bridge pickup (or bridge humbucker) for brightness and bite.
- Gain/Sustain: Use overdrive or distortion and enough volume to sustain the note.
- EQ: Don’t bury your treble. A brighter tone makes the harmonic easier to hear.
- Noise control: Gate if needed, but don’t gate so hard it strangles the squeal.
- Pick: Medium-to-heavy picks often feel more consistent; sharp tips can help accuracy.
- Strings: Fresh strings help clarity. Old strings can still squeal, but they’re less cooperative.
If you’re learning on clean tone at whisper volume, you’re basically trying to learn fireworks indoors with the lights off.
Possible, but emotionally expensive.
The 10 Steps to a Consistent Pinch Harmonic
Step 1: Start With One Friendly Note
Choose a note that tends to behave. A classic starting point is the G string around the 7th–10th fret
(for example: 9th fret G string). It’s bright enough to squeal and not too floppy.
Fret the note cleanly. Use your fretting-hand fingertips and keep other strings muted (lightly touch adjacent strings
with unused fingers) so you don’t summon the spirit of accidental noise.
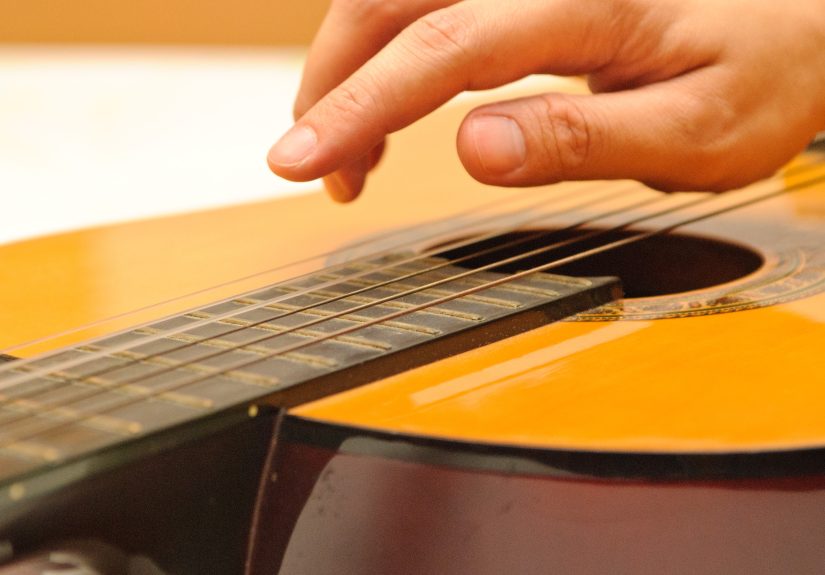
Step 2: Choke Up on the Pick (Yes, Really)
Show less pick tip than you normally wouldjust a few millimeters. This is crucial because your thumb needs
to graze the string immediately after the pick hits it. If your pick is sticking out like a ski jump, your thumb can’t
get close enough in time.
Step 3: Angle the Pick Slightly
Rotate the pick a bit so it’s not perfectly flat against the string. A slight angle helps the pick release cleanly
and makes it easier for the thumb to “follow through” and touch the string.
You’re not trying to carve the string like a Thanksgiving turkey. Just enough angle to glide.
Step 4: Set Your Thumb as the “Secret Second Picker”
The magic is the side of your picking-hand thumb. As you downpick, let the thumb’s flesh lightly
brush the string immediately after the pick attack. That brief touch creates the node and cancels
the fundamental.
Keyword: brief. If your thumb stays on the string, you’ll mute it and wonder why your squeal turned into a whisper.
Step 5: Find the “Sweet Spot” by Moving Your Picking Hand
Not every picking location produces the same harmonic. Slide your picking hand a little closer to the bridge or closer
to the neck pickup and try again. You’re searching for a spot where the harmonic jumps out with the least effort.
Practical drill: keep fretting the same note, and pick it repeatedly while slowly shifting your picking position.
When it squeals, remember where your hand was. That’s a repeatable coordinate on your guitar’s map.
Step 6: Pick With Commitment (But Not Aggression)
You generally need a confident attack to excite the harmonic. Super-light “barely touching” picking can
make the harmonic weak or nonexistent. On the other hand, slamming the string can pull it sharp, create extra noise,
or make your right hand tensetension is the sworn enemy of consistency.
Aim for “firm and controlled,” like knocking on a door, not like trying to knock down the building.
Step 7: Mute Everything You Aren’t Playing
Pinch harmonics magnify everythingincluding the strings you didn’t mean to hit.
Use a combination of:
- Fretting-hand muting: lightly touch unused strings with spare fingers.
- Picking-hand palm muting: rest the edge of your palm near the bridge to tame low strings when needed.
Clean muting is the difference between “legendary squeal” and “my guitar is auditioning for a horror movie.”
Step 8: Add Vibrato Right Away
A pinch harmonic often sounds best with vibratoit helps the squeal sustain and sing instead of popping
out and vanishing like it remembered it left the oven on.
After the harmonic speaks, add a small, controlled vibrato (side-to-side for classical-style vibrato on electric,
or a gentle bend-and-release style, depending on your technique). Start subtle; you can always get more dramatic later.
Step 9: Try It on a Bend (Classic “Scream” Move)
For that iconic scream, fret a note on the B or G string, hit the pinch harmonic, then bend it up a whole step.
The bend increases tension and makes the harmonic feel like it’s climbing a skyscraper in high heels (impressive, loud).
Keep your picking hand steady; don’t chase the string during the bend. Let the fretting hand do the moving.
Step 10: Build a Mini Practice Loop for Consistency
Consistency comes from repeating a small set of variables until your hands stop negotiating and start cooperating.
Use this 3-minute loop:
- Pick the same fretted note 10 times, aiming for the squeal each time.
- Move your picking hand slightly and repeat 10 times (new sweet spot).
- Switch strings (G to B) and repeat 10 times.
Track what works: string, fret, pickup setting, and where your picking hand sat. You’re basically doing science,
but with more distortion and fewer lab coats.
Troubleshooting: Why Your Pinch Harmonic Isn’t Working (Yet)
Problem: It sounds like a normal note
- Show less pick tip and let your thumb graze immediately after the pick hits.
- Move your picking positionthere are multiple sweet spots per note.
- Increase sustain (more gain, more volume, or a touch of compression).
Problem: It’s muted or choked
- Your thumb is staying on the string too long. Make it a quick brush, not a parking job.
- Check palm mutingmute only what you need, not the target string.
Problem: Too much squeal… everywhere… always
- You’ve learned the superpower. Congrats. Now back it off with a flatter pick angle and less thumb contact.
- Practice switching between normal notes and pinch harmonics deliberately (control is the real flex).
Problem: It works on some frets but not others
- That’s normal. Different fretted notes shift the harmonic node locations.
- Re-find the sweet spot by sliding your picking hand while repeating the same note.
When to Use Pinch Harmonics (So It Sounds Musical, Not Random)
Pinch harmonics shine when they have a job:
- Accent a riff: Use them on the last note of a phrase for punctuation.
- Highlight a bend: Squeal + bend = instant vocal-like scream.
- Create call-and-response: Alternate normal notes and squeals like a conversation.
- Add texture to palm-muted rhythms: A quick squeal can break up chugging patterns.
A good rule: if the harmonic makes the phrase sound more intentional, keep it. If it sounds like your guitar sneezed,
maybe save it for the next chorus.
A Fast 5-Minute Practice Plan
- 1 minute: Single-note pinch harmonics on G string (pick-hand sweet spot hunt).
- 1 minute: Same note, add vibrato after the squeal.
- 1 minute: Switch to B string, repeat.
- 1 minute: Add a bend after the harmonic.
- 1 minute: Insert one pinch harmonic into a simple riff every two bars.
Short daily reps beat marathon frustration. Your hands learn faster when they’re not emotionally exhausted.
of Real-World “Pinch Harmonic” Experiences
Most players don’t learn pinch harmonics in a straight line. It’s more like a sitcom: lots of failed attempts,
one accidental success, and then you spend a week trying to recreate the magic like you’re chasing a rare Pokémon.
The first time it works, it usually happens by surprise. You’re riffing, you slightly shift your picking hand,
your thumb brushes the string just rightand suddenly your amp screams like it stubbed its toe. You freeze for half
a second, because your brain is busy processing two thoughts at once: “I DID IT!” and “WAIT, HOW DID I DO IT?”
The next phase is the “confidence trap.” You assume you’ve got it, you try to do it again immediately, and your guitar
responds with a totally normal notepolitely, calmly, like it has never met you before. That’s when you learn the biggest
lesson: pinch harmonics are not one trick, they’re a coordination of tiny timing details. The pick has to strike,
the thumb has to graze, and then everything has to get out of the string’s way so it can ring. The difference between
squeal and disappointment is often measured in milliseconds and millimeters.
Then comes the “sweet spot discovery.” You realize the squeal isn’t only about your pick gripit’s also about where your
picking hand is along the string. Players often describe it like finding hidden buttons on the guitar: you move your hand
a little closer to the bridge and the harmonic gets sharper and more aggressive; you move it toward the neck pickup and a
different overtone pops out, sometimes higher, sometimes sweeter. Once you notice this, practicing becomes less frustrating
because you’re not blaming your hands for everythingyou’re adjusting variables and getting predictable results.
Another common experience is learning how much muting matters. Pinch harmonics can make a messy rig sound even messier,
because they boost the brightest, most noticeable parts of your signal. Players usually go through a moment where they
finally get the squeal… and also accidentally ring three other strings, creating a chaotic chord that sounds like a fax
machine arguing with a swarm of bees. That’s not a failure; it’s feedback. It tells you your technique is close and your
muting needs to level up. Once you start muting with both handsfretting-hand “lazy touches” and picking-hand control
the squeal starts sounding intentional, like it belongs inside the riff instead of crashing the party.
The best feeling is when pinch harmonics become a choice rather than an accident. You can hit one at the end of a lick,
add vibrato, bend it, and make it singthen immediately return to normal picking without your guitar squealing at every
note like it’s stuck in “extra dramatic” mode. That’s the real milestone: control. And once you get that, pinch harmonics
stop being a gimmick and start feeling like a legitimate musical accentone you can dial up for a solo, sprinkle into a riff,
or save for the perfect moment when the song needs a little chaos (the tasteful kind).
Conclusion
Pinch harmonics are a mix of mechanics (pick grip + thumb graze), geography (finding sweet spots), and discipline (muting and
vibrato). Nail those three, and you’ll be able to make notes squeal on commandlike you’re holding a tiny, screaming spotlight.
Practice slowly, change one variable at a time, and remember: the goal isn’t just squeals. It’s controlled squeals.