Table of Contents >> Show >> Hide
- Before You Start: Safety First, Flames Second
- Know Your Charcoal and Lighting Methods
- Step-by-Step: How to Light a Charcoal BBQ with a Chimney Starter
- Alternative Methods to Light a Charcoal BBQ
- How to Use Lighter Fluid Safely (If You Must)
- Setting Up Cooking Zones: Direct vs. Indirect Heat
- Common Mistakes When Lighting a Charcoal BBQ
- After the BBQ: Extinguishing and Cleanup
- Real-World Experiences: What You Learn After Lighting a Lot of Charcoal
There’s nothing quite like the smell of a charcoal BBQ. It’s smoky, nostalgic, and just a tiny bit chaoticlike summer camp with better food. But before you can grill the perfect burger or those Instagram-worthy veggie skewers, you have to conquer the first big hurdle:
how to light a charcoal BBQ safely and reliably.
The good news? You don’t need special powers, just a little know-how, the right tools, and some patience. This guide walks you through the safest, most effective ways to light a charcoal grillfrom using a chimney starter to handling lighter fluid the right wayplus real-world tips to help you look like a pro, not the person fanning sad, smoky coals for 45 minutes.
Before You Start: Safety First, Flames Second
Charcoal BBQs are simple, but they’re still real fire. Fire departments across the U.S. report thousands of grill-related fires each year, many caused by using grills too close to buildings, mishandling lighter fluid, or leaving grills unattended. Treat your charcoal BBQ with respect and a tiny bit of fear, and it will treat you (and your dinner) kindly.
Choose the Right Spot
- Only grill outdoors. Never use a charcoal grill in a garage, tent, camper, or enclosed porch. Charcoal produces carbon monoxide, which you can’t see or smell.
- Keep at least 10 feet from structures. Place your BBQ away from siding, railings, eaves, and overhanging branches.
- Use a level, stable surface. A tipping grill is a fast way to turn BBQ night into “call 911” night.
- Create a kid-and-pet-free zone. Aim for a 3-foot “no-go” circle around the grill.
Gather Your Gear
For a smooth, low-drama lighting experience, have these tools ready:
- Charcoal briquettes or lump charcoal
- Charcoal chimney starter (highly recommended)
- Newspaper or natural fire starters / lighter cubes
- Long-stem lighter or long matches
- Heat-resistant gloves and long-handled tongs
- Metal ash bucket or metal can for cooled coals
Optional but useful: an electric charcoal starter or a small, dedicated charcoal lighter fluid (if used correctlymore on that in a bit).
Know Your Charcoal and Lighting Methods
Briquettes vs. Lump Charcoal
Most home BBQ setups use one of two types of charcoal:
- Charcoal briquettes: Uniformly shaped, easy to stack, and consistent in burn time and heat. Great for beginners and for long, steady cooks like chicken or ribs.
- Lump charcoal: Natural hardwood pieces, burn hotter and faster, and respond quickly when you adjust vents. Ideal when you want intense heat for searing steaks.
You can light both types using the same methods, though briquettes are often easier to manage if you’re just learning how to light a charcoal grill.
The Main Ways to Light a Charcoal BBQ
- Charcoal chimney starter: The gold standardfast, even, and no chemical taste.
- Lighter cubes / fire starters: Clean-burning and convenient.
- Electric starter: Plug-in element that heats the charcoal directly.
- Lighter fluid: Effective but needs careful, safe use to avoid flare-ups and off-flavors.
We’ll focus first on the chimney starter method, because it’s the safest, most consistent way to light a charcoal BBQ for most home cooks.
Step-by-Step: How to Light a Charcoal BBQ with a Chimney Starter
A chimney starter looks like a metal cylinder with a handle and vent holes. It uses simple physicsheat risesto ignite charcoal quickly and evenly without lighter fluid.
1. Fill the Chimney
Decide how much charcoal you need:
- Full chimney: High heat for searing steaks, burgers, or thin-cut chops.
- Half chimney: Medium heat for chicken pieces, sausages, or veggies.
- Smaller amount: Low heat for gentle cooking or warming.
Pour the charcoal into the top of the chimney starter until you reach the desired level.
2. Add Your Starter Material
Flip the chimney over. In the lower compartment, add one of the following:
- 1–2 loosely crumpled sheets of newspaper (not tightly packed)
- A couple of natural fire starters or lighter cubes
- Brown paper bag pieces or food-safe starter squares designed for grills
Avoid using glossy magazine pages or cardboard with unknown coatings. Stick with plain paper or products labeled safe for grilling.
3. Position the Chimney and Light It
- Place the chimney on the charcoal grate (the lower grate inside your BBQ) or another fire-safe surface.
- Use a long lighter or match to light the newspaper or starter through the holes at the bottom of the chimney.
- Light it in a couple of spots so the flame spreads evenly.
As the starter burns, it ignites the bottom layer of charcoal. The heat rises, lighting each layer above until all coals are glowing.
4. Wait for the Coals to Fully Light
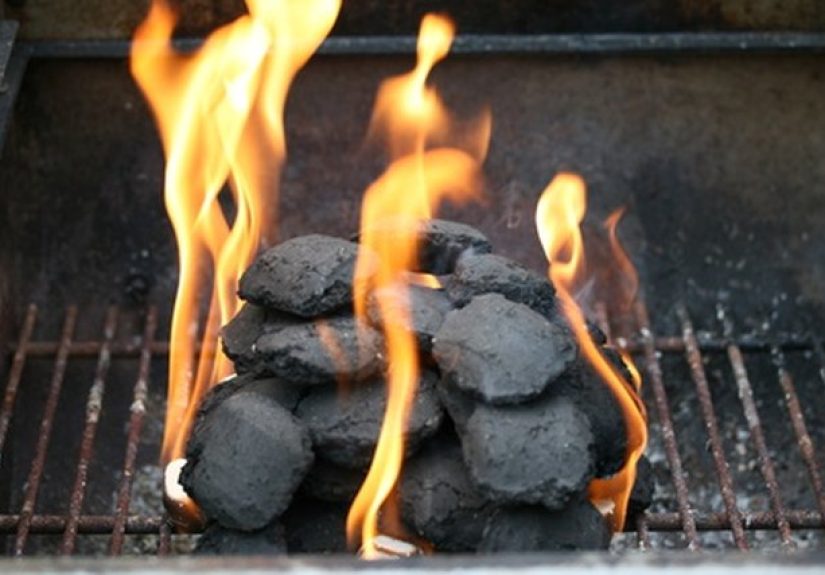
This is the part where new grillers get impatient. Don’t rush it. Properly lit charcoal should:
- Glow red/orange when you look down into the chimney
- Be mostly covered with a light gray or white ash
- Stop producing heavy, thick, black smoke
Depending on the type of charcoal and the amount, this usually takes about 10–20 minutes. Think of it as preheating your ovenexcept your “oven” smells like a backyard party.
5. Carefully Pour the Coals into the Grill
- Put on heat-resistant gloves.
- Grab the chimney handle and any secondary heat shield handle, if your model has one.
- Slowly pour the hot coals onto the charcoal grate.
Arrange the lit coals depending on how you plan to cook (we’ll get to cooking zones in a moment). Replace the cooking grate and let the grill preheat for 5–10 minutes before adding food.
Alternative Methods to Light a Charcoal BBQ
Using Lighter Cubes or Natural Fire Starters
If you don’t have a chimney starter, lighter cubes are a clean and easy option:
- Place 1–2 lighter cubes on the charcoal grate.
- Build a small pile of charcoal over and around the cubes, creating a loose pyramid.
- Light the cubes with a long lighter.
- Wait until most coals are glowing and ash-covered, then spread them out.
This method takes a bit longer than a chimney but still avoids the chemical smell of lighter fluid.
Using an Electric Charcoal Starter
Electric starters are metal heating elements you bury in charcoal, plug in, and let them do their thing:
- Place a small pile of charcoal on the charcoal grate.
- Insert the electric starter so the element is under and surrounded by the coals.
- Plug it into a grounded outdoor outlet.
- Wait 8–12 minutes until the charcoal around the element starts glowing.
- Unplug and remove the starter (carefullyit stays hot), then add more charcoal and let it catch.
This method is great when your area has restrictions on open flames or you just prefer not to deal with paper and matches.
How to Use Lighter Fluid Safely (If You Must)
Many people learn how to light a charcoal BBQ with lighter fluidand done correctly, it can work. Done incorrectly, it leads to flare-ups, chemical flavors, and emergency-room stories.
Safe Lighter Fluid Basics
- Only use charcoal lighter fluid, never gasoline, alcohol, or other accelerants.
- Only apply lighter fluid to cold coals. Never add fluid to hot or glowing coalsthis can cause a fire to shoot back toward the bottle.
- Cap and move the bottle away from the grill immediately after using it.
Step-by-Step with Lighter Fluid
- Arrange charcoal in a pyramid on the charcoal grate.
- Sprinkle lighter fluid over the coals until they look lightly coateddon’t soak them.
- Wait 30–60 seconds so the fluid can absorb.
- Use a long match or lighter to ignite the base of the pile in a few spots.
- Let the coals burn until they’re mostly covered in gray ash and the high flames die down.
Do not place food on the grill until the fluid has burned off and you no longer smell it. Otherwise, your burgers will taste like a chemistry experiment.
Setting Up Cooking Zones: Direct vs. Indirect Heat
Lighting the charcoal is only half the battle. Arranging it properly gives you control over temperature and cooking style.
Two-Zone Fire (Most Versatile Setup)
After the coals are lit:
- Push most or all of the coals to one side of the grill for direct heat.
- Leave the other side with little to no charcoal for indirect heat.
Use the hot side for searing and the cooler side for finishing thicker foods like chicken thighs or pork chops without burning the outside.
Single-Zone High Heat
For thin foods that cook quicklyburgers, hot dogs, kabobsyou can spread the coals in an even layer across the bottom of the grill for consistent direct heat.
Common Mistakes When Lighting a Charcoal BBQ
- Using too much lighter fluid. More isn’t better. It just adds risk and bad flavor.
- Cooking too soon. If flames are still high or coals are mostly black, your grill isn’t ready. You’ll get uneven cooking and more flare-ups.
- Overloading the grill with food immediately. Give the grill grates time to heat up so food doesn’t stick.
- Ignoring the wind. Wind can blow sparks and embers around. Avoid very windy days or position your BBQ so smoke and sparks blow away from people and structures.
- Walking away from a lit grill. Even “just for a minute” is enough time for trouble to start.
After the BBQ: Extinguishing and Cleanup
When you’re done cooking, resist the urge to douse the grill with water. That sudden temperature shock can damage the metal and create clouds of ash.
Let the Coals Burn Out Safely
- Close all vents on the grill to cut off oxygen.
- Close the lid and let the coals cool completelythis can take several hours or overnight.
- When they’re cold, transfer ashes to a metal container with a lid.
Never dispose of ashes in paper bags, cardboard boxes, or plastic containers. Even “cold-looking” embers can still be hot enough to start a fire.
Clean the Grill
Once everything is cool:
- Brush down the cooking grates.
- Empty old ash from the ash catcher or bottom of the grill.
- Wipe any grease from accessible surfaces to reduce future flare-ups.
A few minutes of cleanup after each use makes lighting and grilling easier next timeand reduces the risk of grease fires.
Real-World Experiences: What You Learn After Lighting a Lot of Charcoal
Learning how to light a charcoal BBQ isn’t just about following steps; it’s also about the little lessons you pick up every time you grill. Here are some experience-based tips and observations that can save you time, stress, and maybe an eyebrow or two.
Patience Beats Brute Force
Almost every charcoal beginner has the same moment: the coals aren’t lighting fast enough, and the temptation hits“What if I just add more lighter fluid?” That thought is your sign to step away, not lean in. Extra lighter fluid on partially lit coals can create a sudden fireball that’s as impressive as it is dangerous.
Over time, you realize that patience is the real superpower of charcoal grilling. A chimney starter that takes 15–20 minutes to do its job may feel slow at first, but it’s incredibly consistent. Once you trust the process, you’ll find that those few waiting minutes are the perfect time to prep your food, season your meat, or mix a quick BBQ sauce.
The Weather Has Opinions, Too
Wind, humidity, and temperature all affect how your charcoal behaves. On breezy days, coals may light faster, but embers can also travel farther. That’s when you really appreciate setting your grill in a clear, open space and keeping a bucket of sand or water and a fire extinguisher nearby.
On humid or cooler days, charcoal sometimes feels sluggish. If your coals seem slow to catch, it’s usually not your faultit’s the environment. Using a chimney starter, dry newspaper or cubes, and keeping the vents open during startup helps compensate for less-than-perfect weather.
Different Charcoal, Different Character
After a few BBQ sessions, you’ll notice that not all charcoal behaves the same:
- Briquettes are predictable and great for “set it and forget it” cooking. They’re ideal when you’re practicing and want consistent results.
- Lump charcoal is more responsive and burns hotter. It’s fantastic for searing, but it can also flare or burn through faster if you’re not paying attention.
Many experienced grillers keep both on hand. Briquettes handle longer cooks like chicken or roasts, while lump charcoal shines for fast, intense heat. Experimenting with both will help you learn how to light a charcoal BBQ that matches your cooking style.
Vent Control Is Your Secret Weapon
Lighting the grill is step one; managing the vents is step two. Even if you start with a perfect chimney of glowing coals, you can accidentally overheat or cool down the grill if your vents are fully closed or wide open.
Over time, you’ll develop a feel for it:
- Open vents = more oxygen = hotter fire.
- Partially closed vents = moderate temperature.
- Closed vents = fire slowly dies out.
The important experience-based tip here: when you first dump the lit coals, start with vents mostly open. Once the grill reaches the temperature you want, you can very slightly close them to stabilize the heat.
Preheating Makes Food Taste Better
One of the subtle lessons you learn after a few grilling sessions is that a properly preheated grill makes almost everything easier:
- Food sticks less.
- Grill marks look better.
- Cooking times are more predictable.
After your charcoal is lit and arranged, give the grill another 5–10 minutes with the lid on and vents open. Think of it as letting the grill “come to temperature,” just like you would with an oven. This small step is one of the biggest quality upgrades you can make with almost no extra effort.
You Don’t Need Gadgets, But They Help
Technically, you can light a charcoal BBQ with nothing more than matches, newspaper, and some patience. But experience teaches you that a few simple tools make life easier and safer:
- A reliable chimney starter cuts frustration dramatically.
- Heat-resistant gloves protect you when moving chimneys, grates, or hot vents.
- A decent grill brush helps keep grates clean, which reduces flare-ups and sticking.
- A simple grill thermometer (built-in or clip-on) takes the guesswork out of heat levels.
None of these are strictly required, but every seasoned charcoal fan eventually builds up a small collection of favorites that make each cookout smoother.
The Biggest Takeaway: Confidence Comes with Practice
The first time you light a charcoal BBQ, it can feel like a science experiment. The tenth time, it feels more like a ritual. You’ll learn how much fuel you really need, how long your preferred charcoal takes to light, how your particular grill responds to vent changes, and how weather affects your cook.
Once you’ve got a few successful lighting sessions under your belt, you’ll spend less time worrying about the fire and more time focusing on what really matters: flavor, timing, and enjoying the people gathered around your backyard BBQ.
In the end, learning how to light a charcoal grill is simply the first step in learning how to love charcoal grilling. With safe habits, good tools, and a bit of trial and error, you’ll go from “Is this going to work?” to “Dinner will be ready in 10 minutes” sooner than you think.