Table of Contents >> Show >> Hide
- Why a No-Sew Spider-Man Costume Works So Well
- What You Need
- Pick Your Spider-Man Style First
- Step-by-Step: How to Make the Costume
- How to Make It Look Better Without Spending More
- Comfort and Safety Tips That Actually Matter
- Common Mistakes to Avoid
- Ideas for Kids, Teens, and Adults
- What It’s Actually Like to Make and Wear a No-Sew Spider-Man Costume
- Final Thoughts
If you want to dress like Spider-Man but your sewing machine is either missing, broken, or still sitting in the box judging you from a closet shelf, good news: you can still make a fantastic homemade Spider-Man costume without sewing a single stitch. In fact, a no-sew version can be faster, cheaper, more comfortable, and way less stressful than trying to wrestle stretchy fabric into submission at 11:43 p.m. the night before Halloween.
The secret is simple. Instead of building a superhero suit from scratch, you start with everyday clothes in the right colors and add the recognizable Spider-Man details with felt, fabric glue, fabric tape, craft foam, and dimensional paint. The result can look playful and polished enough for trick-or-treating, a school event, a comic-themed party, or a last-minute costume contest where you plan to win on charm and commitment.
This guide walks you through the whole process, from choosing the base outfit to making the spider emblem, mask, web pattern, and finishing touches. It also includes comfort and safety tips, budget-friendly upgrades, and a longer real-world experience section at the end so you know what this project is actually like once the scissors come out and the glue starts warming up.
Why a No-Sew Spider-Man Costume Works So Well
Spider-Man is one of the best DIY costumes because the character is instantly recognizable. You do not need movie-level tailoring to sell the look. Most people identify Spider-Man through a few core elements: red and blue color blocking, web lines, white or black-edged eyes, and a spider emblem on the chest. Once those pieces are in place, the costume reads clearly.
That is why no-sew methods work so well. A red long-sleeve shirt or hoodie, blue pants or leggings, and a few well-placed details can do most of the heavy lifting. The costume becomes even better when you lean into neat lines, strong contrast, and practical materials that move with the body. Spider-Man swings from buildings. You will probably just walk to a party, but the principle still applies: the costume should be flexible, comfortable, and not feel like you are wrapped in a decorated tarp.
What You Need
You do not need every item on this list. Think of it as a choose-your-own-superhero-adventure supply shelf.
- Red long-sleeve shirt, sweatshirt, hoodie, or fitted top
- Blue joggers, leggings, sweatpants, or athletic pants
- Red socks or gloves
- Black felt, red felt, and white felt
- Craft foam or felt for the mask eyes and spider emblem
- Fabric glue or strong craft glue made for fabric
- Fabric tape or hem tape
- Black dimensional fabric paint or puffy paint
- Black fabric marker or permanent marker for small details
- Scissors
- Chalk or washable marker for sketching lines
- Elastic for a simple eye mask
- Optional: red face paint, black face paint, reflective tape, red shoes, and a red beanie or balaclava
If you are working on a budget, thrift stores are excellent for the base outfit. If you are making this for a child, pajamas, leggings, and soft tops often work better than stiff clothing because kids want to run, crouch, and dramatically pose on furniture while being told not to dramatically pose on furniture.
Pick Your Spider-Man Style First
Classic Red-and-Blue Spider-Man
This is the easiest and most recognizable version. Use a red top and blue bottoms, then add black webbing and a chest spider.
Homecoming-Inspired Casual Spider-Man
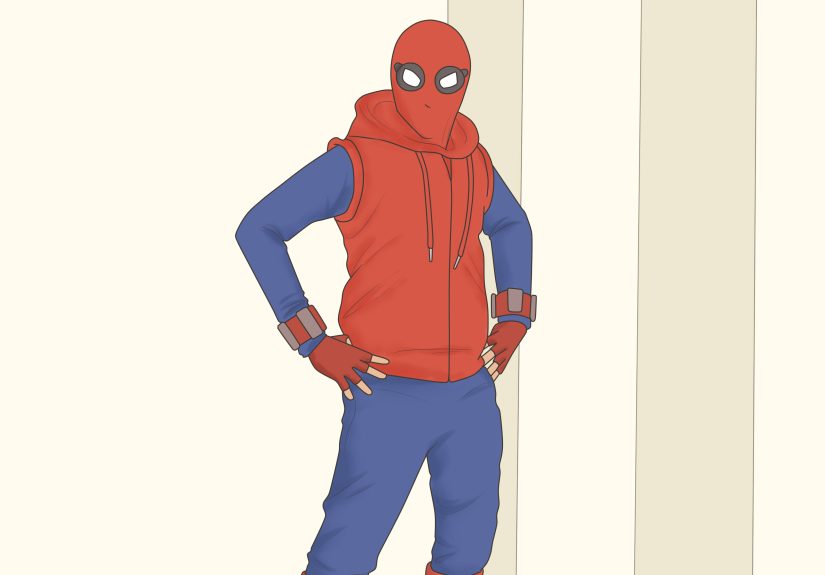
Use a red hoodie, blue pants, and web details only on the upper body, gloves, and mask. This works especially well for colder weather and feels more wearable.
Miles Morales-Inspired No-Sew Version
Use a black base outfit with a red spider emblem and eye mask. Then layer on a red hoodie or jacket for that streetwear vibe. It is sleek, comfortable, and easier than tracing webs all over a full red shirt.
For most people, the classic red-and-blue version is the sweet spot between effort and payoff, so that is the one this tutorial focuses on.
Step-by-Step: How to Make the Costume
Step 1: Build the Base Outfit
Lay out your red top and blue pants on a flat surface and check the proportions. A fitted long-sleeve shirt paired with slim joggers or leggings creates the most superhero-like silhouette, but comfort matters more than fake abs. If the shirt is too loose, you can lightly secure the sides inside with fabric tape for a cleaner shape. If the pants are a bit baggy, tuck them into socks or boots.
If you want a more comic-book look, add red socks over the bottom of the blue pants to mimic red boots. Red gloves or even inexpensive knit gloves can help finish the suit. These details do more than people think. A costume starts looking intentional when the color blocking feels complete from shoulder to ankle.
Step 2: Make the Spider Emblem
The spider emblem is the visual anchor of the costume. Cut one out of black felt or thin black craft foam. If freehand drawing a spider sounds risky, print a simple spider silhouette, place it under the felt, and trace it. Keep the design bold. Tiny legs may be accurate, but they are not always readable from six feet away while someone is carrying a bowl of mini candy bars and trying to open the front door.
Once the emblem is cut, position it in the center of the chest and attach it with fabric glue or fabric tape. Let the adhesive dry completely before wearing the shirt. If you want extra polish, add a smaller spider to the back as well.
Step 3: Add the Web Pattern
This is the step that transforms “red shirt” into “Spider-Man.” Use chalk to lightly sketch the web design before committing with paint. Start with straight or slightly curved lines radiating from the chest, shoulders, and mask area, then connect them with arched horizontal lines to create the web effect.
Black dimensional fabric paint is your best friend here because it creates slightly raised lines that look more finished than marker. It also gives the costume a comic-book texture. Work in sections rather than trying to decorate everything at once. Front of shirt first, then sleeves, then gloves, then any mask pieces. Let each section dry flat.
If you are short on time, fake the full-body effect. Put most of your webbing effort into the chest, shoulders, forearms, and mask. Those are the areas people notice first in photos and in person. You do not need museum-grade web accuracy on the back of one knee.
Step 4: Make a No-Sew Spider-Man Mask
You have three good options, and the best one depends on comfort and visibility.
Option A: Felt Eye Mask
This is the easiest and most comfortable method. Cut a red felt mask shape that covers the area around the eyes and upper nose. Cut large white eye shapes from felt or craft foam, then outline them with thin black felt. Glue the white eye pieces onto the red mask and attach elastic to the sides. This gives a strong Spider-Man look while leaving most of the face uncovered for comfort.
Option B: Red Beanie or Balaclava Upgrade
Start with a red beanie, stretch cap, or soft balaclava. Glue white eye shapes to the front and add web lines with black fabric paint. This creates a fuller Spider-Man headpiece without sewing. Make sure the eye openings or visibility area works for the person wearing it. Looking cool is important. Walking into a shrub because you cannot see is less iconic.
Option C: Face Paint Plus Eye Frame
If full masks feel hot or restrictive, use face paint around the eyes and forehead, then add a small red or black eye frame. This is especially good for younger kids who hate masks after about eleven minutes.
No matter which version you choose, keep the eye shapes large and clean. Spider-Man eyes are one of the character’s most recognizable features, so this is not the place to get timid with your scissors.
Step 5: Finish the Hands, Feet, and Extras
Add web lines to gloves if you have them. Use red shoes, red socks over shoes, or simple shoe covers made from red felt wrapped neatly around the ankle area and secured with fabric tape. Keep any add-on close to the foot so it does not become a tripping hazard.
If you want a little extra flair, make wrist web-shooters from toilet paper rolls, gray felt cuffs, or painted cardboard strips. These are optional, but they can be fun for kids and great for photos.
How to Make It Look Better Without Spending More
The difference between a costume that looks homemade in a charming way and one that looks like it lost a fight with a discount craft bin usually comes down to restraint. Focus on three upgrades:
- Keep the web lines consistent. They do not need to be perfect, but they should look deliberate.
- Use clean, bold eye shapes. Strong mask eyes instantly elevate the whole costume.
- Make the emblem centered and readable. If the chest spider looks good, the whole outfit looks better.
Also, do a full try-on before the event. This is when you catch small problems like stiff glue spots, peeling edges, and pants that slide down every time someone says, “Do the Spider-Man pose!”
Comfort and Safety Tips That Actually Matter
A homemade Spider-Man costume should not just look good. It should be wearable. Choose clothing that fits well and does not drag. Avoid long fabric pieces that could catch on things or get too close to candles and decorations. If you are adding lights, use battery-powered options. If you are using face paint, patch-test it ahead of time. And if a full-face mask limits vision or breathing, switch to a felt eye mask or painted face version instead.
For evening events, add a little reflective tape to the back, shoes, or treat bag. You can hide it along the seams or under arm lines so it does not ruin the look. This is one of those practical details that nobody notices until it really matters.
Finally, let all glued and painted parts dry completely before wearing the costume. Fabric glue and dimensional paint need time. Rushing this step is how you end up permanently attaching a spider emblem to the kitchen table.
Common Mistakes to Avoid
- Using regular school glue instead of fabric glue
- Making the eye pieces too small
- Drawing web lines without sketching first
- Adding too many bulky layers under the costume
- Using shoes that are slippery or hard to walk in
- Choosing a mask that looks amazing but feels awful after ten minutes
The best no-sew costume is the one you can actually wear for hours without wanting to peel it off in the car ride home.
Ideas for Kids, Teens, and Adults
For Kids
Use soft basics like pajama tops, leggings, or joggers. Skip anything scratchy. A simple eye mask is often better than a full head covering.
For Teens
Teens usually care about silhouette and photos. Use a fitted hoodie, neater web lines, and cleaner eye shapes. A Miles Morales-inspired version is especially cool and modern.
For Adults
Keep it comfortable and subtle if you are going to a party. A red athletic top, blue compression pants or joggers, and sharp black detailing can look surprisingly sleek. Add a lightweight mask you can remove easily once snacks appear. Spider-Man may have self-control. Most people do not when mozzarella sticks arrive.
What It’s Actually Like to Make and Wear a No-Sew Spider-Man Costume
One of the most interesting things about making a homemade Spider-Man costume without sewing is that the project tends to start with confidence, drift into mild chaos, and then somehow end in triumph. At the beginning, it feels almost suspiciously easy. You find a red shirt, blue pants, scissors, glue, and felt, and you think, “I am basically a costume designer now.” Then you start laying out the web lines and realize Spider-Man’s suit contains approximately one million tiny decisions.
The first real experience most people have is discovering that the costume looks awkward right up until the moment it suddenly does not. Before the spider emblem goes on, it is just laundry. Before the eye pieces are attached, it is just red fabric with ambition. But once the emblem is centered, the web lines dry, and the mask comes together, the outfit snaps into focus. That shift is genuinely satisfying. It feels less like arts and crafts and more like you cracked a secret superhero formula hidden inside ordinary clothes.
Another common experience is realizing that comfort matters more than perfection. A full head mask may look amazing on a chair. On a real person at a school parade, neighborhood party, or front porch photo session, it can get hot fast. Kids often start out excited and then begin negotiating mask-free Spider-Man terms within half an hour. Adults are not always much different. That is why no-sew builders often end up loving felt eye masks, soft hoods, or partial face-paint options. They are easier to wear, easier to fix, and far less likely to trigger a dramatic mid-event costume failure.
There is also a very real “night before” energy to this kind of project. You may tell yourself you will start in the afternoon, but somehow it becomes an evening craft session with dimensional paint drying on baking paper and a spider emblem sitting next to a coffee mug like it lives there now. Oddly, this is part of the charm. No-sew costumes often feel more personal because they carry the little improvisations that happen in the moment: a glove becomes a web-shooter base, a hoodie becomes the perfect Spider-Man top, and a strip of reflective tape gets hidden so cleverly you feel like a genius.
When the costume is finally worn, the payoff is immediate. People recognize it fast. That matters. You do not have to explain the look. Even a simplified no-sew version gets the reaction you want, especially from kids, comic fans, and anybody who appreciates a homemade costume that clearly had thought behind it. Photos also tend to look better than expected because Spider-Man’s colors and shapes are strong on camera. The white eyes, black webbing, and chest emblem do a lot of visual work.
Maybe the best part of the experience is that it feels achievable. You do not need advanced skills, expensive fabric, or a perfect pattern. You just need a smart plan, a little patience, and the willingness to accept that glue drying is a legitimate stage of creative suspense. By the end, you have not only made a Spider-Man costume without sewing, but also created something wearable, memorable, and honestly kind of fun to brag about. And you did it without threading a needle, which is the sort of superhero origin story many of us can get behind.
Final Thoughts
Making a homemade Spider-Man costume without sewing is all about choosing recognizable details, smart materials, and comfortable layers. Start with a red-and-blue base, add a clean spider emblem, create web lines where they matter most, and choose a mask that balances style with visibility. Keep the process simple, and the final look will feel intentional instead of overworked.
The beauty of a no-sew costume is that it leaves room for creativity without requiring expert-level construction. You can make it classic, casual, kid-friendly, photo-ready, or party-proof. And when someone asks where you bought it, you get the deeply satisfying pleasure of saying, “Oh, this? I made it.” Very superhero behavior.