Table of Contents >> Show >> Hide
- Why Make a DIY Paper Wallet in the First Place?
- Materials You’ll Need
- Pick the Right Paper (This Matters More Than You’d Think)
- Origami Vocabulary in 60 Seconds
- Step-by-Step: Classic No-Glue Origami Wallet (Bifold Style)
- Step 1: Start in landscape
- Step 2: Make the center guideline
- Step 3: Fold both sides toward the center (then undo it)
- Step 4: Fold the top corners down and in
- Step 5: Fold the bottom corners up and in
- Step 6: Fold the sides in and keep them folded
- Step 7: Flip it over
- Step 8: Fold the top down to create the “pocket frame”
- Step 9: Bring the bottom up, then crease-and-unfold once
- Step 10: Tuck the bottom up into the side triangles
- Step 11: Fold the whole piece in half to form the wallet
- Step 12: Test the pockets
- Make It Better: Practical Upgrades That Don’t Ruin the Origami Vibe
- Durability Hacks: How to Make a Paper Wallet Last Longer
- Common Mistakes (and How to Fix Them Without Crying)
- Fun Variations You Can Try Next
- FAQ
- Conclusion
- Extra: Real-World Experiences with Origami Wallets (The Good, The Bad, The Crinkly)
Ever looked at your wallet and thought, “Wow, this thing is basically a tiny bill-folding gym membership I never asked for”? Good news: you can make a surprisingly functional origami wallet with one sheet of paper, zero glue, and the kind of confidence you normally reserve for assembling furniture “without reading the instructions.”
In this guide, you’ll learn how to make an origami wallet that holds cash, cards, and your dignity (mostly). We’ll cover paper choices, step-by-step folding instructions, durability upgrades, and a few variationsbecause once you fold one, you’ll want to fold five. That’s just science.
Why Make a DIY Paper Wallet in the First Place?
A folded paper wallet isn’t just a crafty flex. It’s genuinely usefulespecially when you need something lightweight, quick, and customizable:
- Emergency backup wallet for travel (or the “I forgot my wallet” moment of shame).
- Gift card holder that feels thoughtful without requiring you to learn calligraphy.
- Kids’ craft project that teaches patience, precision, and how to follow steps in order.
- Minimalist everyday carry when you don’t want to lug around a brick of loyalty cards.
Materials You’ll Need
Keep it simple. Origami is basically “doing a lot with very little,” which is also my approach to cooking on weeknights.
- 1 sheet of paper (US Letter 8.5" × 11" works great; A4 works too)
- Optional: a ruler or old gift card (for sharpening creases)
- Optional: clear tape (for reinforcement, not required)
- Optional upgrade: a Tyvek-style mailing envelope for extra durability
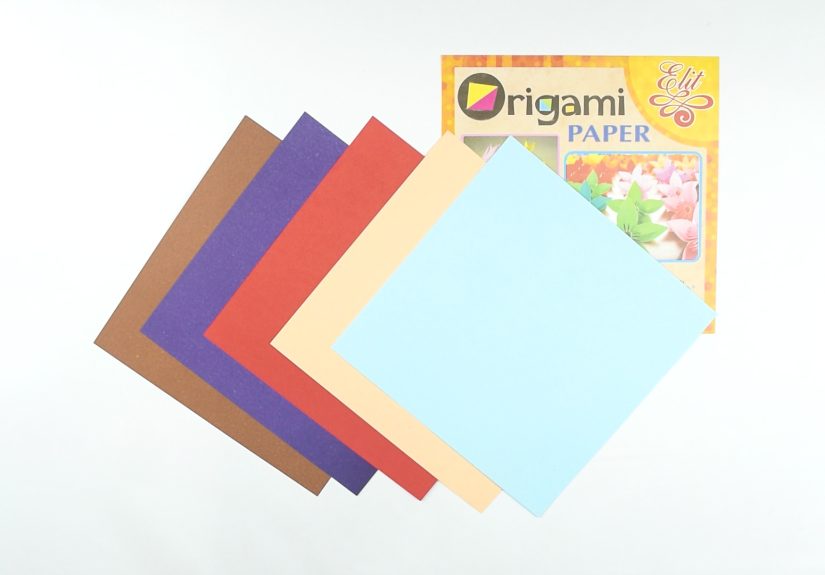
Pick the Right Paper (This Matters More Than You’d Think)
Best paper for a beginner origami wallet
If this is your first attempt, regular printer paper is totally fine. It’s forgiving enough to practice with, easy to crease, and cheap enough that you won’t mourn mistakes. If you want a cleaner look, try lightweight colored cardstockbut keep it thin, because thick paper turns neat folds into lumpy sadness.
How paper choice changes your wallet
- Printer paper: easy to fold, decent structure, “everyday temporary wallet” vibes.
- Origami paper: folds beautifully, often thinner; great for a sleek card holder.
- Light cardstock: sturdier feel, but harder to fold sharply.
- Tyvek-style mailer material: the “I want this to survive my jeans pocket” option.
Pro tip: decorate before you fold
Want a wallet that looks like it came from a boutique instead of your printer tray? Add patterns firstmarkers, doodles, stamps, washi tape strips, even a quick “grid” design. Just keep it flat and dry so your folds stay crisp.
Origami Vocabulary in 60 Seconds
You don’t need to become a folding scholar. But these two terms help:
- Valley fold: fold toward you (like making a little paper “valley”).
- Mountain fold: fold away from you (like a paper “ridge”).
If that still feels abstract, don’t worryyour hands will figure it out. They always do. Eventually.
Step-by-Step: Classic No-Glue Origami Wallet (Bifold Style)
This is a popular origami wallet tutorial style because it creates multiple pockets without cutting or taping. Take your time, line things up, and crease firmly.
Step 1: Start in landscape
Place your paper on a flat surface with the long edges at the top and bottom (landscape orientation).
Step 2: Make the center guideline
- Fold the left edge over to meet the right edge.
- Crease well, then unfold. You should have one vertical crease down the center.
Step 3: Fold both sides toward the center (then undo it)
- Fold the left edge inward to meet the center crease. Crease.
- Fold the right edge inward to meet the center crease. Crease.
- Unfold both sides. You now have helpful crease lines to aim for later.
Step 4: Fold the top corners down and in
Using the crease lines you just made as guides:
- Fold the top-left corner down and inward so the edge aligns neatly with the nearest vertical crease line.
- Repeat for the top-right corner.
You’re forming two neat triangular flaps at the top. Sharp creases here = cleaner wallet later.
Step 5: Fold the bottom corners up and in
- Fold the bottom-left corner up and inward to mirror what you did at the top.
- Repeat for the bottom-right corner.
Step 6: Fold the sides in and keep them folded
- Fold the left edge inward to the center crease and leave it folded.
- Fold the right edge inward to the center crease and leave it folded.
At this point, your paper should look narrower, and you’ll feel triangular areas at the top and bottom.
Step 7: Flip it over
Turn the paper over so the short edges are now top and bottom.
Step 8: Fold the top down to create the “pocket frame”
Fold the top edge down far enough that you reveal the triangular shapes underneath. Crease firmlythis is a multi-layer fold, so press like you mean it (use a ruler edge or gift card if you have one).
Step 9: Bring the bottom up, then crease-and-unfold once
- Fold the bottom edge up toward the top, stopping around the midpoint of the top flap you just created.
- Crease, then unfold that bottom fold. This creates a guide for the tuck.
Step 10: Tuck the bottom up into the side triangles
Fold the bottom edge up againbut this time, slide the bottom corners into the left and right triangular areas of the top flap. This tuck is what makes the wallet stay together without glue.
Step 11: Fold the whole piece in half to form the wallet
Fold the wallet left-to-right (or right-to-left) so it becomes a compact bifold. Press the spine crease well.
Step 12: Test the pockets
- Slide in a folded bill (fold once or twice depending on pocket depth).
- Try a gift card or old membership card to check the fit.
- If it’s too tight, gently widen the pocket opening by easing the foldsno yanking.
Make It Better: Practical Upgrades That Don’t Ruin the Origami Vibe
Upgrade 1: Sharpen your creases (seriously)
Most “my wallet looks weird” issues are actually “my creases were timid.” Use a ruler edge, a spoon handle, or an old card to burnish folds. Crisp creases make the wallet flatter, tighter, and more durable.
Upgrade 2: Add a “receipt pocket” without extra paper
If your fold creates a larger interior space, reserve it for receipts or notes. Keep cards in the smaller exterior pockets so they don’t bulge the spine.
Upgrade 3: Add a closure (optional, but satisfying)
If your wallet pops open in your pocket like it’s trying to escape:
- Tuck-closure: tuck one outer flap slightly deeper into a pocket so it “locks” more firmly.
- Tape-closure: a small strip of clear tape on the inside seam can reinforce the closing edge without changing the look.
- Minimalist band: wrap a thin rubber band around it (very “I’m prepared,” very “I might also own a headlamp”).
Durability Hacks: How to Make a Paper Wallet Last Longer
Paper wallets are surprisingly sturdy, but the real world is not a gentle place. Here’s how to keep your DIY paper wallet from turning into confetti:
Option A: “Tape laminate” method (fast and effective)
- Before you fold, cover one side of the paper with wide clear tape strips, slightly overlapping.
- Trim edges so no sticky tape hangs off.
- Fold as usual. Your wallet becomes more water-resistant and tear-resistant in high-stress spots.
Option B: Use Tyvek-style material for a rugged origami wallet
If you’ve ever held a Tyvek mailing envelope, you know it’s basically paper’s tougher cousin who drinks black coffee and does squats. Folding a wallet from Tyvek-style material gives you a wallet that handles moisture and pocket friction far better than standard paper.
Option C: Reinforce only the stress points
Don’t want to tape the whole thing? Reinforce the “hinge” (the fold spine) and pocket openings with tiny strips of clear tape on the inside. It won’t scream “I used tape,” it’ll whisper “I’m practical.”
Common Mistakes (and How to Fix Them Without Crying)
The wallet looks crooked
This is usually a misalignment early on. Unfold back to your first center crease and make sure your side folds meet it evenly. In origami, millimeters matter. Annoying? Yes. Worth it? Also yes.
The pockets are too tight for cards
Use thinner paper, or slightly loosen the pocket opening by easing the fold layers apart. You can also store cards only on one side to reduce bulk.
The tuck keeps slipping out
Two fixes:
- Crease harderespecially the flap that forms the tuck.
- Make sure the tucked corners go fully into the triangular “channels,” not just halfway.
The paper tears at the spine
That’s pocket friction doing its job. Reinforce the spine with a thin strip of tape on the inside, or upgrade your paper (lighter cardstock or Tyvek-style material).
Fun Variations You Can Try Next
Once you’ve mastered the basic folded paper wallet, you can branch out:
Mini dollar-bill wallet (great for tips or travel)
A crisp dollar bill can fold into small shapes and holders. This isn’t your everyday wallet replacement, but it’s perfect as a novelty holder for a couple billsespecially when you want to hand someone cash and also a conversation starter.
Origami wallet as a gift card envelope
Use patterned paper and tuck a note inside. Suddenly your gift card feels intentional instead of “I panicked at the checkout line.”
Card holder / business card case style
Fold a slimmer version using thinner paper and fewer layers. Great for a minimal carry or a clean desk accessory that makes you look 17% more organized.
FAQ
How long does it take to make an origami wallet?
The first one usually takes 10–15 minutes because you’re learning the moves. After that, you’ll fold them faster than you can decide what to watch next.
Can an origami wallet hold coins?
Coins are the natural enemy of flat paper pockets. A few coins can work in a tighter interior pocket, but for everyday coin carry, consider a small folded envelope insert or a separate coin pouch.
Is a paper wallet actually secure?
It can be surprisingly snugespecially with good creases and tight tucks. But it’s not a vault. Treat it as a lightweight wallet, travel backup, or fun craft that happens to hold money.
Conclusion
Now you know how to make an origami wallet that’s simple, functional, and oddly satisfying. Start with regular printer paper, focus on alignment and crisp creases, and you’ll end up with a wallet that can hold real cash and cards plus the bragging rights of saying, “Oh this? I folded it.”
If you want it to last longer, try clear-tape reinforcement or fold one from a tougher mailing material. Either way, you’ve officially joined the club of people who look at a sheet of paper and see a storage solution.
Extra: Real-World Experiences with Origami Wallets (The Good, The Bad, The Crinkly)
Let’s talk about what happens after you fold your paper walletbecause the real world is where crafts go to get tested. People usually start with a burst of optimism: the wallet looks sharp, the pockets feel snug, and you suddenly believe you could fold your own parachute if needed. Then reality shows up wearing jeans with tight pockets.
The first experience most folks have is the pocket fit test. You slide in a couple cards, maybe a folded bill, and the wallet immediately develops opinions about your lifestyle choices. Too many cards? The spine bulges. Thick paper? The edges look like they’re wearing tiny shoulder pads. Thin paper? It’s sleekuntil your keys decide to chew on it. The best “aha” moment is realizing that a paper wallet works best when you keep it minimalist. Two to four cards and a couple bills? Great. Your entire collection of punch cards for frozen yogurt? Not so much.
Then there’s the crease learning curve. A timid crease is like a weak handshake: it doesn’t inspire confidence. People often report that their second wallet is dramatically better than the firstnot because the steps changed, but because their folds got bolder. Using the edge of an old gift card to press the folds is a game-changer. Suddenly the wallet lays flatter, the pockets grip better, and it looks less like “paper that had a rough day.”
Next comes the humidity and spill reality. If you live somewhere humid, or you’ve ever kept a wallet in a pocket during a long summer day, you already know moisture is paper’s nemesis. Many people end up doing one of two things: (1) accepting that their paper wallet is a “temporary hero,” or (2) upgrading with clear tape or tougher material. The taped version often becomes the favorite because it still folds like paper but resists the usual wearespecially at the spine.
Another common experience is the social reaction. When you pull out a folded paper wallet at a coffee shop, somebody will notice. The reactions range from “That’s adorable” to “Is that… legal tender storage?” And yes, it can spark actual conversations. People ask how you made it, what paper you used, and whether you’re secretly a wizard who can fold anything into anything. (You are. Welcome.)
Finally, there’s the customization spiral. You make one wallet, then think, “What if I add a pocket?” Then, “What if it had a secret flap?” Then, “What if I color-code wallets for travel currencies?” Before you know it, you’ve got a small stack of wallets and a strong opinion about paper thickness. That’s normal. That’s growth. And if a fold fails? That’s not a failureit’s a test prototype. Scientists have labs; you have a recycling bin.
The biggest takeaway from real-world use is simple: an origami wallet is at its best when you treat it like a clever, lightweight tool. Keep it slim, crease it confidently, and don’t be afraid to reinforce it if you want it to survive daily carry. Whether you use it as a travel backup, a gift card holder, or your everyday minimalist wallet, the experience is the same: you’ll never look at “just a sheet of paper” the same way again.