Table of Contents >> Show >> Hide
- What Does It Mean to Boot a Raspberry Pi Over USB?
- Why Boot Your Pi Over USB Instead of microSD?
- Which Raspberry Pi Models Support USB Boot?
- What You Need Before You Start
- How to Boot Your Pi Over USB: Step-by-Step
- USB Boot vs NVMe Boot on Raspberry Pi 5
- Common Problems and How to Fix Them
- Best Use Cases for USB Boot
- Security and Backup Tips
- Practical Experience: Lessons From Booting a Pi Over USB
- Conclusion
Booting a Raspberry Pi from USB is one of those upgrades that feels small until you try it. One minute your tiny board is shuffling along from a microSD card; the next, it is starting from a USB SSD like it found a gym membership and actually used it. For makers, homelab builders, media-server fans, classroom tinkerers, and anyone tired of corrupt cards, learning how to boot your Pi over USB can make the whole Raspberry Pi experience faster, sturdier, and much less dramatic.
The idea is simple: instead of loading Raspberry Pi OS from a microSD card, your Pi starts from a USB mass storage device such as a flash drive, SATA SSD in a USB adapter, or external USB SSD enclosure. On newer Raspberry Pi boards, this is often straightforward. On older boards, it may require enabling a boot mode or updating firmware first. Either way, the reward is worth it: better reliability, more storage space, easier backups, and fewer “why did my server disappear again?” moments.
What Does It Mean to Boot a Raspberry Pi Over USB?
To boot your Pi over USB means the Raspberry Pi firmware looks for an operating system on a USB storage device and starts from that drive. The USB device replaces the microSD card as the main boot media. This is different from simply plugging in a USB drive after the system has already started. In a true USB boot setup, the root filesystem, boot files, applications, logs, and user data can all live on the USB drive.
In practical terms, the Raspberry Pi treats the USB drive as its main disk. You can flash Raspberry Pi OS directly to the USB storage device using Raspberry Pi Imager, plug it into the Pi, remove the microSD card if needed, and power on. If the board and bootloader are ready, the Pi should detect the drive and begin booting.
Why Boot Your Pi Over USB Instead of microSD?
MicroSD cards are convenient, cheap, and tiny enough to vanish into the same alternate dimension as lost socks. They are also not always ideal for long-running Raspberry Pi projects. If your Pi is logging data, running Home Assistant, hosting a website, managing Docker containers, or acting as a media server, constant writes can wear out lower-quality cards over time.
Better Reliability
A good SSD is generally more durable for write-heavy workloads than a typical microSD card. If your Raspberry Pi runs 24/7, this matters. Databases, logs, browser caches, container images, and frequent updates all create disk activity. USB SSD booting gives those tasks a healthier home.
Improved Performance
On Raspberry Pi 4 and Raspberry Pi 5, USB 3.0 ports can deliver much better storage performance than many microSD cards. Boot times may improve, applications may launch faster, and tasks involving lots of small file reads and writes can feel noticeably smoother. A Raspberry Pi will not magically turn into a workstation-class PC, but with an SSD it may stop acting like it is carrying groceries uphill.
More Storage Space
USB SSDs and flash drives are easy to find in sizes far larger than typical microSD cards. For a media library, development box, local backup server, retro gaming setup, or personal cloud, starting with 250GB, 500GB, or 1TB of storage makes life easier.
Easier Cloning and Maintenance
USB drives are simple to connect to another computer for imaging, cloning, resizing, repairing, or backing up. You can also keep a spare boot drive ready. If your main system fails, swapping drives is faster than rebuilding everything from scratch while whispering unkind things at your keyboard.
Which Raspberry Pi Models Support USB Boot?
USB boot support depends on the Raspberry Pi model and its bootloader configuration. Newer boards are much friendlier than older ones.
Raspberry Pi 5
Raspberry Pi 5 supports booting from USB mass storage and can also boot from NVMe storage through its PCIe interface when properly configured. For USB boot, you can use a USB SSD or flash drive. For NVMe boot, you need compatible M.2 hardware such as an M.2 HAT or PCIe adapter. USB boot remains one of the easiest paths because it does not require opening the PCIe world or wrestling with ribbon cables that seem designed to test your patience.
Raspberry Pi 4 and Raspberry Pi 400
Raspberry Pi 4 and Raspberry Pi 400 support USB mass storage boot through the EEPROM bootloader. Early Raspberry Pi 4 boards may need a bootloader update before USB boot works reliably. Most modern setups can be prepared using Raspberry Pi Imager, Raspberry Pi OS, or the Raspberry Pi configuration tools.
Raspberry Pi 3B+, Zero 2 W, and Some Earlier Boards
Raspberry Pi 3B+ and Raspberry Pi Zero 2 W support USB mass storage boot more directly than the original Raspberry Pi 3B. On Raspberry Pi 3B, 3A+, Compute Module 3, and some Raspberry Pi 2B revisions, you may need to enable USB host boot mode by programming an OTP bit. OTP means one-time programmable, which is the hardware version of “measure twice, click once.” Once set, it cannot be undone.
Older Raspberry Pi Boards
Older models can be more limited. Some may require a microSD card containing only boot helper files while the main operating system lives on USB. This can still reduce microSD wear because the card is only used at startup, but it is not the same clean no-card USB boot experience available on newer boards.
What You Need Before You Start
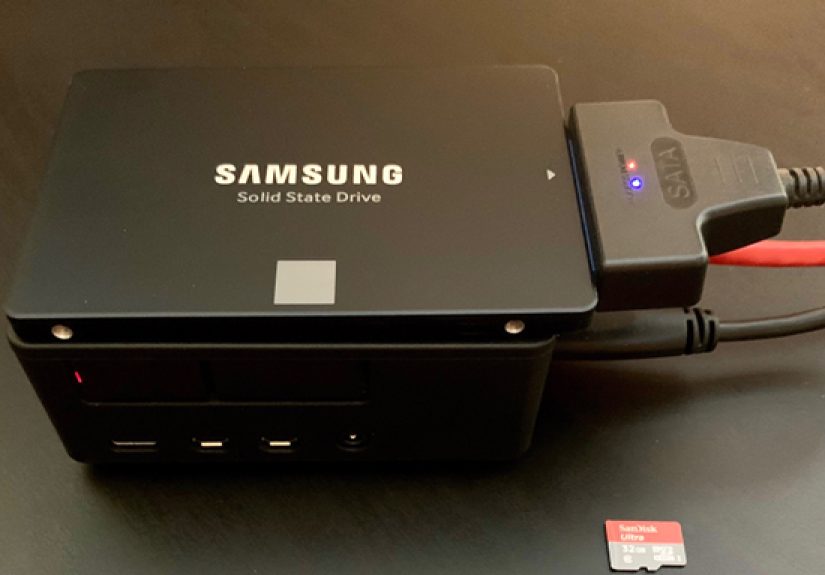
Before booting your Pi over USB, gather the right pieces. The process is not difficult, but weak hardware choices can turn a simple upgrade into a mystery novel where the culprit is always the cable.
Recommended Hardware
- A Raspberry Pi model that supports USB mass storage boot
- A reliable USB SSD, SATA SSD with USB adapter, or quality USB flash drive
- A proper power supply for your Raspberry Pi model
- Raspberry Pi Imager installed on a Windows, macOS, or Linux computer
- An optional microSD card for bootloader updates or recovery
- A powered USB hub if your external drive needs more power than the Pi can provide
For best results, use an SSD rather than a bargain-bin flash drive. USB flash drives work, but many are slower and less durable than SSDs. If your project writes data often, an SSD is the safer long-term choice.
How to Boot Your Pi Over USB: Step-by-Step
The exact path varies by model, but the general workflow is easy: update the Pi, set the boot order, flash the USB drive, connect it, and boot.
Step 1: Update Raspberry Pi OS and Firmware
If you already have Raspberry Pi OS running from a microSD card, update the system first. Open a terminal and run:
After rebooting, check whether the bootloader is current:
If an update is available on Raspberry Pi 4 or Raspberry Pi 5, apply it with:
Updating helps ensure the Pi knows how to search for USB boot devices and use current boot behavior.
Step 2: Set the Boot Order
On Raspberry Pi 4, Raspberry Pi 5, and related EEPROM-based boards, the bootloader uses a boot order. This tells the Pi where to look first: SD card, USB mass storage, NVMe, network, or another supported source.
The easiest method is raspi-config:
Navigate to:
Choose a USB boot option. A common setup is USB first, then SD card as fallback. This lets the Pi boot from your SSD when it is attached but still recover from a microSD card if needed.
Advanced users can edit EEPROM configuration directly:
For example, a boot order such as 0xf14 means the Pi tries USB mass storage first, then SD card, then repeats. A boot order such as 0xf41 tries SD first, then USB. Unless you enjoy surprise boots from the wrong device, choose carefully.
Step 3: Flash Raspberry Pi OS to the USB Drive
Open Raspberry Pi Imager on your computer. Select Raspberry Pi OS or another compatible operating system, choose your USB SSD or flash drive as the target storage, and write the image. Double-check the target drive before clicking write. Raspberry Pi Imager does not politely preserve your vacation photos if you select the wrong disk.
You can also configure username, password, Wi-Fi, SSH, hostname, and locale settings in Imager before writing. This is especially useful for headless setups where you do not plan to connect a keyboard and monitor.
Step 4: Connect the USB Drive to the Pi
For Raspberry Pi 4 and Raspberry Pi 5, connect the SSD to a USB 3.0 port when possible. These are the faster blue USB ports on Raspberry Pi 4. Raspberry Pi 5 also provides high-speed USB ports suitable for external drives. If using a SATA-to-USB adapter, pick one known to work well with Linux and Raspberry Pi boards.
Remove the microSD card if your boot order still prefers SD first. Then power on the Pi. The first boot may take a little longer while the filesystem expands and the operating system completes setup.
Step 5: Confirm You Booted From USB
Once the Raspberry Pi starts, verify that the root filesystem is on the USB drive. Run:
You should see your USB drive listed, often as /dev/sda, with boot and root partitions mounted. You can also check:
If the root mount points to the USB device, congratulations. Your Pi is now booting over USB, and your microSD card can go take a well-earned nap.
USB Boot vs NVMe Boot on Raspberry Pi 5
Raspberry Pi 5 adds a tempting option: NVMe boot through PCIe. NVMe can be faster than USB SSD storage, especially for demanding workloads. However, it requires an M.2 HAT or adapter, correct PCIe configuration, and a compatible drive. USB boot is simpler and often fast enough for most users.
Choose USB boot if you want easy setup, external access, and broad compatibility. Choose NVMe boot if you want a cleaner internal build, higher performance potential, and do not mind extra hardware. For many home servers, development boxes, and general desktop experiments, USB SSD boot is the sweet spot.
Common Problems and How to Fix Them
The Pi Ignores the USB Drive
First, check the boot order. If SD card boot is first and a microSD card is inserted, your Pi may start from that instead. Remove the microSD card or set USB first. Also confirm that the USB drive was flashed correctly and contains a valid Raspberry Pi OS image.
The Drive Works on a PC but Not on the Pi
Some USB-to-SATA adapters and enclosures behave strangely with Raspberry Pi boot firmware. If the drive is not detected, try another adapter, another cable, or a powered USB hub. Cheap cables can cause boot failures that look like software problems. The cable is innocent-looking, which is how it gets you.
Random Freezes or Reboots
Power is the usual suspect. External SSDs can draw more current during startup than the Pi can comfortably provide, especially with other USB devices attached. Use the official power supply for your model, avoid weak phone chargers, and consider a powered hub or self-powered enclosure.
Slow Performance
Make sure the drive is connected to a USB 3.0 port on models that have one. Also remember that not all USB flash drives are fast. A decent SATA SSD in a good USB 3 enclosure usually beats a tiny promotional flash drive that came free with a conference badge in 2014.
Bootloader Recovery Is Needed
If boot settings become messy, you can reflash or reset the bootloader using a recovery image created with Raspberry Pi Imager. This is useful when experimenting with boot order, EEPROM settings, or a Pi that refuses to start normally.
Best Use Cases for USB Boot
USB boot is useful anywhere the Raspberry Pi needs dependable storage. A Home Assistant server benefits from fewer SD card failures. A Pi-hole DNS server gains reliability. A Plex or Jellyfin media box gets more room for libraries and metadata. A small web server or Git server enjoys better write endurance. A retro gaming console gains space for ROMs and save files. A classroom lab can clone drives quickly and reset systems between lessons.
For developers, USB boot also makes testing easier. You can keep multiple SSDs with different operating systems or project environments. Swap drives, reboot, and you are in a different setup without rewriting microSD cards all afternoon.
Security and Backup Tips
Once your Pi boots from USB, treat that drive like a real system disk. Change default passwords, enable SSH keys if using remote login, keep packages updated, and back up important files. SSDs are reliable, not immortal. They are storage devices, not magical data vaults guarded by tiny dragons.
For backups, you can clone the USB drive periodically using disk imaging software on another computer. You can also back up important directories with tools like rsync. If your Pi runs services, export configuration files and database backups regularly. A bootable spare drive is a beautiful thing when a project matters.
Practical Experience: Lessons From Booting a Pi Over USB
The first lesson from real-world USB booting is that the storage drive is only half the story. The adapter matters just as much. A high-quality SSD connected through a flaky USB enclosure can behave worse than a modest drive in a reliable adapter. If your Pi fails to boot, hangs during startup, or vanishes after a few hours, do not immediately blame Raspberry Pi OS. Try another cable, port, enclosure, or power source before rebuilding the system.
The second lesson is that power problems are sneaky. A Raspberry Pi may appear to boot normally and then freeze when the SSD draws extra current. This often happens during updates, database writes, or heavy file transfers. The fix is usually boring but effective: use the correct official power supply, avoid long thin USB cables, and use a powered USB hub when the drive needs more current. Boring fixes are not glamorous, but neither is reinstalling your server at midnight.
The third lesson is to choose your storage based on the project. For a temporary test bench, a USB flash drive may be fine. For a 24/7 server, use an SSD. For a Raspberry Pi 4, a SATA SSD over USB 3.0 is often an excellent balance of speed, price, and simplicity. For a Raspberry Pi 5, USB SSD boot is still easy, while NVMe is attractive when you want a compact high-performance build. Do not overbuy for a simple sensor project, but do not run a database on a fragile no-name flash drive either.
The fourth lesson is that boot order can save you from trouble. Setting USB first and SD card second gives you convenience. If the USB drive is attached, the Pi boots from it. If something goes wrong, you can insert a recovery microSD card and repair the system. For remote systems, consider how you will recover from failure before you need to. Future-you deserves kindness, snacks, and a bootable backup.
The fifth lesson is to document your setup. Write down the Pi model, boot order, operating system version, drive model, adapter model, and any custom configuration. When everything works, documentation feels unnecessary. When something breaks three months later, documentation feels like a love letter from your past self.
Finally, USB booting changes how a Raspberry Pi feels. It becomes less like a disposable experiment and more like a dependable small computer. Updates finish faster. Services feel steadier. Backups are easier. Storage expansion becomes less annoying. The Pi still has limits, of course; it is not going to replace a rack server just because you gave it an SSD. But for many projects, USB boot is the upgrade that makes the difference between “cute little board” and “surprisingly capable machine.”
Conclusion
Booting your Pi over USB is one of the best upgrades you can make to a Raspberry Pi. It improves reliability, expands storage, simplifies maintenance, and can make everyday performance feel much snappier. Newer boards like Raspberry Pi 4, Raspberry Pi 400, and Raspberry Pi 5 make the process fairly simple with updated bootloaders and Raspberry Pi Imager. Older models may need extra steps, but many can still benefit from USB mass storage boot or hybrid boot methods.
The winning formula is straightforward: use a compatible Raspberry Pi, update the bootloader, set the correct boot order, flash Raspberry Pi OS to a reliable USB drive, and verify that the system starts from USB. Add a good power supply and a dependable adapter, and your Pi will be ready for bigger, more durable projects. In the tiny-computer world, that is about as satisfying as it gets.
Note: This article was written from current, real-world Raspberry Pi USB boot behavior, official bootloader concepts, and practical SSD boot troubleshooting experience. Always check model-specific requirements before changing OTP or EEPROM settings.


