Table of Contents >> Show >> Hide
- Why a Window Bench With Drawers Is Worth Building
- Before You Build: Planning the Bench the Smart Way
- Best Materials for a DIY Window Bench Seat
- Tools You Will Likely Need
- How to Build a Window Bench Seat With Drawer Storage
- Design Tips That Make the Finished Bench Better
- Common Mistakes to Avoid
- Is a DIY Window Bench Seat With Drawer Storage Beginner-Friendly?
- Budget Expectations
- Real-Life Experience: What Building One Actually Feels Like
- Conclusion
Note: This article is written for web publishing in standard American English and is designed to be easy to copy, paste, and edit. Always confirm your own measurements, wall conditions, and local code requirements before cutting wood or attaching anything to a wall.
Some home projects are flashy. Others are practical. A DIY window bench seat with drawer storage is the rare overachiever that manages to be both. It gives you a cozy place to read, sip coffee, hide clutter, admire the rain, and pretend you live in the sort of house where everyone casually folds throw blankets for fun.
Better yet, this project makes good use of that awkward under-window zone that often ends up as wasted space. A well-built window bench can add seating, improve organization, and make a room feel custom without requiring a full renovation budget. If you build it with drawers, it becomes even more useful because now your bench is not just pretty, it is secretly working a second job.
In this guide, you will learn how to plan, build, and finish a window bench seat with drawer storage that looks built-in, feels sturdy, and actually functions the way real households need it to. We will cover sizing, materials, frame construction, drawer planning, finishing details, and the small choices that separate “custom charm” from “weekend chaos with sawdust.”
Why a Window Bench With Drawers Is Worth Building
A window bench already earns points for style, but drawers make it far more practical. Instead of lifting a top every time you need a blanket or game board, you can pull out a drawer and grab what you want without performing furniture gymnastics.
This type of built-in works especially well in living rooms, bedrooms, breakfast nooks, mudrooms, and home offices. In a small room, it can replace extra chairs. In a family home, it becomes a hiding place for toys, shoes, books, craft supplies, seasonal decor, or the mysterious tangle of chargers everyone swears they still need.
And unlike freestanding benches, a built-in version can be customized to your exact wall length, window width, and storage needs. You can take it wall to wall for a more architectural look, or build it just under the window for a classic reading nook feel.
Before You Build: Planning the Bench the Smart Way
Measure Everything Twice
The most important step is not cutting wood. It is measuring the space correctly before you get anywhere near a saw. Start with the full width of your intended bench area. Then measure from the floor to the windowsill, and from the wall out into the room to decide how deep the seat should be.
A comfortable bench seat is usually around 16 to 20 inches deep, and many designers keep the final bench height in the range of a standard chair. That usually lands around 18 to 23 inches, depending on the room and who will use it. If your bench goes too high, it can interfere with the window visually and practically. If it is too low, it may feel more like a stage prop than a seat.
Also watch for trim, baseboards, outlets, floor vents, and uneven walls. Old houses love surprises. They treat square corners like optional suggestions.
Decide What the Drawers Will Store
Do not just say, “It will hold stuff.” That is how you end up building drawers too shallow for blankets and too deep for books. Decide in advance what belongs inside: shoes, baskets, linens, puzzles, board games, pet gear, or extra pillows. Storage should follow real life, not your fantasy version of life where every item is neatly categorized in matching bins.
If you want easy everyday access, drawers are ideal. If you want maximum volume and do not mind lifting a lid, a flip-top seat works too. But for a window bench seat with drawer storage, the drawers are the real stars of the show.
Choose a Style That Matches the Room
You can build a clean modern bench with flat drawer fronts, a traditional bench with trim and molding, or a farmhouse-style bench with a painted base and warm wood top. If the room already has built-ins, match their proportions and details. If the room is simple, keep the bench simple too.
A built-in should look like it belongs there, not like it wandered in from an unrelated Pinterest board.
Best Materials for a DIY Window Bench Seat
Frame Materials
Most DIY builders use 2×4 lumber for the internal frame because it is sturdy, widely available, and beginner-friendly. If you are creating a box-style base instead of a wall-anchored frame, plywood panels can also do the job, especially if you want a cleaner, cabinet-like structure.
Bench and Face Materials
Cabinet-grade plywood is one of the best choices for the visible parts of the bench. It is strong, stable, easier to finish neatly, and holds fasteners better than many lower-cost sheet goods. If you plan to paint the whole unit, MDF can work well for trim, drawer fronts, and some interior parts because it cuts smoothly and paints beautifully. The catch is moisture. MDF does not love water, so it is best used indoors in dry conditions and sealed properly.
If your window area gets condensation, strong sunlight, or occasional dampness, lean more heavily on plywood for the structural and exposed components.
Drawer Materials
For drawer boxes, plywood is usually the better long-term choice because it is lighter and stronger. For drawer bottoms, thinner plywood often works well. Drawer fronts can be made from plywood, MDF, or pre-primed trim panels depending on the look you want.
Hardware
Use quality drawer slides. This is not the place to get dramatic with bargain hardware. Side-mount ball-bearing slides are durable and common, and many offer full extension so you can reach the stuff in the back without sacrificing a shoulder. Undermount slides look cleaner because they are hidden, and they can give you slightly more interior drawer width, but they require more precise drawer construction.
If you want your bench to feel custom and smooth, soft-close slides are a nice upgrade. They also reduce the number of dramatic drawer slams in your home, which is a public service.
Tools You Will Likely Need
- Tape measure
- Level
- Stud finder
- Circular saw or table saw
- Drill/driver
- Countersink bit
- Clamps
- Brad nailer or finish nails
- Orbital sander
- Wood glue
- Caulk, wood filler, primer, and paint or stain
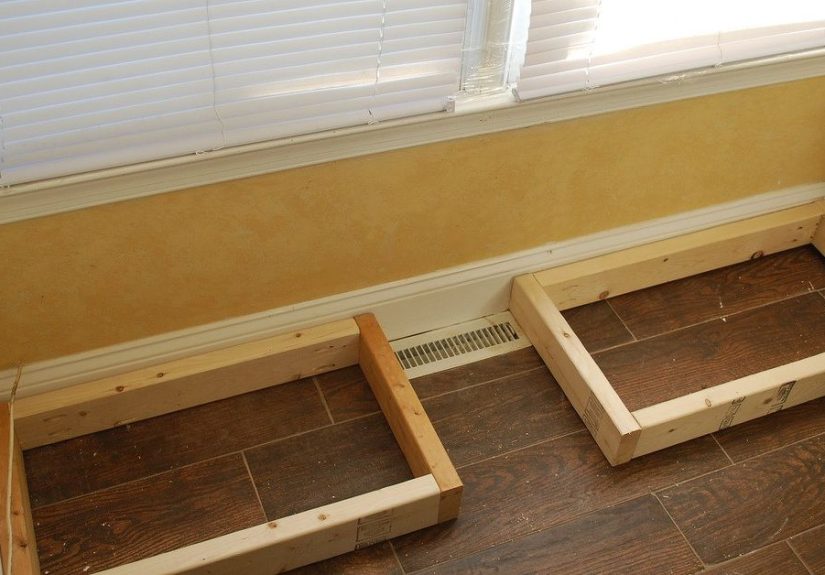
How to Build a Window Bench Seat With Drawer Storage
Step 1: Create the Layout
Mark the full footprint of the bench on the wall and floor. Use a level to check for any slope in the floor or window area. Mark your studs clearly because the frame should anchor into them. Remove baseboards where the bench will sit so the structure can fit tight to the wall.
If you are building wall to wall, measure both the front and back widths. In older homes, those numbers may not match. That is not you failing. That is the house expressing its personality.
Step 2: Build the Base Frame
Build a rectangular base from 2x4s sized to your final bench footprint, minus the thickness of any face panels and trim. Then build the upper frame in the same way. Connect the two with vertical supports to create a sturdy box.
Add internal bracing where drawer dividers will go. These supports matter because the bench needs to carry body weight on top while keeping drawer openings square below. A wobbly frame will create cranky drawers, and cranky drawers never become less cranky over time.
Slide the frame into place, shim as needed to make it level, and fasten it securely into wall studs. If the wall is out of plumb, use filler strips or shims where necessary rather than forcing the frame into a twist.
Step 3: Plan the Drawer Openings
Now decide how many drawers you want. Three is a common choice for a medium bench. Two large drawers can look clean and modern, while four smaller drawers may work better if multiple people will use the storage.
Keep the openings symmetrical unless there is a good reason not to. Symmetry helps a built-in look intentional. Also leave enough space for slide clearance. Many side-mount slides need about a half inch of clearance on each side of the drawer box, so double-check your hardware specs before you cut anything.
Step 4: Skin the Frame
Attach plywood to the front and sides of the frame to create a clean outer shell. Cut openings for the drawers carefully. A face frame can be added for a more cabinet-style look, or you can use a flat overlay design if you prefer modern lines.
The bench top can be made from plywood topped with trim, a thicker hardwood panel, or even butcher block if you want a warm wood finish. If the top will be painted, many DIYers use plywood with a finished front edge or trim banding.
Step 5: Build the Drawers
Build each drawer box square and consistent. This matters more than almost anything else in the drawer phase. Even fancy slides cannot save a drawer box that was built like it lost an argument with the measuring tape.
Cut the drawer sides, front, back, and bottom. Assemble with wood glue and screws or brad nails, depending on your method and material thickness. Check each box for square before the glue sets. Install the drawer bottoms securely and sand all sharp edges.
If you choose side-mount slides, install the cabinet-side members level and parallel inside the bench base, then attach the matching pieces to the drawer boxes. Test fit each drawer before attaching the fronts.
Step 6: Attach Drawer Fronts
Once the drawer boxes glide smoothly, attach the drawer fronts. Use spacers to keep the gaps even. This is where the project starts looking polished. You can use slab fronts for a simple style, shaker fronts for a classic built-in feel, or trimmed flat panels for something in between.
Add knobs, cup pulls, or slim bar pulls depending on your room style. If you want a minimalist look, routed finger pulls or touch-latch hardware can work too, though they demand more precision.
Step 7: Add Trim and Finish Details
Install baseboard trim, side trim, and any molding that helps the bench blend with the room. Caulk the joints, fill nail holes, sand smooth, and apply primer before painting. If you are staining the top, finish that separately and protect it well during the painting process.
These final details are what make a DIY built-in look custom rather than homemade in the “we tried our best and then stopped caring” sense.
Design Tips That Make the Finished Bench Better
Use a Cushion, but Do Not Overstuff It
A bench cushion makes the seat more comfortable, but keep the thickness balanced. If it is too thick, the seat can look bulky and sit too high. A tailored cushion with piping or a removable cover usually looks cleaner than an overstuffed pad trying to impersonate a mattress.
Think About Sunlight
If the window gets strong daylight, choose durable fabric for the cushion and pillows. Fade-resistant material earns its keep quickly in a sunny nook.
Make the Storage Easy to Use
Deep drawers are wonderful, but only if they open fully and do not catch on the rug. If the bench sits in a tight room, confirm the drawers have enough clearance to open comfortably.
Hide Ugly Things Beautifully
The best part of drawer storage is that it hides the not-so-decorative parts of life. Phone chargers, dog leashes, puzzle boxes missing two pieces, emergency gift bags, and winter gloves that somehow become single by February all disappear into the bench. Magic? No. Good millwork.
Common Mistakes to Avoid
- Skipping stud attachment: A built-in bench should be anchored securely, not just resting against drywall.
- Ignoring slide clearance: Drawer openings must match the requirements of your chosen hardware.
- Using the wrong material in a damp area: MDF is smooth and paint-friendly, but it can swell if exposed to moisture.
- Building too deep or too high: A bench that looks dramatic but feels awkward will not get used much.
- Rushing the finish work: Caulk, filler, sanding, and paint touch-ups are what turn a good project into a great one.
Is a DIY Window Bench Seat With Drawer Storage Beginner-Friendly?
Yes, with a caveat. This project is beginner-friendly if you keep the design simple, use straight walls, choose straightforward drawer hardware, and go step by step. It becomes more advanced when the space includes bay windows, uneven floors, radiator workarounds, detailed trim, or fancy drawer systems.
If you are new to building, a smart approach is to keep the bench shape rectangular, use cabinet-grade plywood and simple overlay drawer fronts, and install reliable full-extension side-mount slides. You will still get a custom look without needing the patience of a museum conservator.
Budget Expectations
The total cost depends on your size, finish, and hardware choices. A simple painted bench with plywood, basic trim, and standard slides can stay fairly reasonable. Once you add premium hardwood tops, soft-close undermount slides, custom cushion work, and decorative molding, the price climbs quickly.
Still, compared with many custom built-ins, a DIY window bench seat with drawer storage can deliver a lot of function and charm for the money. It is one of those projects that feels expensive once it is done, which is exactly the kind of deception most homeowners enjoy.
Real-Life Experience: What Building One Actually Feels Like
If you have never built a window bench before, here is the truth: the project starts with excitement, briefly wanders into self-doubt, and usually ends with you standing in the room saying, “Okay, that actually looks really good.” The early phase is fun because it feels full of possibility. You picture the finished seat, the cushion, the baskets, the books, the sunlight. Then you start measuring and learn that your window is not centered, your floor is not level, and your wall appears to have been built during an era when tape measures were considered optional.
That is normal. In fact, that is the real DIY experience. The most successful builders are not the ones who avoid problems. They are the ones who expect little surprises and keep going without throwing a pencil across the room.
One of the biggest lessons people learn from this project is that the frame stage matters far more than the pretty stage. When the skeleton is square, level, and anchored well, almost everything else becomes easier. When the frame is rushed, every later step becomes a negotiation. Drawer slides refuse to cooperate. Gaps look uneven. Trim suddenly seems personal. So if there is one “been there, built that” piece of advice worth repeating, it is this: spend extra time getting the base right.
Another common experience is realizing how much hardware quality changes the final result. Cheap slides can make a beautiful bench feel clunky. Good slides make a DIY project feel custom. The same goes for paint prep. Sanding feels boring in the moment, but after the final coat dries, you understand why smooth surfaces and clean edges are worth the effort.
And then there is the oddly satisfying part: using the bench for the first time. Someone sits there with coffee. A child climbs up with a book. Shoes disappear into drawers instead of migrating across the floor. The bench starts acting like it has always belonged in the room. That is the reward of a good built-in. It does not just look nice in photos. It changes how the room works every day.
So yes, the build may include sawdust in your socks, a few muttered complaints, and at least one trip back to the store because of a measurement mishap. But once it is done, you get a piece that is equal parts seating, storage, and “I made that.” And that is a very nice thing to sit on.
Conclusion
A DIY window bench seat with drawer storage is one of the smartest upgrades for homeowners who want more function without giving up style. It turns unused wall space into a practical feature, adds custom charm to almost any room, and gives everyday clutter a place to disappear. With thoughtful measurements, solid materials, dependable drawer hardware, and patient finishing work, you can build a bench that looks polished and works hard for years.
In other words, this is not just a bench. It is a seat, a storage system, a design feature, and a quiet little victory over household chaos.