Table of Contents >> Show >> Hide
- Before You Reattach Anything, Figure Out What Actually Failed
- Signs a Rebond Repair Has a Decent Chance of Working
- Signs You Should Skip DIY and Call a Convertible Top or Upholstery Specialist
- What You Will Need
- How to Reattach Rear Window Glass to a Convertible Car Top
- Step 1: Work in the right environment
- Step 2: Inspect the top frame and window alignment
- Step 3: Clean the bonding surfaces properly
- Step 4: Dry-fit the glass before committing
- Step 5: Repair fabric-to-fabric failure first
- Step 6: Apply the correct adhesive system
- Step 7: Hold the glass in place without distorting it
- Step 8: Keep the top closed while the bond cures
- Step 9: Test for leaks gently
- Best Adhesives and Sealers for the Job
- When a Rear Window Section or Full Top Replacement Is the Smarter Move
- Mistakes That Cause Repeat Failures
- How to Prevent the Rear Window from Separating Again
- Real-World Experiences and Lessons from Convertible Owners and Trim Shops
- Final Thoughts
Few automotive betrayals feel more personal than hearing a weird flap-flap sound, checking your rearview mirror, and realizing your convertible’s rear window is slowly trying to leave the relationship. One day it is a stylish soft top. The next day it is a drafty science experiment with trust issues.
The good news is that rear window glass separation is a common convertible problem, especially on aging cloth and vinyl tops. The less-good news is that there is no one-size-fits-all repair. Sometimes the fix is a careful rebond. Sometimes it is a temporary leak-seal. And sometimes the top is telling you, in the most expensive voice possible, that it wants a new rear window section or an entirely new top.
If you want the repair to last, the first step is not squeezing adhesive everywhere like you are decorating a cupcake. The first step is understanding what failed, choosing the right repair path, and resisting the temptation to use whatever mystery glue is currently rolling around in your garage.
Before You Reattach Anything, Figure Out What Actually Failed
When rear window glass pulls away from a convertible car top, the problem usually falls into one of three categories. The repair gets much easier once you know which one you are dealing with.
1. Minor leak at the edge
If the window is still structurally attached and you are mainly dealing with a tiny gap, a little water intrusion, or a draft, you may only need a leak-sealing product. This is the lightest-duty scenario. Think of it as weatherproofing, not rebuilding.
2. True glass-to-top bond failure
This is the classic “rear window separating from canvas” problem. The glass is intact, the top still has decent shape, but the bond between the glass assembly and the surrounding top material has let go. In this case, a proper reattachment may work if the fabric is still flexible, the gap is manageable, and the frame has not gone out of alignment.
3. Shrinkage, seam failure, or rotten top material
This is where DIY optimism goes to die. If the top material has shrunk, the fabric is brittle, the seam has failed, or the window keeps pulling away because the top is under constant tension, a simple rebond is usually a short-lived fix. You may need a new rear window section, new curtain assembly, or a full top replacement.
Here is the simple rule: if the window is separating because the top is old, stiff, torn, or misshapen, adhesive alone will not magically reverse aging. If only the bond failed and the surrounding structure is still healthy, reattachment is much more realistic.
Signs a Rebond Repair Has a Decent Chance of Working
- The glass is not cracked or chipped around the bonding area.
- The fabric around the window is still flexible and not crumbling.
- The separation is limited rather than dramatic all the way around.
- The top can close normally without forcing the fabric into place.
- The window section still lines up naturally with the surrounding top.
- The rear defroster wiring and connectors are intact.
Signs You Should Skip DIY and Call a Convertible Top or Upholstery Specialist
- The top material has visibly shrunk.
- The fabric is tearing, fraying, or dry-rotted around the glass.
- The seam behind the window has failed.
- The glass has detached across a large area or more than once.
- The top frame is bent, rusty, or no longer closes squarely.
- You see multiple leaks, mold, or water-damaged interior trim.
At that point, you are not really “regluing a window.” You are trying to rescue a larger soft-top failure. That is usually professional territory.
What You Will Need
A lasting repair starts with the right category of materials, not just the right attitude. For a true reattachment, use an automotive glass urethane or a convertible-top bonding system designed for glass and top materials. For a minor seep or edge leak, a flowable automotive glass sealer may be enough. Those are different jobs, and confusing them is how people end up doing the same repair twice.
Useful supplies include painter’s tape, soft clamps or suction-cup style holding tools, nitrile gloves, eye protection, lint-free cloths, a gentle cleaner recommended by the adhesive maker, and trim-safe tools for accessing the area without damaging the top. A helper is also handy because glass has a sneaky talent for shifting the second you think you have it perfectly aligned.
What you should avoid: household super glue, random construction adhesive, hardware-store caulk used as a structural bond, and any “this was under the sink so I tried it” repair logic. Convertible tops remember that kind of disrespect.
How to Reattach Rear Window Glass to a Convertible Car Top
Step 1: Work in the right environment
Do the job indoors if possible. You want the top dry, clean, and out of direct sun, rain, and dust. Convertible-top repairs hate moisture, surprise breezes, and panic. A calm garage beats a sunny driveway every time.
Step 2: Inspect the top frame and window alignment
Before using adhesive, close the top gently and see how the fabric wants to sit against the glass. If you have to tug hard to make the material reach, that is a warning sign. If the frame is worn or misaligned, the bond may fail again because the top is pulling on the window every time you raise or lower it.
Step 3: Clean the bonding surfaces properly
Old loose adhesive, dirt, wax, and contamination are the enemies of a good bond. Clean the mating areas according to the adhesive system you are using. Do not improvise with harsh chemicals unless the product instructions specifically allow them. The goal is a clean, dry, properly prepared surface, not a chemistry experiment.
Step 4: Dry-fit the glass before committing
Place the glass where it naturally belongs and check the fit before adding adhesive. This is the moment to confirm that the edges line up, the top closes smoothly, and the fabric is not under absurd tension. Mark alignment points with low-tack tape if needed. Your future self will thank you when the window tries to drift half an inch to the left.
Step 5: Repair fabric-to-fabric failure first
If the folded edge or nearby fabric seam has separated, deal with that before rebonding the glass. Otherwise you are bonding to a section that is already unstable. Many repeat failures happen because the visible glass gap gets attention while the hidden fabric separation behind it gets ignored.
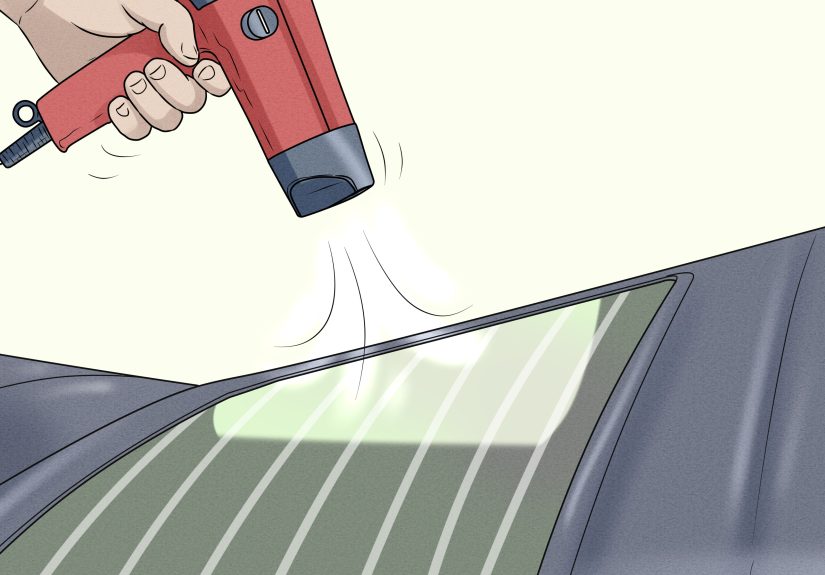
Step 6: Apply the correct adhesive system
For a structural reattachment, use the adhesive exactly as directed by the manufacturer. In general, you want a continuous, even bond line with no gaps, voids, or random thick blobs. A neat application is not just about looks. It helps reduce leaks and weak spots.
If you are sealing only a tiny leak where the bond is otherwise intact, a flowable glass sealer can sometimes do the job. But for a real separation, sealers are not a substitute for a proper bond. They are more like raincoats than surgery.
Step 7: Hold the glass in place without distorting it
Once the adhesive is applied, the glass has to stay where it belongs while the bond sets. Soft clamps, retention tape, or suction-based holding tools can help keep steady pressure without stressing the glass. Avoid over-clamping. You want contact and alignment, not a wrestling match.
Step 8: Keep the top closed while the bond cures
This part is where patience earns its paycheck. Do not lower the top early. Do not test the edge every 20 minutes. Do not slam the doors and then act surprised when the glass shifts. Let the adhesive cure based on product instructions, then give the top extra time in the closed position so the material can relax and settle into shape.
As a practical rule, convertible-top makers often recommend leaving a newly installed top and window assembly closed for a meaningful period after installation, especially with cloth tops. That is a smart principle to follow after a rebond too: the less movement during cure and early settling, the better.
Step 9: Test for leaks gently
Once the cure period is complete, do a gentle water test. Use a light stream rather than a pressure washer. You are checking for leaks, not interrogating the repair. If water gets in, stop and inspect the exact path. A tiny missed section may need targeted correction, but repeated leakage around a stressed edge can mean the top material itself is the problem.
Best Adhesives and Sealers for the Job
Automotive glass urethane
This is the right family of products for true glass bonding. It is designed for stationary automotive glass, stays flexible enough for vehicle use, and is built for weather exposure. If the rear window is pulling away from the top and the rest of the top is still healthy, this is usually the category worth considering.
Flowable windshield and glass sealer
This is best for small leaks, edge seepage, or voids where the structure is still intact. It flows into tiny spaces and can help weatherproof the area. It is not the hero you send into battle when the glass is halfway divorced from the top.
Double-sided tape and light heat
Some light-duty guides suggest tape-based reattachment for small separations. That can work as a temporary or limited repair on certain tops, but it is not usually the best long-term answer for a major glass-to-top bond failure. Think of it as an emergency room bandage, not a lifetime commitment.
When a Rear Window Section or Full Top Replacement Is the Smarter Move
Sometimes the best repair is admitting you are no longer dealing with a simple repair. Aftermarket convertible-top suppliers sell rear window sections for certain vehicles, and some tops can be repaired by replacing only the curtain or glass section. That can be a very smart middle ground between a tiny fix and a full top replacement.
In other cases, replacing the whole top is the economical choice in disguise. If the fabric is shrinking, seams are failing, weather seals are tired, and the window bond is peeling because the whole assembly is aging out, spending money on repeated reattachment attempts can feel cheap right up until it becomes expensive.
That is especially true if the rear window defroster wiring is damaged, the headliner has to come apart, or water has already started attacking carpet, seat foam, and trim. At that point, the convertible is not just leaking. It is auditioning to become a mold farm.
Mistakes That Cause Repeat Failures
- Using a sealer when the repair really needs structural adhesive.
- Bonding to dirty, damp, or contaminated surfaces.
- Trying to force shrunken fabric back onto the glass.
- Ignoring nearby fabric or seam separation.
- Lowering the top before the cure is complete.
- Cleaning glass or fabric with products that leave residue.
- Using too much heat and damaging the top or adhesive.
- Assuming “it looks lined up” is the same as “it is aligned under tension.”
How to Prevent the Rear Window from Separating Again
Once the repair is done, a little routine care goes a long way. Keep the top up and latched when the car is parked for long periods. Do not store the top wet. Check the weather seals and frame for wear. Clean the glass with a water-based cleaner, and do not let cleaner run into seams, heat seals, or defroster connections.
Also, pay attention to the top frame itself. Rust, sticky joints, and jerky movement create extra stress across the rear section. If the top does not move smoothly, the rear window bond may be taking the punishment for a frame problem that nobody bothered to fix.
Real-World Experiences and Lessons from Convertible Owners and Trim Shops
One of the most common owner experiences is discovering that the separation looked tiny at first, almost too minor to worry about. Maybe it started as a small gap at the lower edge of the rear glass. Maybe there was just a little fogging inside after a rainstorm or a faint musty smell in the cabin. Then a week later the gap widened, the top started buzzing at highway speed, and the rear parcel shelf turned into a sponge. That pattern matters, because early intervention is usually much kinder to both the car and the wallet.
Another recurring lesson is that a “successful” repair depends heavily on what failed. Owners who catch a limited bond failure early, clean the area correctly, stabilize the glass carefully, and let the repair cure without rushing often report much better results than people who try a five-minute parking-lot fix with the wrong adhesive. The difference is not magic. It is preparation, alignment, and patience.
Trim shops also see a steady parade of cars that were made harder to repair by enthusiastic shortcuts. The classic examples include household silicone smeared over the entire edge, random glue that soaked into the fabric, and repairs attempted while the top was wet, cold, or still under heavy tension. Those fixes may look heroic for about three days. After that, they usually become evidence.
There is also a strong pattern around shrinkage. Owners often assume the glass came loose first and the fabric problem happened later. In reality, the fabric may have been shrinking for months or years before the bond gave up. Once that shrinkage gets bad enough, even a careful reattachment can fail because the top is constantly trying to pull away from the glass. That is why experienced upholstery shops are quick to recommend a rear curtain replacement or a full new top when the material is stiff, undersized, or visibly tired.
Some of the best experiences come from people who accepted that convertible tops are not just fabric roofs. They are tensioned assemblies with glass, seams, frame movement, seals, wiring, and weather exposure all working together. Those owners tend to maintain the top in the closed position when stored, clean it correctly, keep the frame moving smoothly, and inspect small leaks before they become interior damage. In other words, they treat the top like a working part of the car instead of a decorative hat.
The honest takeaway from years of owner stories is refreshingly simple: a rear window rebond can absolutely be worth doing, but only when the surrounding top is still healthy enough to support it. When the top is worn out, the smartest “repair” is often replacement. It may not be the answer anybody wants, but it is usually the answer that keeps the rear window from trying to escape again the next time it rains.
Final Thoughts
If you are wondering how to reattach rear window glass to a convertible car top, the best answer is this: match the repair to the failure. A tiny leak may need only sealer. A clean, limited bond failure may respond well to a proper automotive urethane rebond. But a shrunken, brittle, or badly worn top is not asking for glue. It is asking for parts.
Take the time to inspect the top honestly, use products meant for automotive glass and convertible-top materials, and let the repair cure like you actually want it to last. Do that, and your convertible has a good chance of going back to being charming, stylish, and rain-resistant instead of acting like a rolling aquarium with trust issues.