Table of Contents >> Show >> Hide
- What’s the Difference Between a Thermocouple and a Flame Sensor?
- How to Tell Which Part Is Causing the Problem
- Safety First, Heroics Never
- Tools and Supplies You May Need
- How to Replace a Water Heater Thermocouple
- How to Replace a Water Heater Flame Sensor
- Step 1: Shut off gas and power completely
- Step 2: Remove the outer door and gain access
- Step 3: Remove the burner/manifold assembly if required
- Step 4: Clean before you replace, if appropriate
- Step 5: Install the new flame sensor
- Step 6: Inspect the burner door gasket before reassembly
- Step 7: Reassemble carefully
- Step 8: Leak-test and restart
- Common Mistakes to Avoid
- When Cleaning Is Enough and When Replacement Is Better
- When You Should Call a Pro
- Repair or Replace the Whole Water Heater?
- Conclusion
- Real-World Lessons From Replacing Thermocouples and Flame Sensors
- SEO Tags
Note: This guide covers residential gas storage water heaters, not electric units. Always match the replacement part to your exact model and serial number, and stop immediately if you smell gas, hear hissing, or find a damaged burner door or gasket.
When a gas water heater quits, it has a special talent for doing it right before a shower, right before guests arrive, or right when you finally decided to wash that mountain of dishes. In many cases, the trouble comes down to one small safety part: the thermocouple or the flame sensor. Tiny component, huge attitude.
The good news is that replacing one can be a manageable repair for a careful DIYer. The less-good news is that water heaters are not fond of guesswork, cross-threading, or “I watched half a video, so let’s wing it.” This guide walks you through how to replace a water heater thermocouple or flame sensor safely, how to tell which one you have, and when the smart move is to put the wrench down and call a pro.
What’s the Difference Between a Thermocouple and a Flame Sensor?
Thermocouple
A thermocouple is usually found on an older or more basic standing-pilot gas water heater. It sits right in the pilot flame and acts like a safety referee. If the pilot flame goes out, the thermocouple stops signaling the gas valve to stay open, and the gas shuts off. That is exactly what you want. Unlit gas floating around your utility room is not a fun surprise.
If your pilot lights but dies the moment you release the control knob, the thermocouple is one of the first suspects. On some models, you may also have a thermopile instead of a single thermocouple, but the troubleshooting idea is similar: the flame-sensing safety device is not keeping the gas valve satisfied.
Flame Sensor
A flame sensor is more common on newer water heaters with electronic ignition, especially power-vent and direct-vent models. Instead of babysitting a standing pilot all day, these systems ignite when needed and use the flame sensor to confirm that the burner flame is actually present. If the control board does not detect flame, it shuts off gas flow and may retry ignition or lock the system out.
In plain English: the thermocouple watches a pilot flame, while the flame sensor verifies burner flame in a more modern ignition setup. Same general mission, different hardware, different layout, and often a very different replacement procedure.
How to Tell Which Part Is Causing the Problem
Before ordering parts like a person panic-buying snacks before a storm, look at the symptoms.
- Pilot will not stay lit: often points to a bad, dirty, misaligned, or failing thermocouple.
- Burner tries to ignite but shuts down quickly: often points to a dirty or failing flame sensor, flame-proving issue, or ignition problem.
- Repeated lockouts or status-light fault codes: common on electronic ignition units with flame-sensing trouble.
- Weak, unstable, or oddly colored flame: may mean the problem is not the sensor at all, but drafts, low gas pressure, combustion-air trouble, soot buildup, or a dirty burner area.
- Pilot lights only after several attempts on a new install: there may simply be air in the gas line.
That last point matters. A bad sensor is not always the villain. Sometimes the flame is weak, lifting, dirty, or not touching the sensing element correctly. Replacing the part without fixing the flame is like buying new shoes because you tied the old ones badly.
Safety First, Heroics Never
Any repair involving natural gas or propane deserves a little humility. Before touching anything:
- Turn the water heater control to the lowest setting or OFF.
- Shut off the gas at the water heater and, if needed, the local shutoff valve.
- Disconnect electrical power on models with electronic ignition or power venting.
- Wait at least five minutes so residual gas can clear.
- Let hot components cool down.
- Use a flashlight, not an open flame, to inspect the burner area.
If you smell gas, do not relight anything. Do not keep troubleshooting. Do not tell yourself it is “probably fine.” Leave the area, shut off gas only if it is safe to do so, and contact your gas utility or a qualified technician.
Tools and Supplies You May Need
- Adjustable wrench or open-end wrenches
- Screwdriver or nut driver
- Flashlight
- Approved noncorrosive leak-detection solution
- Replacement thermocouple or OEM flame sensor assembly
- Work gloves
- Fine abrasive pad or ultra-fine steel wool for cleaning a flame sensor, if your manual allows it
- Your water heater’s model and serial number
That last item is not a joke. It is the difference between fixing the heater and standing in the aisle holding a “universal” part that is universal in the same way one-size-fits-all hats are universal.
How to Replace a Water Heater Thermocouple
Step 1: Confirm it’s worth replacing
If the thermocouple is just sooty, you may be able to clean it first. A light coating of carbon can interfere with proper sensing. But if the pilot still will not stay lit afterward, or the old part is corroded, bent, loose, or obviously worn out, replacement is the better play.
Step 2: Remove the access covers
Take off the outer access panel and any inner burner or pilot cover your model uses. Keep screws somewhere safe. Water heaters have a mystical ability to make one tiny screw disappear forever.
Step 3: Disconnect the old thermocouple
Follow the copper thermocouple tube back to the gas control valve. Loosen the connection carefully. Then free the thermocouple from the pilot bracket or pilot assembly. Some slide out; others are held by clips or screws.
Step 4: Match the replacement correctly
Match the new part to the original length, connection type, and mounting style. Avoid sharp bends and odd routing. On many water heaters, a basic universal thermocouple works, but some models are happier with brand-specific pilot kits. When in doubt, use the part recommended for your exact model.
Step 5: Install the new thermocouple
Seat the new thermocouple fully in the pilot bracket. Route it along the original path, avoiding kinks. Reconnect it to the gas valve carefully by hand first to avoid cross-threading. A common manufacturer instruction is to tighten the thermocouple connection finger-tight and then add about a quarter turn. Snug is good. Gorilla-mode is not.
Step 6: Make sure the tip sits in the flame correctly
The tip of the thermocouple needs to sit where the pilot flame will engulf it properly. If it is too far out of the flame, it cannot sense heat reliably. If the flame is weak, lazy, or yellow, you may have a combustion or gas-supply issue rather than a bad thermocouple.
Step 7: Relight the pilot and test
Follow the lighting instructions on the water heater label exactly. Many standing-pilot models require you to hold the pilot control down for around 60 seconds; some systems take longer. Once the pilot stays lit, turn the control back to ON and set the temperature. A safe, common target for most homes is 120 degrees Fahrenheit unless your household needs a different setting for a specific reason.
If the pilot now stays lit, congratulations. If it still drops out, the issue may be the pilot flame itself, the gas control valve, drafts, a clogged pilot, a thermal switch, or another combustion problem.
How to Replace a Water Heater Flame Sensor
Flame sensor replacement is usually more model-specific than thermocouple replacement. On many water heaters, the flame sensor is part of or mounted near the igniter assembly, and getting to it may involve removing the burner door or manifold assembly.
Step 1: Shut off gas and power completely
This is non-negotiable on an electronic ignition unit. Turn off the gas control, shut off the gas supply, and unplug or disconnect electrical power.
Step 2: Remove the outer door and gain access
Take off the outer door or front cover. Some units require disconnecting wiring harnesses from the gas control valve or control board before you can remove the manifold or burner assembly.
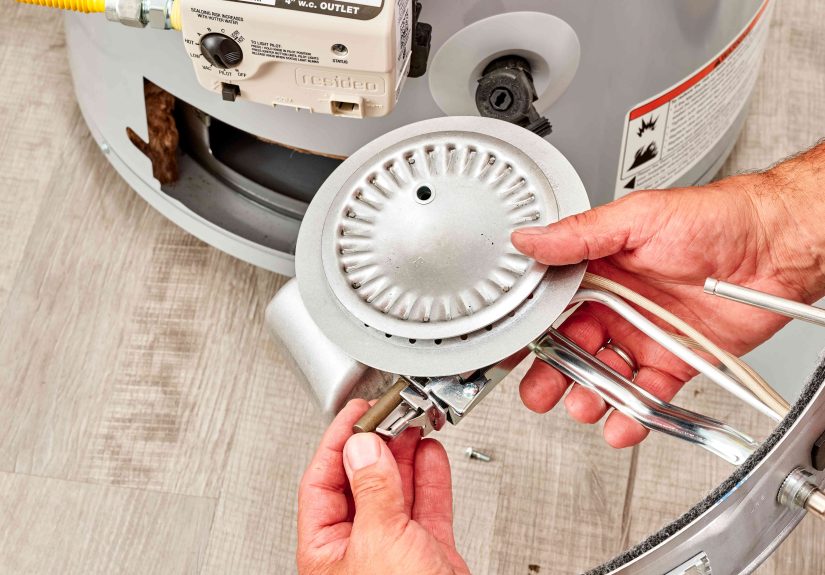
Step 3: Remove the burner/manifold assembly if required
Many modern designs place the flame sensor behind a sealed burner door. You may need to disconnect the manifold tube, unplug electrical connectors, and remove mounting screws so the inner door and burner assembly can come out as one piece. Go slowly and note the original wire routing.
Step 4: Clean before you replace, if appropriate
If the flame sensor is only lightly oxidized or dirty, some manufacturers allow gentle cleaning with an abrasive pad or ultra-fine steel wool. If the sensor is cracked, badly corroded, loose, or part of a failing igniter assembly, replace it instead of trying to rescue it with wishful thinking.
Step 5: Install the new flame sensor
Remove the retaining screw or clip, swap the sensor, and route the connector wire exactly as the original was routed. On some units, the flame sensor and igniter can be replaced separately. On others, the whole assembly comes as a kit. Use OEM or factory-authorized parts when the manual calls for them.
Step 6: Inspect the burner door gasket before reassembly
This step matters more than many DIY guides admit. If the burner door gasket is worn, pinched, or damaged, replace it. Do not operate a sealed-combustion water heater if the burner door does not seal properly. A bad seal can create combustion and safety problems that make your new flame sensor look innocent and useless at the same time.
Step 7: Reassemble carefully
Reconnect the manifold tube by hand first so you do not cross-thread it. Reconnect wiring harnesses fully. Make sure no insulation, wires, or debris are trapped in the burner-door seal. Then restore power and gas.
Step 8: Leak-test and restart
Brush approved leak-detection solution on the gas connection you disturbed. If bubbles form, shut it down and fix the leak before proceeding. Once you confirm no leak is present, restart the water heater using the lighting instructions on the unit. Watch the ignition sequence and verify the burner lights and stays running normally.
Common Mistakes to Avoid
- Buying a part based on “looks close enough” instead of model compatibility
- Forcing a connection and cross-threading the gas-valve fitting
- Bending a thermocouple sharply instead of routing it gently
- Skipping the leak test after reconnecting gas components
- Ignoring a weak or yellow flame and blaming the sensor
- Reassembling a sealed burner door with a damaged or misaligned gasket
- Forgetting to reconnect electrical plugs fully on electronic units
- Assuming a lockout code automatically means the sensor itself is bad
When Cleaning Is Enough and When Replacement Is Better
Cleaning may be enough when: the sensor has light soot or oxidation, the ceramic is intact, the wiring is good, and the flame pattern looks normal.
Replacement makes more sense when: the pilot still will not hold after cleaning, the flame sensor keeps triggering lockouts, the old part is visibly corroded, the ceramic is cracked, the wire terminal is damaged, or the unit only works briefly before failing again.
There is also a practical angle here. A thermocouple is inexpensive enough that many homeowners simply replace it once symptoms point strongly in that direction. A flame sensor can also be affordable, but the labor to reach it may be the real issue. If you already have the burner assembly apart and the part is questionable, replacement can be smarter than repeating the whole job next weekend.
When You Should Call a Pro
Some water heater repairs are squarely in DIY territory. Others are an open invitation to regret. Call a qualified service technician if:
- You smell gas or hear a hiss
- The unit repeatedly locks out after sensor replacement
- The burner flame looks unstable, lifts off, or burns wrong
- The thermal switch or flammable-vapor system has tripped
- You see scorched wires or damaged controls
- The burner door gasket will not seal correctly
- You suspect gas pressure, venting, or combustion-air problems
- You are working on a sealed, power-vent, or high-tech model that clearly wants a service manual and more patience than you have left
Repair or Replace the Whole Water Heater?
If the only issue is a failed thermocouple or dirty flame sensor, repair is usually the obvious move. But if the tank is older, the control system has multiple faults, the unit is leaking, or you are already stacking expensive repairs on top of each other, a replacement conversation may be more sensible. In many homes, once a gas water heater gets into the 10-year-plus range and starts acting like a drama club major, homeowners start looking at the bigger picture.
Conclusion
Replacing a water heater thermocouple or flame sensor is one of those repairs that feels small because the parts are small. Do not be fooled. These components are safety devices, and the job only goes well when you respect that. Match the right part, shut off gas and power, reassemble carefully, leak-test every disturbed connection, and make sure the flame itself looks healthy before you declare victory.
Do that, and you may restore your hot water with a modest repair instead of a full water-heater replacement. Do it carelessly, and you may spend your afternoon buying a second part, a third tool, and an emergency pizza while waiting for a pro. Let us aim for the first version.
Real-World Lessons From Replacing Thermocouples and Flame Sensors
In real homes, this repair rarely fails because someone could not turn a wrench. It usually fails because the first diagnosis was too narrow. A classic example is the homeowner who replaces a thermocouple because the pilot will not stay lit, only to discover the real issue was a weak pilot flame caused by dust, a partially clogged pilot opening, or poor combustion air. The new part is fine, but the flame still is not strong enough to heat it properly. That is why it pays to look at flame quality before assuming the sensor is the only problem in the room.
Another common experience shows up with flame sensors on electronic ignition models. The water heater may fire for a second, shut off, retry, and then lock out. Many people immediately assume the control board has failed because the sequence feels “electrical.” Often, though, the flame sensor is just dirty or lightly corroded. A quick cleaning, if allowed by the manufacturer, can bring the unit back to life. That tiny rod collects oxidation over time, and the heater suddenly acts like it has forgotten how fire works.
There is also the great replacement-part trap. Plenty of DIYers bring home a universal thermocouple, install it, and then discover the routing is awkward, the length is wrong, or the bracket fit is sloppy. Technically, the part is close. Practically, it is a headache. The smoother repairs usually happen when people start with the model and serial number, pull the correct part list, and buy the right component the first time. It is less exciting than guessing, but also less expensive than buying two wrong parts and one angry afternoon.
New installations create their own confusion. Sometimes the pilot or ignition sequence fails simply because there is still air in the gas line. Homeowners understandably assume the new part or new heater is defective, when the real solution is patience and following the lighting instructions exactly. A few extra attempts may be normal in that situation. The trick is knowing the difference between normal startup stubbornness and a true ongoing fault.
One of the most underrated lessons involves the burner door and gasket. People focus so hard on the sensor that they forget the assembly has to go back together correctly. On sealed-combustion units, a pinched gasket, trapped wire, or crooked manifold door can cause a second round of problems that look unrelated to the original repair. The heater may run poorly, trip safeties, or refuse to behave, all because the reassembly was rushed.
And then there is the final real-world lesson: sometimes the part really is bad, the replacement really is easy, and the job really does solve the problem in under an hour. Those are beautiful days. But the most successful homeowners approach the repair with a wider lens. They look at the flame, the venting, the door seal, the wiring, the part number, and the age of the heater. That bigger-picture approach is what turns a lucky fix into a reliable one.


