Table of Contents >> Show >> Hide
- What Makes These Pistachio Bars Actually Good
- Quick Recipe Snapshot
- Ingredients
- Equipment
- Step-by-Step Instructions
- Troubleshooting (Because Bars Have Personalities)
- Variations You’ll Actually Want to Try
- Storage and Make-Ahead Tips
- Serving Ideas
- FAQ
- Kitchen Notes & Experiences (500+ Words of Real-Life Pistachio Bar Wisdom)
- Conclusion
Pistachio bars are the kind of dessert that makes people “casually” cut a second piece and then pretend it’s for later. They’re nutty, buttery, and just fancy enough to look like you tried (even if you mostly just followed directions and vibed).
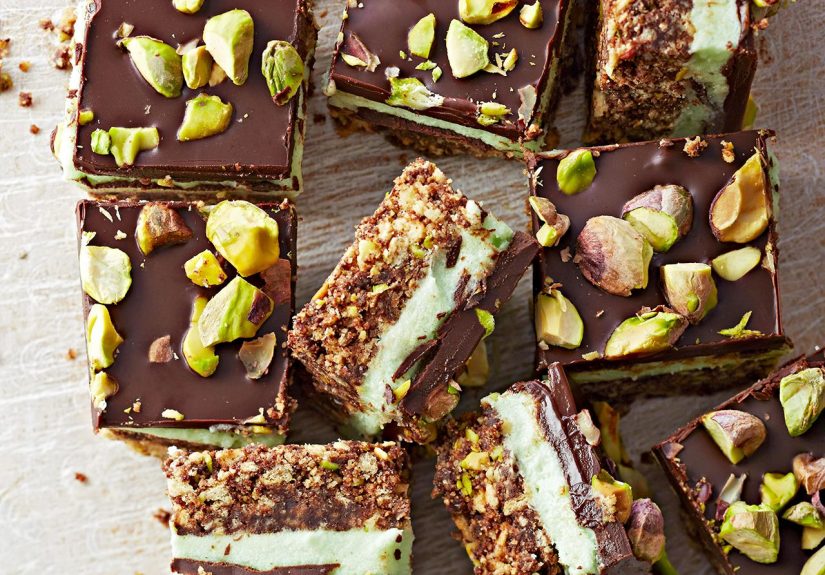
This version is a bakery-style pistachio cheesecake bar with a pistachio shortbread crust and an optional dark chocolate topping. It’s rich but not heavy, sweet but not tooth-aching, and it tastes like pistachiosnot “mysterious green dessert.”
What Makes These Pistachio Bars Actually Good
Pistachio desserts can go two ways: elegant and nutty… or neon and “pistachio-ish.” The secret is building flavor in layers:
- Toasted pistachios for deeper flavor (raw pistachios taste flatterlike they’re still waking up).
- Pistachio paste (or pistachio butter) for real pistachio taste and creamy texture.
- A shortbread crust that doesn’t crumble into sad dust the moment you lift a bar.
- Chill time so the bars slice cleanly instead of sliding into a “pistachio puddle situation.”
Quick Recipe Snapshot
- Yield: 16 bars (9×9-inch pan)
- Total time: About 1 hour 10 minutes active + 4–6 hours chilling
- Difficulty: Easy/Medium (you can do this with one spatula and confidence)
- Main keywords: pistachio bars recipe, pistachio dessert bars, pistachio cheesecake bars
Ingredients
Pistachio Shortbread Crust
- 1 cup (120g) all-purpose flour
- 1/3 cup (40g) powdered sugar
- 1/4 teaspoon fine salt
- 1/2 cup (113g) unsalted butter, cold and cubed
- 1/2 cup (60g) roasted, salted pistachios, finely chopped (or pulse in a food processor)
- 1/2 teaspoon vanilla extract (optional, but recommended)
Pistachio Cheesecake Filling
- 16 ounces (454g) cream cheese, softened
- 2/3 cup (135g) granulated sugar
- 2 large eggs, room temperature
- 1/3 cup (80g) sour cream (or full-fat Greek yogurt)
- 1/2 cup (120g) pistachio paste or pistachio butter
- 1 teaspoon vanilla extract
- 1/4 teaspoon almond extract (optional, but it makes pistachio taste louder in a good way)
- 1/4 teaspoon fine salt
- 1 tablespoon lemon juice (optionalbrightens the flavor without tasting lemony)
Optional Chocolate Topping
- 4 ounces (113g) dark chocolate, chopped (or chips)
- 1/3 cup (80ml) heavy cream
- Pinch of salt
- 2–3 tablespoons chopped pistachios, for finishing
Optional “Shortcut Pistachio Boost” (Use If You Want More Color)
If you want a greener hue or a more “classic American pistachio dessert” vibe, you can add:
- 2–3 tablespoons instant pistachio pudding mix to the filling (reduce sugar by 2 tablespoons)
This is optional. Pistachio paste gives the best flavor, while pudding mix leans nostalgic (and yes, greener).
Equipment
- 9×9-inch baking pan
- Parchment paper (or foil) for a “sling”
- Mixing bowls + electric mixer
- Spatula
- Fine mesh sieve (optional, for ultra-smooth filling)
Step-by-Step Instructions
1) Prep the Pan Like You Mean It
Heat oven to 350°F. Line a 9×9-inch pan with parchment so it hangs over two sides (a sling). Lightly grease the parchment. This makes lifting and slicing dramatically easierand prevents you from doing the “shake the pan and hope” method.
2) Make the Pistachio Shortbread Crust
In a bowl, whisk flour, powdered sugar, and salt. Cut in the cold butter with a pastry cutter or your fingers until it looks like coarse sand with a few pea-sized bits (those bits = buttery magic). Stir in chopped pistachios and vanilla.
Press firmly into the pan in an even layer. (Use the bottom of a measuring cup to pack it downyour future clean slices will thank you.) Bake for 14–18 minutes, until the edges look lightly golden. Let it cool for 10 minutes while you make the filling.
3) Mix the Pistachio Cheesecake Filling
Reduce oven to 325°F. Beat cream cheese and sugar on medium until smooth, about 1–2 minutes. Scrape the bowl (seriouslydo it). Add eggs one at a time, mixing on low just until combined. Overmixing adds air, and air can mean cracks. Cracks are not a tragedy, but we’re aiming for “bakery neat.”
Mix in sour cream, pistachio paste, vanilla, almond extract (if using), salt, and lemon juice. Mix until smooth. If you’re using pudding mix, add it now and mix briefly.
4) Bake
Pour filling over the warm crust and smooth the top. Bake at 325°F for 28–35 minutes. You’re looking for edges that are set and a center that still has a slight jiggle (like Jell-O that’s almost set, not like soup).
Turn off the oven, crack the door, and let the pan sit for 10 minutes. This gentle cool-down helps prevent dramatic sinking or cracking.
5) Cool + Chill (The Part Everyone Wants to Skip)
Cool on the counter until no longer warm (about 60–90 minutes), then refrigerate for at least 4 hoursovernight is even better.
6) Optional Chocolate Topping
Warm heavy cream until steaming (microwave or small pot). Pour over chopped chocolate, add a pinch of salt, and let sit 2 minutes. Stir until glossy.
Spread a thin layer over chilled bars (you decide: full coverage or dramatic drizzle). Sprinkle chopped pistachios on top. Chill 15–20 minutes to set.
7) Slice Like a Pro
Lift bars out using the sling. For clean cuts, run a sharp knife under hot water, wipe dry, slice, and repeat. Is it extra? Yes. Is it worth it? Also yes.
Troubleshooting (Because Bars Have Personalities)
My filling crackeddid I ruin it?
Not at all. Cracks are usually from overmixing, baking a touch too long, or sudden temperature changes. Chocolate topping covers many sins. So does whipped cream. So does “it tastes amazing.”
My crust is crumbly.
Make sure you pressed it firmly and baked it until the edges barely turn golden. Also, finely chopped pistachios help bind into the crust instead of acting like little marbles.
My bars taste “sweet” but not “pistachio.”
Use pistachio paste (not just extract). Toast the pistachios. Add a tiny bit of almond extract. And don’t skip the saltsalt makes pistachio taste more pistachio.
Variations You’ll Actually Want to Try
No-Bake Pistachio Bars
Swap the cheesecake filling for a no-bake pistachio cream layer: cream cheese + powdered sugar + pistachio pudding mix + whipped topping. Chill until set. It’s lighter, more retro, and very potluck-friendly.
Fruit + Pistachio Bars
Add a thin layer of raspberry or cherry preserves over the crust before pouring the filling. Pistachio and tart fruit taste like they were invited to the same party on purpose.
“Dubai Chocolate” Energy
Want extra drama? Use a thicker ganache layer and top with chopped pistachios and flaky salt. The sweet-salty crunch is dangerously good.
Gluten-Free Option
Use a 1:1 gluten-free baking flour blend for the crust. Press firmly and bake until lightly golden at the edges. The filling is naturally gluten-free (just double-check any pistachio paste or pudding mix you use).
Storage and Make-Ahead Tips
- Refrigerator: Store covered for up to 5 days.
- Freezer: Freeze sliced bars (wrapped) up to 2 months. Thaw overnight in the fridge.
- Make-ahead: These are best the next day, so they’re perfect for parties and holidays.
Serving Ideas
- Serve cold for clean slices and a fudgier texture.
- Add a dollop of whipped cream and chopped pistachios for “restaurant energy.”
- Pair with coffee, mint tea, or a glass of milk like you’re eight years old again (no judgment).
FAQ
Can I use salted pistachios?
Yesespecially for topping. For the filling, salted pistachios are fine, but keep added salt modest. The goal is “sweet-salty,” not “why does my dessert taste like pretzels?”
Do I need food coloring?
Nope. Real pistachio paste may be beige-green rather than bright green. If you want that classic pistachio-bar look, pudding mix helps. But flavor is the main character here.
What if I can’t find pistachio paste?
Use pistachio butter, or make a quick DIY version by blending shelled pistachios with a little neutral oil until smooth. You can also lean on instant pistachio pudding mix for flavor, though it tastes more nostalgic than purely nutty.
Kitchen Notes & Experiences (500+ Words of Real-Life Pistachio Bar Wisdom)
The first time I made pistachio bars, I thought the hardest part would be the cheesecake layer. Wrong. The hardest part was not eating the pistachios straight out of the bag while “measuring.” (Somehow, the bag always ends up mysteriously lighter. Science can’t explain it.)
Batch one taught me that pistachio flavor is shy if you don’t give it a microphone. I used chopped pistachios in the crust and called it a day. The bars were goodsweet, creamy, butterybut the pistachio was more of a background singer. When I switched to pistachio paste, everything changed. The filling suddenly tasted like pistachios on purpose, not like cheesecake that once walked past a pistachio.
Batch two was when I learned the power of toasting. I used roasted pistachios for the crust, and the aroma alone made the kitchen smell like a fancy bakery that sells $7 pastries in tiny boxes. Toasting doesn’t just make nuts taste “more nutty.” It adds a deeper flavor that balances the sugar and dairy. If you’ve ever wondered why your homemade nut desserts taste a little flat compared to bakery versions, this is often the difference.
Then came the great “green debate.” Some people want pistachio bars to look like pistachiosearthy, natural, a little muted. Others want that iconic American pistachio-dessert color: bright, cheerful, and slightly suspicious (in a nostalgic way). I tested both. Adding a couple tablespoons of instant pistachio pudding mix gave the bars that throwback vibe, plus a bit of extra structure from the starch. But pistachio paste still tasted more authentic. My compromise move now is simple: pistachio paste for flavor, and pudding mix only if I’m trying to please a crowd that expects the classic “pistachio bar” experience.
Another lesson: don’t rush the chill. I know. Waiting is emotionally difficult when there’s a pan of pistachio dessert bars sitting right there. But slicing too early turns the first few pieces into what I politely call “chef’s snacks,” meaning they look messy but taste incredible. If you need clean, photo-ready pistachio cheesecake bars, give them at least four hours, and ideally overnight. The texture tightens, the flavors settle, and your knife doesn’t drag filling into the next slice like it’s painting a mural.
Finally, the chocolate topping. I used to think it was optional in the same way “bringing snacks” is optional on a road trip. Sure, you can skip it, but why would you? A thin layer of dark chocolate makes the pistachio taste nuttier and less sweet, and it adds that satisfying snap when the bar is cold. If you’re serving these at a party, the topping also buys you confidence: a tiny crack in the cheesecake disappears under chocolate and pistachios like it never happened. It’s dessert camouflage.
These bars have become my go-to for potlucks because they travel well, they slice into neat little squares, and people remember them. Pistachios feel a bit speciallike you planned this dessert rather than panic-baking brownies (no shade to brownies; they’re heroes). If you want a pistachio bars recipe that hits the sweet spot between “easy” and “impressive,” this one is the keeper.
Conclusion
Pistachio bars are the perfect dessert when you want something that feels elevated without being complicated. With a buttery pistachio shortbread crust, a creamy pistachio cheesecake center, and an optional chocolate finish, these bars deliver big flavor, clean slices, and serious snackability. Make them once and you’ll understand why pistachio dessert bars disappear faster than you can say “I only cut a small piece.”