Table of Contents >> Show >> Hide
- What Is a Rain Chain, Exactly?
- Rain Chains vs. Downspouts: Which One Wins?
- Choosing the Right Rain Chain for Your Home
- How to Install a Rain Chain (Without Losing Your Weekend)
- The Remodelaholic Rain Chain Giveaway: How to Enter
- Creative Ways to Use a Rain Chain If You Win
- Real-Life Experience: Living With a Rain Chain (and Hosting a Giveaway)
- Conclusion: A Small Upgrade With a Big Payoff
If you’ve ever stared at your boring metal downspouts and thought, “You know what would make you less ugly? Literally anything,” this post is for you.
Rain chains turn something purely functional into a little outdoor water feature and in true Remodelaholic fashion, we’re celebrating with a
Rain Chain Giveaway.
Before you scroll down to see how to enter, let’s talk about what rain chains are, why they’re having a major moment in curb-appeal land, and how to
actually install one without needing a roofing crew or a full weekend of your life.
What Is a Rain Chain, Exactly?
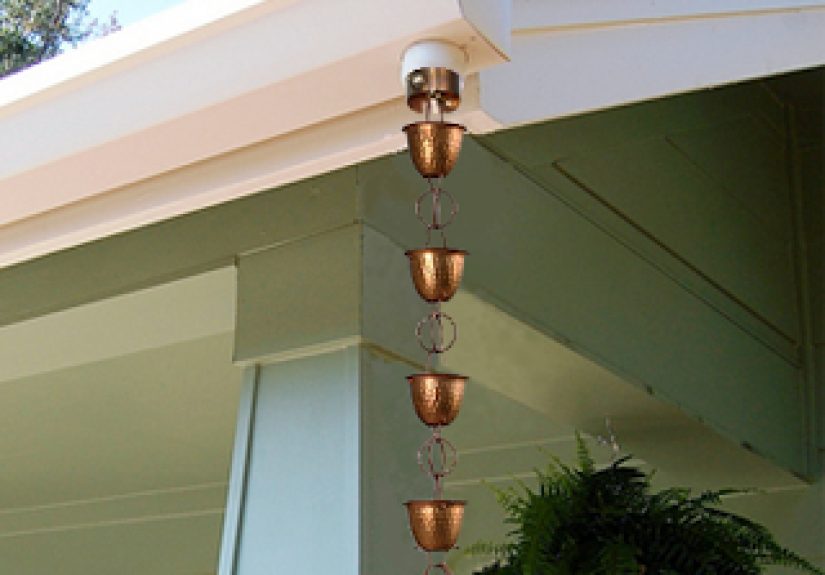
A rain chain is a decorative alternative to a traditional downspout. Instead of sending water down an enclosed pipe, your gutters drain into a chain
(or a series of small cups) that guides the water to the ground in a visible, gentle flow. Think of it as the love child of a gutter and a zen fountain.
The concept comes from Japan, where rain chains have been used for centuries on homes and temples. Today, they’re popular worldwide as a
simple upgrade that turns rainy days into a free show. You install the chain where a downspout would normally be, and let water drip (or stream,
depending on rainfall) down into a drain, gravel bed, basin, or rain barrel.
Instead of “Where is all this water even going?” you get, “Ooh, look at that pretty copper chain helping my foundation and my stress levels at the same time.”
Rain Chains vs. Downspouts: Which One Wins?
Where Rain Chains Shine
Traditional downspouts are all business. Rain chains are the stylish cousin who also does their job. Here’s what makes rain chains so appealing:
- Curb appeal boost: Rain chains come in cup styles (little linked buckets, flowers, bells) or link styles (rings, loops, geometric shapes). They instantly feel more “garden design” and less “hardware aisle.”
- Soothing sound: Instead of water roaring through a metal tube and dumping out with a splash, rain slips down the chain and cups in a softer, more controlled flow, often creating a calming trickling sound.
- Water visibility: You can actually see where your rainwater is going. It’s surprisingly satisfying to watch it travel from gutter to ground.
- Eco-friendly potential: Aim your rain chain into a barrel, decorative pot, or dry area of the yard, and you’ve just upgraded to rainwater harvesting and erosion control with style.
Where Downspouts Still Win
Before we crown rain chains the ruler of all gutters, there’s one big caveat: volume. In areas with very heavy rainfall, traditional downspouts typically move more water and do it with less splash.
Rain chains can absolutely handle real storms, but they may splash more and need better planning at the base (like gravel, a large basin, or extra drainage).
If your roof rivals Niagara Falls during a thunderstorm, you might:
- Use rain chains in visually important areas (front porch, garden focal point).
- Keep at least some high-capacity downspouts in the most high-flow spots.
In other words: it doesn’t have to be “team downspout” or “team rain chain.” You can mix both and let each do what it does best.
Choosing the Right Rain Chain for Your Home
When you’re dreaming about winning our Rain Chain Giveaway, it helps to know what you’d actually install. Here are the main decisions.
1. Cup Style vs. Link Style
Rain chains come in two main personalities:
-
Cup style: These look like a series of small cups or buckets, each with a hole at the bottom. They generally handle water better,
especially in heavy rain, because they “catch and funnel” the flow from cup to cup. Great if you want both looks and performance. -
Link style: These are open chains made of links, loops, or rings. They offer a sleek, modern look and usually handle wind a little better
because there’s less surface area to push around. They may splash more, especially in big storms, but they’re gorgeous on contemporary homes.
If your weather forecast often involves phrases like “torrential downpour,” cup styles are usually the safer choice. If your rain is more occasional and you love a minimalist vibe, link styles work beautifully.
2. Material: Copper, Aluminum, or Stainless Steel?
Once you know the style, pick the material:
- Copper: The classic. Copper starts bright and shiny, then slowly develops a rich brown patina and may eventually turn greenish in some climates. It’s durable, strong, and looks fantastic with traditional, rustic, or high-end exteriors.
- Aluminum: Lightweight, budget-friendly, and rust-resistant. Aluminum chains are great if you want a longer run or live in a windy area, because they don’t add as much weight to your gutters.
- Stainless steel or coated metals: These options emphasize durability and low maintenance, often with modern designs and finishes that keep their look for years.
For the best look and performance, match your chain to your gutters where you can: copper with copper, aluminum with aluminum, or at least coordinating tones so it looks intentional instead of “Oops, that’s the only one the store had.”
3. Length, Anchoring, and Drainage
A rain chain should reach from your gutter outlet down to your collection or drainage area. Many chains come in standard lengths (often around 8–10 feet) and can be extended with add-on sections if you have a taller roofline.
You’ll also want:
- An anchor point: A stake, heavy basin, or buried loop helps keep the chain from swinging wildly in wind.
- A base plan: A gravel bed, rain barrel, large pot, or existing drain to receive the water and reduce splashing and erosion.
How to Install a Rain Chain (Without Losing Your Weekend)
Good news: installing a rain chain is usually much simpler than installing a new downspout. Here’s a typical process, broken down Remodelaholic-style.
Step 1: Pick the Right Spot
Choose a place where water already leaves the roof usually where a downspout lives now. Make sure the wall and foundation in that area are properly
protected, and that you can either connect to your existing drain or create a drainage area (gravel, basin, or barrel).
Step 2: Remove the Old Downspout
Carefully remove the downspout from your gutter outlet. Depending on your setup, this might involve unscrewing brackets and loosening a joint or two.
Keep screws and brackets handy in case you ever want to reinstall a traditional downspout.
Step 3: Install a Gutter Outlet or Reducer
Many rain chains hang from a special outlet piece or “reducer” that fits into the hole in your gutter and funnels water directly into the first cup or link.
Some products include this; others sell it as an accessory. Pop it into place, following the manufacturer’s instructions.
Step 4: Hang the Chain
Attach the top of the rain chain to the outlet, hook, or bracket. The connection should be solid remember, your charming little chain gets a lot heavier when it’s full of water.
Allow the chain to hang freely and see where it naturally lands. If it’s too long, remove a section. If it’s too short, add one.
Step 5: Secure the Bottom and Set Up Drainage
At the base, you have options:
- Place the chain into a decorative pot filled with river rock.
- Anchor it with a stake in the ground and surround the bottom with gravel.
- Guide it into a rain barrel or cistern to collect water for plants.
The goal is to slow the water and prevent soil from washing away or splashing onto walls.
Step 6: Test It
Grab a garden hose and run water into the gutter near the chain. Watch how the water travels down. If it splashes too much, you may need to adjust the angle,
length, or base area. Once it behaves nicely under hose-level water, you’re ready for real rain.
The Remodelaholic Rain Chain Giveaway: How to Enter
Now the fun part: let’s talk about the Rain Chain Giveaway | Remodelaholic.
Here’s a sample structure of how a giveaway like this typically works (always check the actual live giveaway rules on the site, of course):
- The prize: A beautiful cup-style rain chain (and often a compatible gutter outlet or hanger), perfect for upgrading one downspout on your home.
- Who can enter: Usually residents of the United States, age 18 or older, where permitted by law.
- How to enter: Commonly by leaving a comment on the blog post, submitting a simple entry form, or completing actions like joining an email list.
- Bonus entries: Some giveaways offer extra chances if you follow on social media or share the giveaway with friends.
- Deadline and winner selection: Entries are accepted up to a posted closing date, and the winner is typically chosen at random and notified by email.
Giveaways like this are a win-win: you get a chance to score a gorgeous upgrade for free, and Remodelaholic gets to share a product we genuinely love with readers who are just as obsessed with home projects as we are.
Creative Ways to Use a Rain Chain If You Win
Sure, you can just replace a basic downspout and call it a day. But if you’re entering a rain chain giveaway, you’re probably not a “bare minimum” person.
Here are some fun ideas for putting that prize to work:
- Frame your front porch: Install a rain chain by the entry and catch water in a large ceramic pot filled with stones. Instant focal point.
- Feed a rain garden: Direct runoff from the chain into a planted area that loves moisture think ferns, irises, astilbe, or native wet-loving plants.
- Backyard retreat: Hang a rain chain near a seating area, so you can sit outside and listen to the rain without feeling like you’re in a car wash.
- Balcony or patio: Shorter chains can work from small roof edges, overhangs, or patio covers, especially if you collect water in a small barrel or pot.
- DIY twist: Even if your main chain is a fancy copper design, you can experiment with a second DIY chain using small buckets, recycled materials, or budget items to add personality in less visible spots.
Real-Life Experience: Living With a Rain Chain (and Hosting a Giveaway)
Let’s talk about what it’s actually like to swap a regular downspout for a rain chain and what happens behind the scenes when a Remodelaholic-style giveaway goes live.
The very first time you install a rain chain, there’s a moment of doubt. You stand in the yard looking up at your gutter and wonder if this pretty string of cups
is really going to handle a storm. Then the rain clouds roll in and you find yourself at the window like it’s your favorite show premiere night.
When the rain hits, there’s usually a split second of suspense, followed by relief: water spills into the first cup, then flows smoothly down the chain, cup to cup, link to link.
The sound is softer than a regular downspout more “garden fountain” than “metal echo chamber.” If you’ve aimed the chain into a pot or gravel bed, you’ll see the water collect neatly instead of gouging a trench in your soil.
There are a few honest “learning curve” moments. In a heavy storm, you might notice more splash than you expected, especially if your chain ends in bare soil.
That’s when you add a wider basin, more rocks, or a small underground drain. You may also realize that your gutters needed cleaning more than you thought
leaves and debris don’t magically behave just because you installed something prettier. But once you dial in the setup, it quickly becomes one of those upgrades you can’t imagine undoing.
Hosting a rain chain giveaway is its own kind of fun. The comments start rolling in: readers share how they’d use the chain, where their current downspouts are driving them crazy,
or how they’ve always wanted to try a rain chain but weren’t sure where to start. You see people from all kinds of climates desert dwellers dreaming of those rare storms,
coastal homeowners dealing with constant drizzle, and suburban families trying to keep water away from the basement while still making the yard look nice.
It’s also a great way to crowdsource real-world tips. People who already use rain chains chime in with what worked for them: anchoring with a hidden stake, using large river rocks to calm splashback,
connecting a barrel overflow to a garden bed, or switching from a basic link chain to a cup style when a roof corner turns out to be a high-flow zone. Suddenly, the giveaway post becomes a mini library of practical experience.
The day the winner is chosen is surprisingly exciting on our side of the screen too. We send that “You won!” email and picture someone out there gleefully planning which sad little downspout is about to be retired.
A few weeks later, we’ll often get a follow-up photo: a gleaming new rain chain framed by fresh mulch and happy plants, or a cozy porch where someone is clearly about to sit with a mug of coffee and enjoy the next storm.
Over time, you stop thinking of the rain chain as “that thing we won in a giveaway” and start thinking of it as part of your home’s personality. Guests ask about it.
Delivery drivers comment on it. Kids watch the water run down it like it’s a science experiment. And on days when life feels loud and messy, the soft sound of rain slipping down those cups can be a surprisingly effective reset button.
Conclusion: A Small Upgrade With a Big Payoff
In the end, a rain chain is a simple idea with a big impact. It does the same job as a downspout guiding water safely away from your home but adds beauty, sound, and personality in the process.
With the right material, style, and installation, it can reduce erosion, help with rainwater harvesting, and give your exterior a custom, designer touch.
And if you can get all of that from a giveaway? Even better.
Whether you’re here to enter the Rain Chain Giveaway | Remodelaholic, to research your very first rain chain, or just to daydream about future projects,
one thing is clear: you don’t have to settle for boring gutters. Let the rain do what it does you might as well make it look (and sound) beautiful on the way down.